Infrastructure Post 1: Setting up a dual stack environment!
Obligatory shill of blog stream post: Phaselockedloopable- PLL’s continued exploration of networking, self-hosting and decoupling from big tech
As always check for updates in the second post ![]()
IPv6 is becoming increasingly common place so its time we had a wiki on a native dual stack environment.
Personally I would go completely IPv6 but theres not quite a need for that and there is still a need for 4. This guide assumes your IPv4 is already setup properly ![]()
What is IPv6?
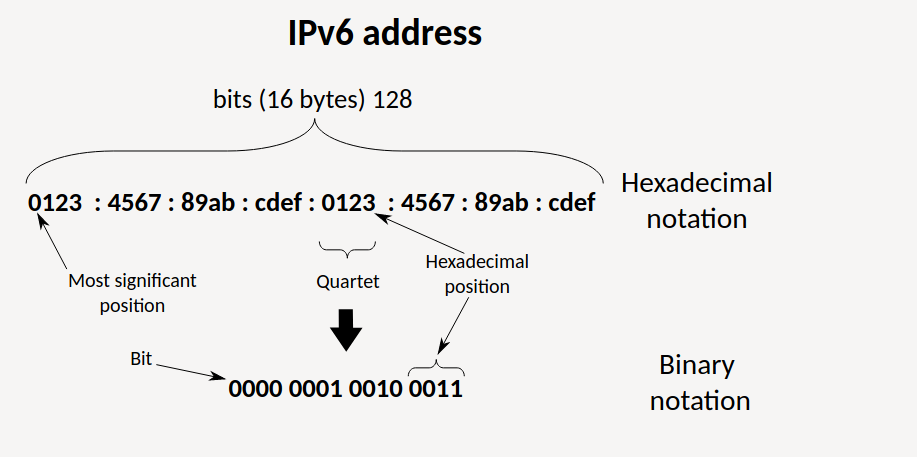
Much to the obvious part, IPv6 is the latest version of the Internet Protocol, which identifies devices across the internet so they can be located its one of many identifiers such as the MAC, EUI, DUID and HWID. Every device that uses the internet is identified through its own IP address in order for internet communication to work. In that respect, it’s just like the street addresses and zip codes you need to know in order to mail a letter. In IPv6 it feels more like an intergalactic zipcode at first but once you understand its address space its not such a strange beast.
IPv6 has a much larger address space. 2128 power. For those who cued on yes this makes it a 128bit address space vs the 32 bit address space of IPv4 (4 sets of 8 bits in an octet format xxx.xxx.xxx.xxx) All address translate to binary which is what the computer at its core uses remember this ![]()
This allows more devices than we currently have in the world to have an address. Its both kind of nice to have a true public IP address but also it is poor for privacy ![]() . Though NAT6 is a thing and can be accomplished by keeping IP address in the internal network link-local and NATing from one external facing IPv6 address. This can be done but it is not necessary and negates advantages IMHO.
. Though NAT6 is a thing and can be accomplished by keeping IP address in the internal network link-local and NATing from one external facing IPv6 address. This can be done but it is not necessary and negates advantages IMHO.
Understanding Private vs Public Address Space in IPv6 is a bit more difficult. First you must understand the address structure.
If you have multiple locations/sites/networks, you should assign each one a different “Subnet ID”, but use the same “Global” ID for all of them. This is very important when making VLANs. We accomplished this on IPv4 via changing the IP from say 10.31.82.1 —> 10.31.83.1 for the interface.
The IPv6 address space is so huge (2128) that everyone should be able to get a public IP address for every device they will ever own. So theoretically it shouldn’t be necessary to have private IPv6 addresses like the 192.168.x.x and 10.x.x.x addresses in IPv4. However some will prefer to do this so I am covering it. You are on your own if this is the type of stack you want. I do not mess with NAT6.
In IPv6 there is a special “Unique Unicast” IP range of fc00::/7 which should be used for this as per RFC4193.
The structure for this link-local or private address is as follows HOWEVER keep in mind that in practice such address will always start with “fd” because the 8th (L) bit must be one. Every IPv6 address is in hexadecimal format. So you may use a converter to verify what I have done. I am experienced with binary so its not too difficult to convert for me
Private:
| 7 bits |1|  40 bits   |  16 bits  |          64 bits           |
+--------+-+------------+-----------+----------------------------+
| Prefix |L| Global ID  | Subnet ID |        Interface ID        |
+--------+-+------------+-----------+----------------------------+
Let’s break down fdf7:cec6:f416:4a5e:abcd:ef01:2345:6789
Prefix: FD = 11111101 (8bits) (The last bit is 1 per the standard which is subject to change)
Global ID: F7CEC6F416 = 1111 0111 1100 1110 1100 0110 1111 0100 0001 0110 (40 bits)
Subnet ID: 4A5E = 0100 1010 0101 1110 (16 bits)
Inteface ID: ABCDEF0123456789 = 1010 1011 1100 1101 1110 1111 0000 0001 0010 0011 0100 0101 0110 0111 1000 1001 (64 bits)
Public is the same way however the L or least significant bit needs to be anything but 1
| 8 bits   |  40 bits   |  16 bits  |          64 bits           |
+--------+-+------------+-----------+----------------------------+
| Prefix   | Global ID  | Subnet ID |        Interface ID        |
+--------+-+------------+-----------+----------------------------+
Let’s break down: 2601:0680:ca00:f711:02e0:67ff:fe21:24f8
Prefix: 26 = 0010 0110 (8bits) (The last bit is anything but 1 per the standard which is subject to change)
Global ID: 010680CA00 = 0000 0001 0000 0110 1000 0000 1100 1010 0000 0000 (40 bits)
Subnet ID: F711 = 1111 0111 0001 0001 (16 bits)
Interface ID: 02E067FFFE2124F8 = 0000 0010 1110 0000 0110 0111 1111 1111 1111 1110 0010 0001 0010 0100 1111 1000 (64 bits)
The “Global ID” and “Subnet ID” must be random to ensure uniqueness. Now why did I go through this. Because the /48 /56 /60 and /64 change the prefix request. Because the subnet ID must be unique a /60 hand out will often allow you to change only the 4 bits of the subnet vs a /48 allows the changing of the global ID for an interface in order to provide 216 networks. This is complicated to understand but essentially its much like changing /24 to a /16 and now you can modify the last 2 octets instead of the last octet in IPv4
Overall though this is just a setup post but I thought it would prudent to cover structure. Let us move onto setup. I will be doing mine via OPNsense on comcast so these settings will be specific to most “cable” providers.
Comcast only provides /48 and /56 to Business. Home connections get up to /60.
Initial Configuration
This will show mostly screenshots from my OPNsense setup. Understand I much prefer DHCPv6 for simplicity. I can use the DUID (more on that later) to setup a static reserve mapping similar to how we use a MAC address for this on IPv4
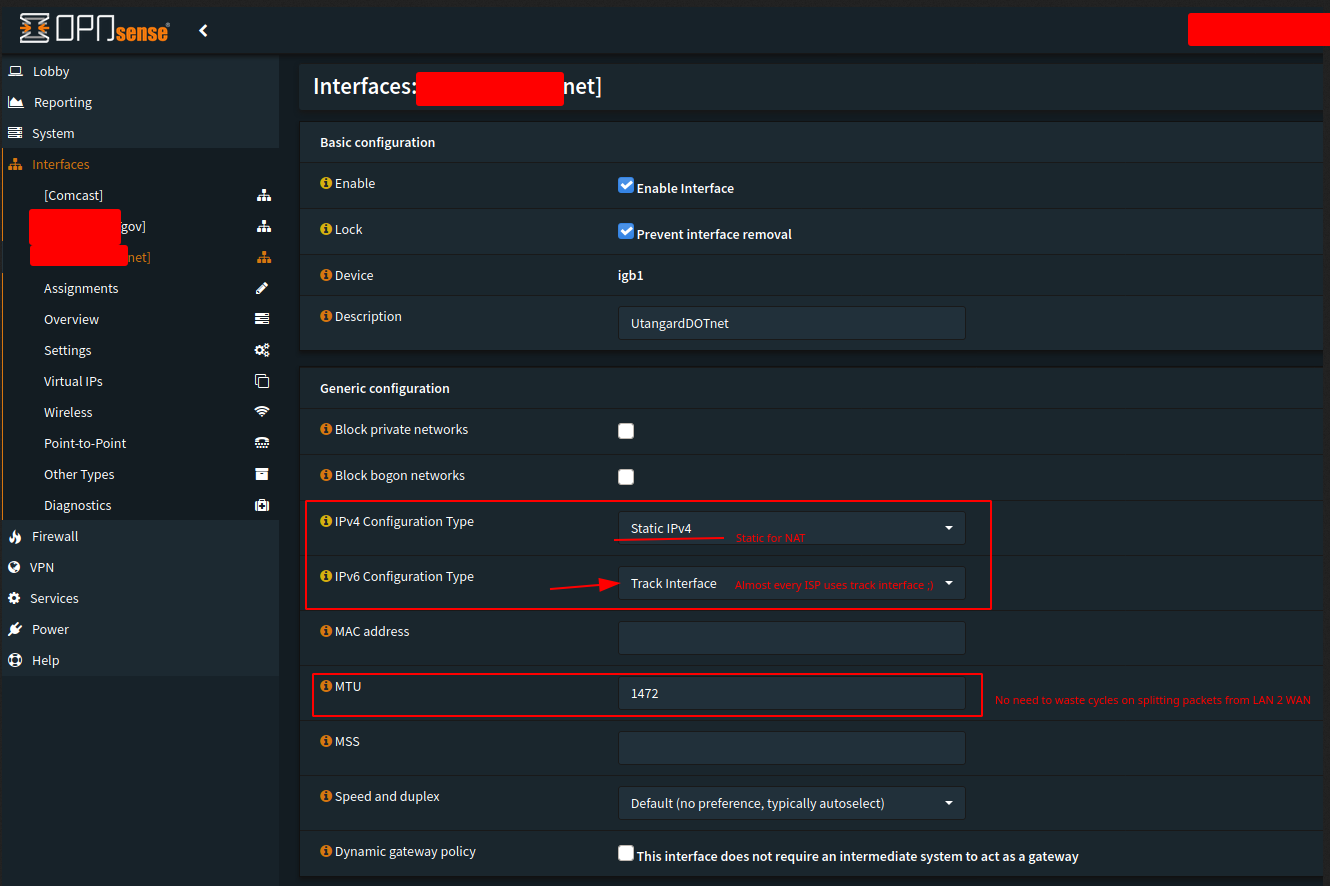
First open your WAN interface
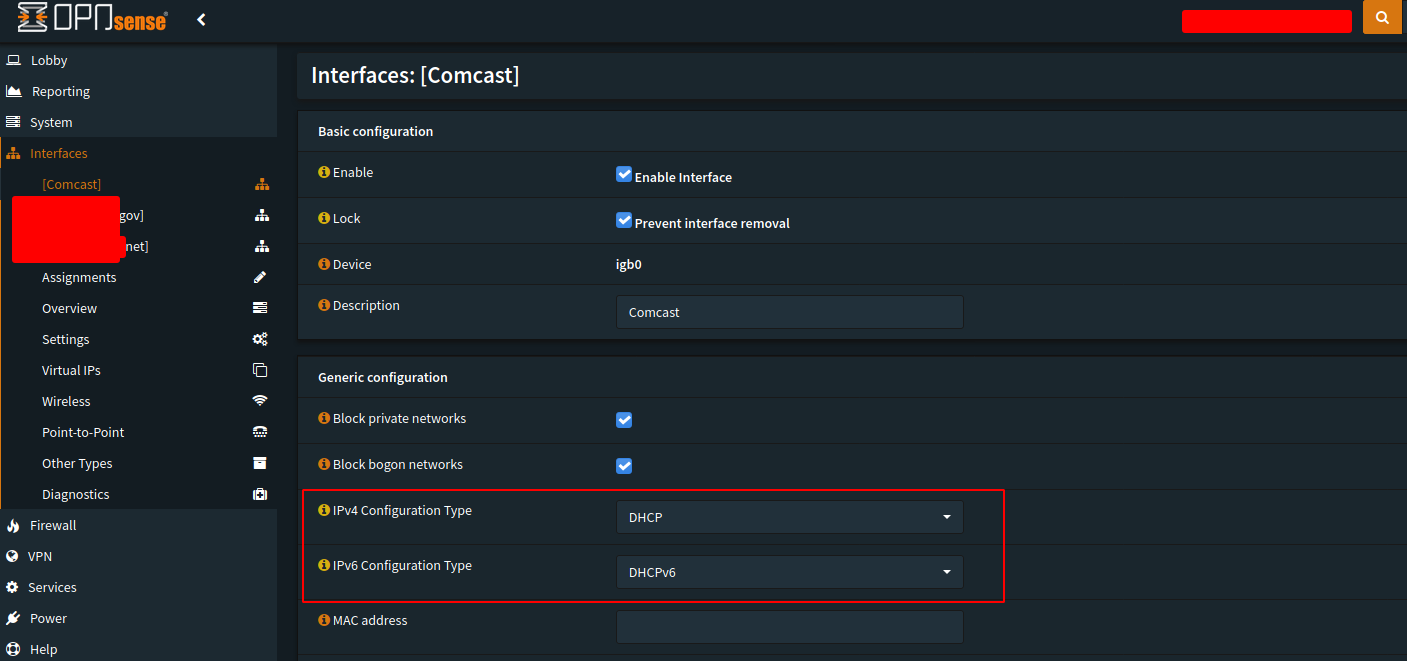
Set the proper configuration type you want for your ISP IP configuration. If you are on cable and have the option of setting an MTU. DOCSIS SPEC is MTU 1472 ![]()
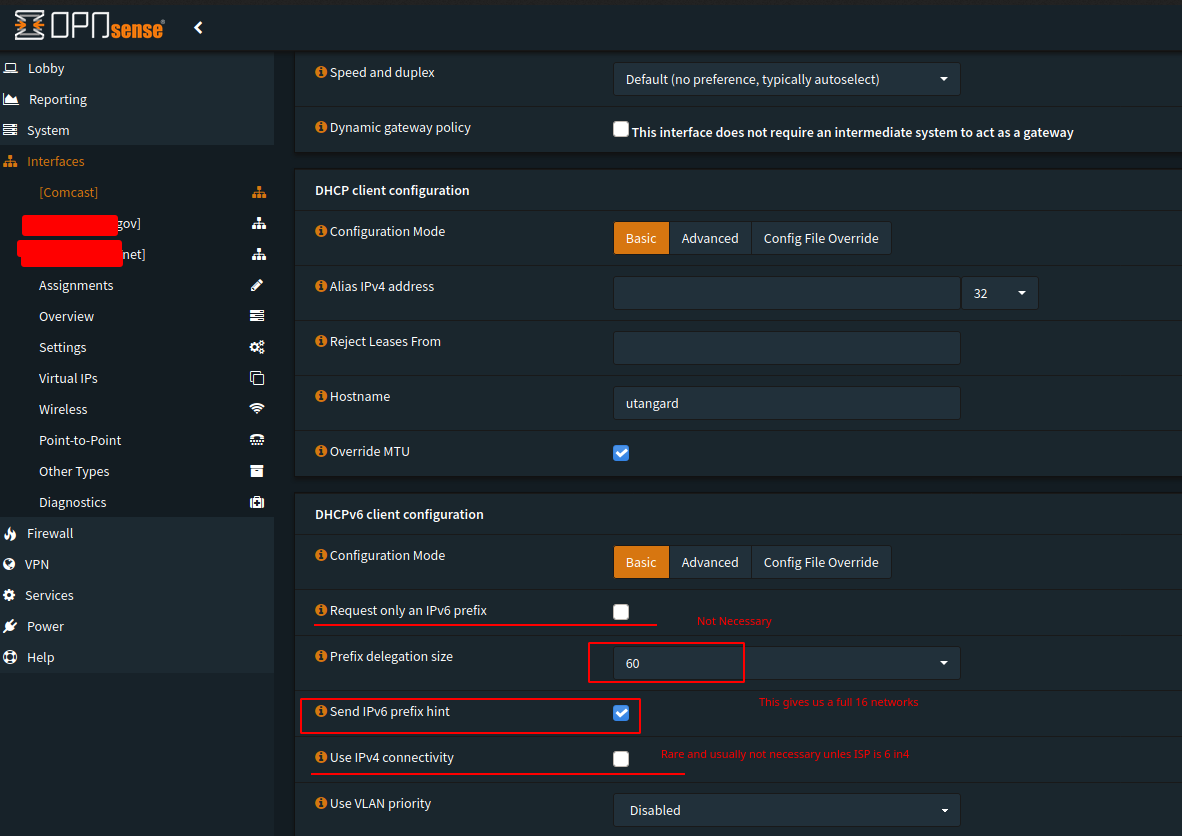
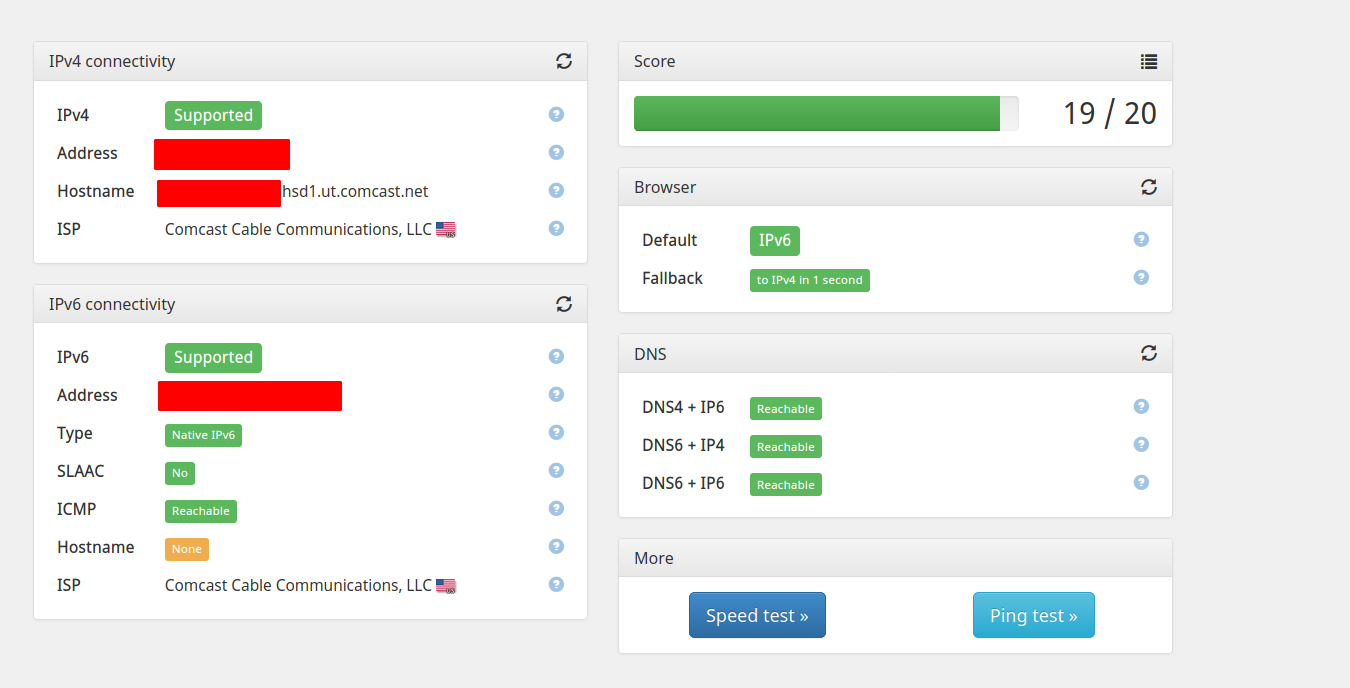
Once you have completed the prfix size you want to request and how you want IPv6 connectivity to be established via DHCP. We can save and check that our WAN recieves an address. You should get a /128 and a delegated prefix if you have done this properly on any of the pf type firewalls
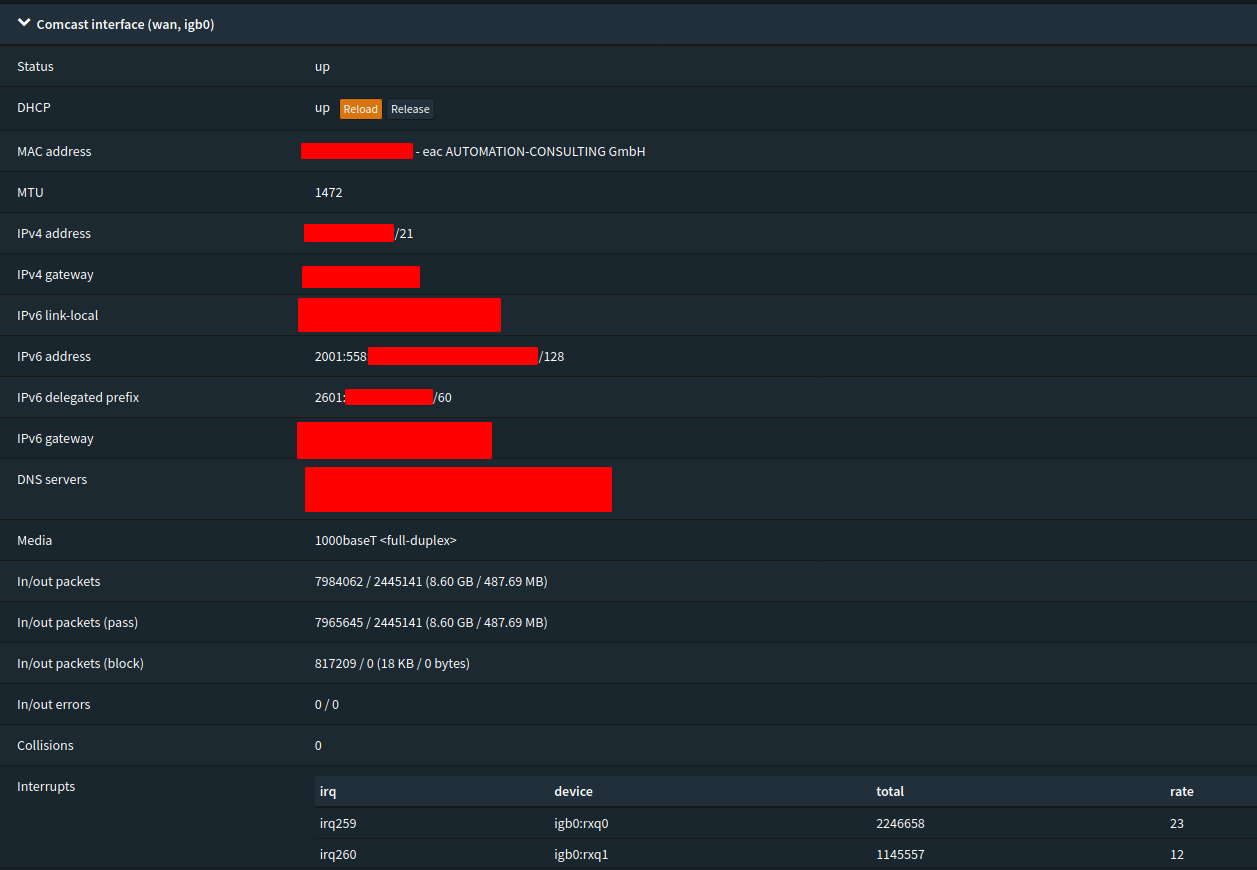
Once you do and you can verify from the firewall that you have IPv6 connectivity its time to move onto the LAN settings.
We want to track our IPv6 interface. We will modify the router advertisements for this later (which is important to enable DHCPv6). We will also delegate subnets. We do this by changing the prefix ID (not to be confused with prefix. This will ADD whatever number we place 0-F to our subnet ID)
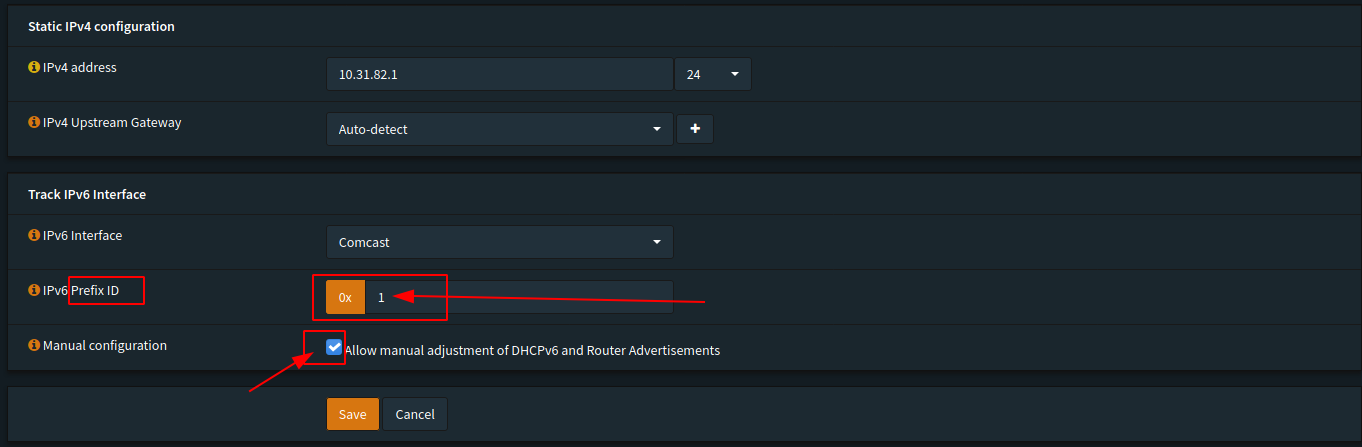
Whatever number we choose with will be added to our subnet to change it. so 0x2 would create the IPv4 10.31.8X.1 of 10.31.83.1. All this essentially does is modify our subnet so we can place different LANs on different subnetworks. Again we have 0x0-0xF available to us… (16 networks) because of our /60 delegation. Now say we had a /48 we would have 0x0 through 0xFFFF available to us ![]() . Simple right? Once you wrap your head around it.
. Simple right? Once you wrap your head around it.
Next set your IPv6 router advertisments so you can handout and delegate the routing via the firewall system
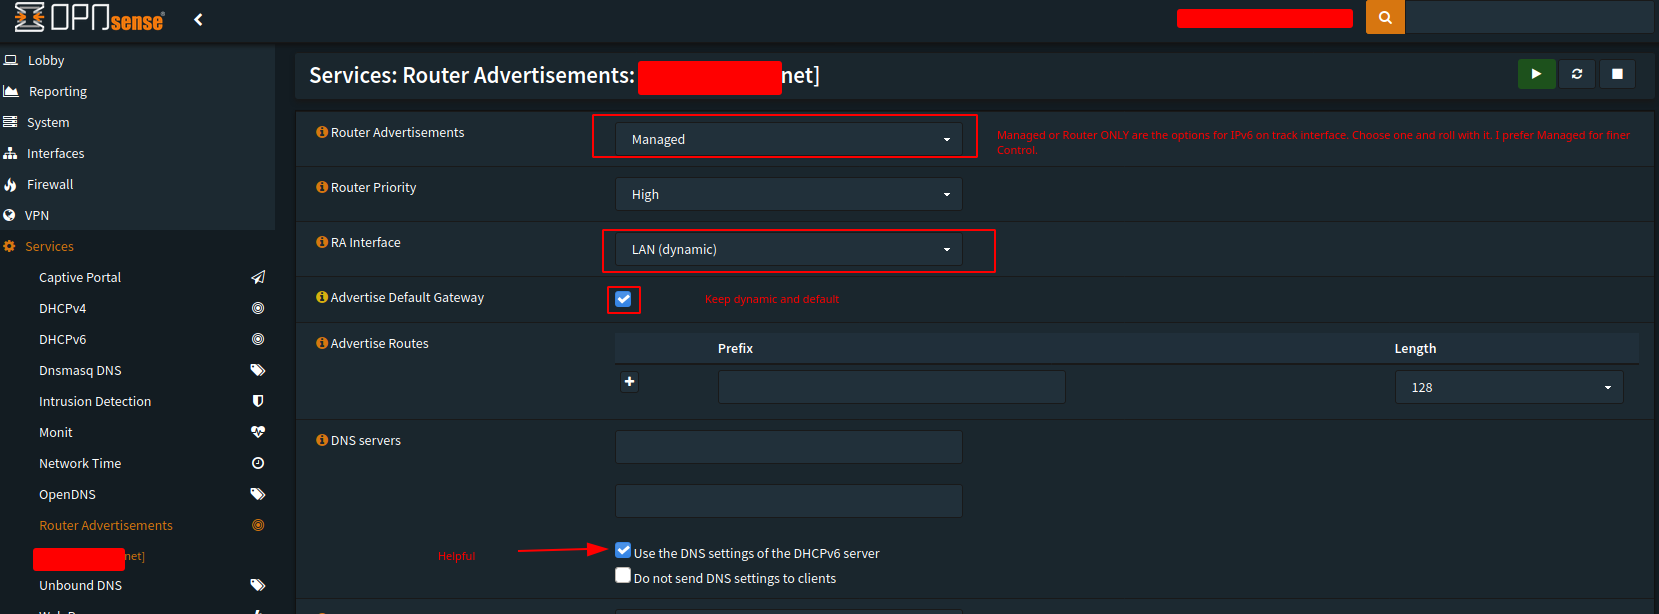
This was my setup. You can choose router only in which case it wont explicitly manage the whole subnet. Where as managed does as well as controlling all advertisment solicitation on the network. (say if you have multiple gateways like I do but want hte routing handled by the primary gateway).
Save and apply. Restart the DHCP servers that should already be enabled when you turn on manual control of RA. If successful you will have IPs for each
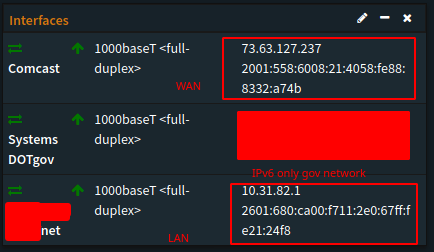
A /128 on WAN and a /128 based on your /60 prefix delegation and ID for LAN notice its 0xF71"1" not 0xF71"0" ![]() this is how things change when changing subnets. Please dont aboose my IP. I dont want to request a different one right now LOL.
this is how things change when changing subnets. Please dont aboose my IP. I dont want to request a different one right now LOL.
Setting easy to remember static reserve address in IPv6
Lets look at my DHCP6 Settings as I have set them up
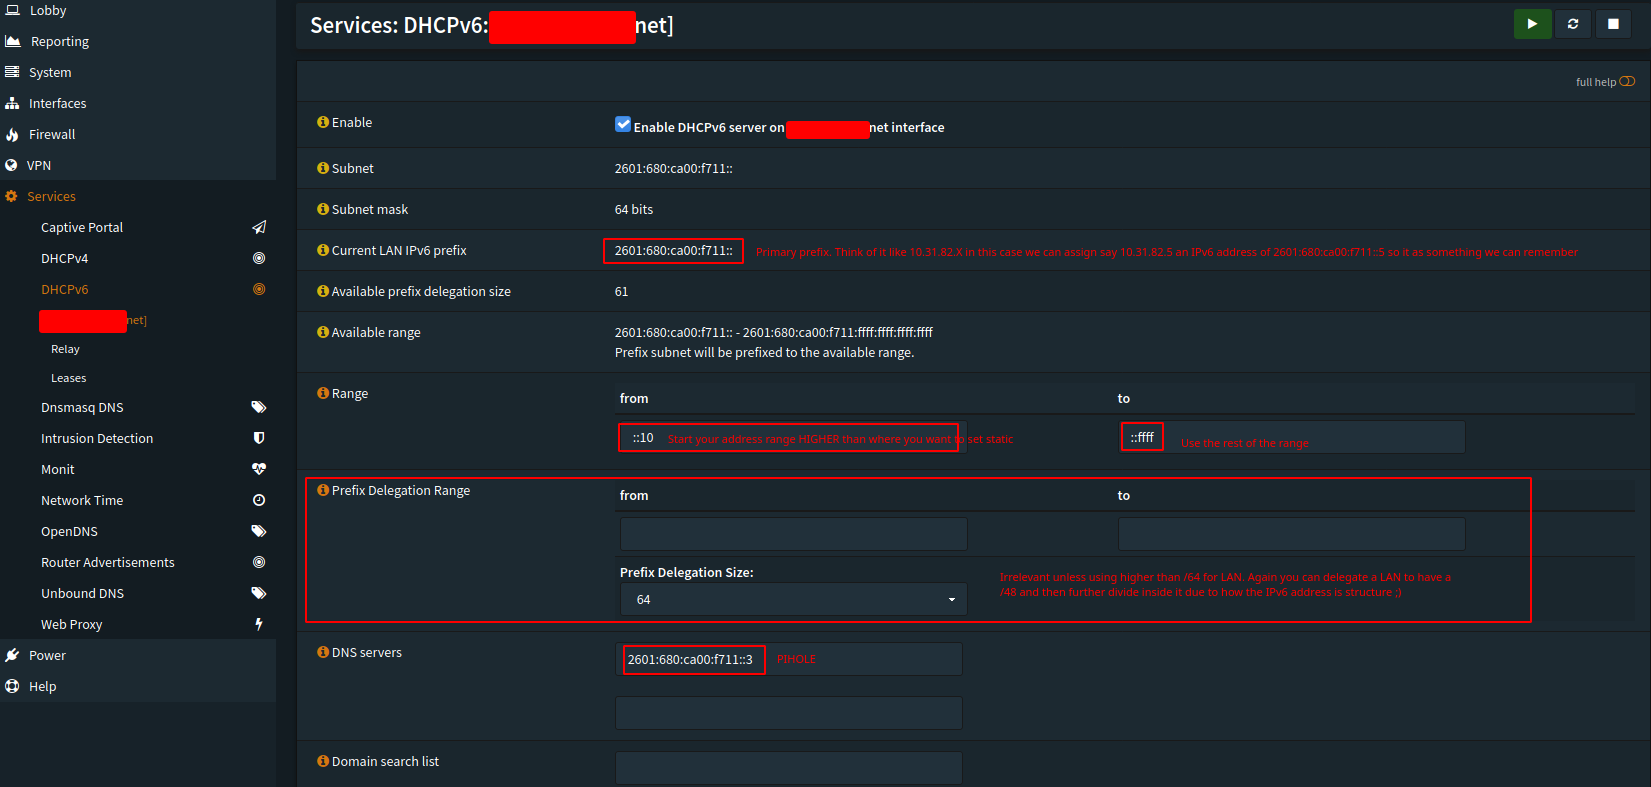
Reading from the picture you can see how the IPv6 structure becomes understandably easier. We want say set the IPv4 device 10.31.82.5 a memorable address that is the same as its 4 strcture. AKA end it in 5. Well to set that we need the DUID of the device. The DHCP Unique Identifier. a MAC address is a 48 bit address. The DUID is much different depending on the device being identified. The DHCP unique identifier (DUID) is used by a client to get an IP address from a DHCPv6 server. It has a 2-byte DUID type field, and a variable-length identifier field up to 128 bits (sound familiar?). Its actual length depends on its type. The server compares the DUID with its database and delivers configuration data (address, lease times, DNS servers, etc.) to the client. The first 16 bits of a DUID contain the DUID type, of which there are four types. The meaning of the remaining DUID depends on the type. So lets just try to acquire it instead of calculating from our mac.
On linux you will find this most often by executing the command on the target system:
sudo cat /var/lib/dhcpcd/duid
Copy and paste this value. It will be necessary for static assignments as you can see:

It really is that simple for a Native setup. Now you have predictable addresses. Restart the firewall/gateway and the rest of the network devices for this to take effect (usually). Now you have a true native dual stack that you also have memorable IPv6 interface identifiers for i.e .4 is ::4 and .3 is ::3 and so on and so forth.
If you need ICMP

Make sure you create the firewall rules that allow it through. IPv6 relies MUCH more heavily on ICMP than IPv4 did and at least ICMPv6 is encrypted ![]()
P.S you dont need rDNS (usually an ISP set property)
I will expand on any infromation that people would like to know more of. I realize this is a kind of a rough draft and active Wiki In Progress ![]() . I hope seeing my setup may help shed light on how to do it yourself. Of course YMMV.
. I hope seeing my setup may help shed light on how to do it yourself. Of course YMMV.
Parting Notes
Bonne Chance ,
PLL
Links to Infrastructure Series and Other Resources
Blog: Phaselockedloopable- PLL’s continued exploration of networking, self-hosting and decoupling from big tech
Series 1: Native Dual Stack IP4+IP6
Infrastructure Series – Native Dual Stack IP4+IP6
Series 2: Wireguard Site to Site Tunnel
Infrastructure Series – Wireguard Site to Site Tunnel
Series 3: Recursive DNS and Adblocking DNS over TLS w/NGINX
Infrastructure Series – Recursive DNS and Adblocking DNS over TLS w/NGINX
Series 4: NGINX Reverse Proxy and Hardening SSL
Infrastructure Series – NGINX Reverse Proxy and Hardening SSL
Series 5: Taking DNS One Step Further - Full DNS Server infrastructure
Infrastructure Series – Taking DNS One Step Further - Full DNS Server infrastructure
Series 6: HTTP(S) Security Headers! You should use them!
Infrastructure Series – HTTP(S) Security Headers! You should use them! [NGINX]
Series 7: Use NGINX to inject CSS themes
Infrastructure Series – Use NGINX to inject CSS themes
ONE KEY TO RULE THEM ALL
Setting up a YubiKey Properly – One Key to rule them ALL!
Series 9: Infrastructure Series: BIND9 Authoritative DNS Guide “Please See Me Edition”
Infrastructure Series: BIND9 Authoritative DNS Guide “Please See Me Edition”
Buy me a crypto-beer
If you found this guide helpful you can donate Monero or Bitcoin to me at the following address in my User Card Profile