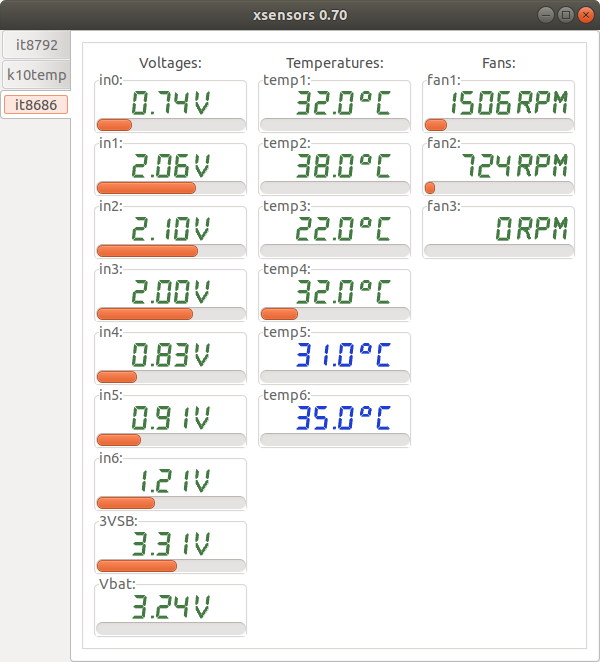
Works beautifully, got nice fans speeds showing
Sorry for the necro but: What does the IT8686E do and what kind of IC is it? So far my googling has only revealed that there has been no driver for it (I’m getting temps in OpenHardwareMonitor due to experimental support it seems).
Looks like it monitors voltage and fan speeds but I only see that from the screenshot and what a previous post shows.
Ah, thanks.
I found that I get the highest temperatures of all sensors on this chip when I run prime95.
OOPS, Haven’t logged in a while.
Good to see that driver working on systems without much trouble.
Sadly I’ve changed my motherboard to a MSI B450 Mortar, which has a much better driver support.
It would still be nice to get most patches into the kernel. The initial IT8686 support should be only a few patches.
However, I’m still pretty much clueless how to contribute to the kernel.
Came back to this thread because my Gigabyte X299 Aorus Gaming 7 Pro needs this driver, however, it needs 2 unknown IDs forced to specific addresses according to sensors-detect.
On 0x2e/0x2f, sensors-detect says it found the IT8686E as 0x8686…
HOWEVER, on 0x4e/0x4f, it found the IT8795E as 0x8733. (apparently the 8792E is the same chip)
Only one unknown ID can be forced at a time in modprobe. There’s no documentation on how to map unknown IDs in case of multiple SuperIO chips.
So I can only grab either/or the 8686 or 8795 if I force the unknown IDs, but with no options it does work properly…
Then after removing the option to force it… It didn’t need them.
You can see how this can cause confusion if you have sensors-detect saying it’s unknown, when using acpi_enforce_resources=lax and just loading the module results in success. That was really confusing.
I’ve created a snippet on gitlab for the config for the Gigabyte X570 Elite motherboard to label the temperature fan inputs appropriately, thought I’d share it here as this appears to be the closest to documentation for using these sensors on Linux that I found on the internet.
Since I’ve just created my account, I can’t include links yet, it appears, so I’ve just included the config files here for now:
/etc/sensors.d/gigabyte-x570.conf
chip "it8688-*"
    label fan1 "CPU_FAN"
    label fan2 "SYS_FAN1"
    label fan3 "SYS_FAN2"
    label fan4 "Chipset fan"
    label fan5 "CPU_OPT"

    label temp1 "SYS1 (rear)"
    label temp2 "SYS2 (front)"
    label temp3 "CPU"
    label temp4 "PCIe"
    label temp5 "VRM"
    label temp6 "Chipset"
You’ll also need the following config files to load the module for this motherboard:
/etc/modprobe.d/it87.conf
options it87 ignore_resource_conflict=1
/etc/modules-load.d/it87.conf
it87
5 Likes
Thanks so much for posting this 
Seems a lot of people are arriving at this thread (especially Gigabyte X570 board owners) to find the most recent version of the driver. The most recent version is here:
And there is no debian .deb for this tree so you will have to download the entire repository and do this:
make clean
make
sudo make dkms
using make install only installs for the specific kernel.
To uninstall
sudo make dkms_clean
The readme was confusing in that it separated the two methods when most people will use the dkms method.
1 Like
It’s just make dkms. To be absolutely clear, make install only does it for the specific kernel you’re CURRENTLY on, and make dkms installs it to dkms and should reinstall modules for every kernel upgrade. To uninstall it’s make dkms_clean.
1 Like
To amend to this, here’s the voltages section I tuned for the X570 I Aorus Pro WiFi. If it’s the same order on other X570 boards, this should work on your board too:
chip "it8688-*"
    label in0 "Vcore"

    label in1 "+3.3V"
    compute in1 1.65*@,@/1.65

    label in2 "+12V"
    compute  in2  @ * (72/12), @ / (72/12)

    label in3 "+5V"
    compute in3 2.5*@,@/2.5

    label in4 "SoC"

    label in5 "VDDP"

    label in6 "DRAM A/B"
    compute in6 @-.03,@-.03 #comment out this line if you want the native Gigabyte DRAM reading
Here’s the X299 Gaming 7 Pro’s .conf file. It should be similar with the X299 Designare EX. (not the 10G model)
This requires the latest version of the it87 driver available at the Github I linked earlier
chip "it8686-*"
    label in0 "VRIN"

    label in1 "+3.3V"
    compute in1 1.65*@,@/1.65

    label in2 "+12V"
    compute  in2  @ * (72/12), @ / (72/12)

    label in3 "+5V"
    compute in3 2.5*@,@/2.5

    label in4 "DRAM C/D"

    label in5 "VCCSA"

    label in6 "DRAM A/B"

    label fan1 "CPU_FAN"
    label fan2 "SYS_FAN1"
    label fan3 "SYS_FAN2"
    label fan4 "SYS_FAN3"
    label fan5 "CPU_OPT"

    label temp1 "System 1"
    label temp2 "Chipset"
    label temp3 "CPU"
    label temp4 "PCIEX16_1"
    label temp5 "VRM"
    label temp6 "EC_TEMP1"

chip "it8792-*"
    label in0 "VRIN"

    label in1 "Vcore"
    compute in1 0.03+@,@-0.03  # Raw reading is 0.03v off, HWinfo64 is the same

    label in2 "Chipset"

    label in4 "VCCIO"

    label in5 "MESH"

    ignore in6

##  label in6 "VRIN4" # feel free to ignore this sensor. This matches HWInfo64
##  compute in6 @-1.1,@+1.1

    label temp3 "System 2"
    label temp2 "EC_TEMP2"
    label temp1 "PCIEX16_2"


    label fan3 "SYS_FAN4"
    label fan2 "SYS_FAN5_PUMP"
    label fan1 "SYS_FAN6_PUMP"
Vcore is calculated extremely weirdly from the it87 sensors on X299. At deeper C-states, Voltage actually reaches 0. Only during a consistent all core workload does the it87 sensor work properly. I have no reference to compare so I have no clue how Vcore is calculated without using i7z.
Edit: Okay, HWInfo64 calculates Vcore the same way when reading from the it8792. I added a proper offset.
Great work everyone!
Did you have a look at the lm-sensors repo?
Most the time, the voltages and temps are mostly similar to older generation boards.
I could open a pull request with the debian package file.
Package files for other distros would be welcome too. 
1 Like
Yeah, and the default installation should be dkms, make dkms a dependency when making the debian package file. Double check dependencies across debian and ubuntu before making the PR.
Hahahah ahh open source. Hey sometimes shit happens thats okay. Thats why we fork
2 Likes
Are you guys able to build this on the 5.10.x kernels? For me dkms fails when installing the new kernel and trying to make the module spits out errors. 5.9.x kernels work fine (using 5.9.16 right now).
Any idea how i can get a config like this done for my motherboard?
when i run sensors-detect i get the following.
Found unknown chip with ID 0x8688
im trying to get unraid to detect this chip so i can control my PWM fans without always going into the BIOS.
Anyone has this working with latest BIOS? I get a ‘no such device’ error when probing or inserting the module, regardless of options (ignore_resource_conflict=1 or force_id=0x8628). Seems BIOS version F31q yields this driver incompatible. Older reports with F11 seem to work fine.
I am running a Gigabyte Aorus Elite, and while the K10temp driver works, obviously I get no other information regarding the motherboard and fan status.