How to Recover Data from Corrupted Windows?

So, i've had a Kingston 120GB SSDNow V300 for around 2 ish years and it has always said that there are some bad blocks, but Kingstone has not allowed me to return it and get a new SSD. Well, today, after installing Asus Share Link software and restarting the PC, the computer decides computer constantly blue screens, giving the error of 0xc000000f . I've tried searching online, and I can't find anything to help me with it. I can't access the drive in Ubuntu because the drive is in "hibernate" mode, and because the drive is somehow corrupted (I can still see all of the partitions, and read SOME data from the drive, from other partitions, that aren't from the main OS partition). To me, it seems like the boot partition SOMEHOW got corrupted, and I have no clue how to recover it and make it work again. The laptop is a Dell Inspiron 11 3148, with Windows 8.1.

I really need help. This drive has years worth of school work, and has NEVER been backup because I was in the process of setting up an automated backup to my NAS.

Please don't tell me what I should have done, tell me what I should do NOW to get this working again. I really need this to work, and I have no clue what the fuck to do. :(

Testdisk

1 Like

What's that?

A program for recovering data, there's also this utility

https://www.system-rescue-cd.org/SystemRescueCd_Homepage

based on gentoo, so you have to manually mount any external storage you're moving the data to

https://forum.teksyndicate.com/t/system-rescue-cd-testdisk-how-to-get-data-to-external-storage-device/94032

1 Like

Thank you so much for the quick notice @StreetGuru

I'm trying the SystemRescueCD thing first because I mainly care about recovering the data, not as much as saving Windows, and from my quick glimpse, it looks like SystemRescueCD will do it faster.

@StreetGuru I'm in the process of using Macrium Reflect to make a copy of my damaged drive to a different HDD, to reduce the risk of losing all of my data. I loaded up SystemRescueCD and it seems to have no GUI, and only a terminal/bash/cmd prompt/whatever it's called type of thing, and I have 0 idea as to what to do.

It has a GUI

1 Like

How do I get to it? When I first loaded it up, I didn't have that.

I've not very good with linux and terminals/bash, so I want to try to avoid using that.

Well do you have thousands of potential dollars for a data recovery service?

it should just load into it or there will be an option for it

1 Like

So... TestDisk doesn't work... It worked a few times and showed my disk when I was learning to use the program, but now it doesn't work at all.....

I gotchu, fam
http://diskdigger.org/

1 Like

Before you do anything else, use ddrescue to take an image of the drive under linux. This allows you to work with the data without putting any more wear on the drive. Now, you'll need one "master copy" of the image that you DO NOT modify. This is so that you don't accidentally screw it up and lose the only good copy of the data.

Next, try mounting your image. If you can't, try using your recovery tools to get the data back.

I can't get too in depth on this right now, just wanted to make a couple suggestions.

Hope it helps!

1 Like

I used Macrium Reflect to make a copy of the image onto a 250GB HDD, however, I had messed around a little bit before I did that.

I tried TestDisk again, and it failed once again.

Is it possible to convert a RAR partition to NTFS?

You could basicly trow a linux distro disc in there, and boot it into live mode.
Then you can acces your drive to copy data from.

1 Like

Ditto. ddrescue the whole drive BEFORE attempting any modification, fixmbr, etc, and always, ALWAYS make a logfile with ddrescue, I'll make you a guide...

Are you talking about RAR or RAW? I've never heard of RAR, and RAW basically just means that the computer doesn't know what type of partition is there, which can sometimes be an indicator that your partition schema is corrupt.

Now, let me clarify a few things. you've cloned the bad SSD to the 250GB HDD. You did this by making a partition on the drive and moving the data to that partition. If you didn't, no big deal, you can just mount the image under linux the same way you would a disk.

Your best bet is probably ntfsundelete. While it says it recovers deleted files, what it really does is scan the disk/image for file headers and recover that to files. Have a look through the man page and see if it does what you're looking for.

PART 2

This may be easier, but will only work if you've cloned the disk from the bad SSD to a partition (not a file) on the 250GB HDD.

Boot into your favorite Linux distro and plug in the HDD that has the partiton cloned.

Okay, that's done. Now open up a terminal and we're going to run some commands to mount the drive read-only.

sudo fdisk -l

which will list your disks. Find the 250GB drive and make note of the partition (might be something like /dev/sdb2)

Now, let's make a directory to mount it in.

sudo mkdir /mnt/recovery

Now, let's try mouning the image: (replace /dev/sdb2 with the path we found in the fdisk commnd)

sudo mount -t ntfs-3g -o ro /dev/sdb2 /mnt/recovery

Now you should be able to navigate with whatever file browser you like to the path /mnt/recovery and that will be the root of your C:/ drive under windows.

If you have any problems, feel free to ask.

Also, for when this is solved, if you want help setting up your backup system, feel free to ask me. (I'm sure there are others out there who'd help as well.)

1 Like

Seems like you have the pre-reqs in hand so I won't teach you to suck eggs.

  1. If you have no Linux distro to use then DL & burn Parted Magic, 2013.08.01 is the latest free ISO (315MB)

  2. Boot on Parted Magic (or whatever) disc with the afflicted source drive and a (preferably much) larger destination recovery media connected, if the destination is USB connect it later to save confusion
    Remember: in Linux the first recognized device will be /dev/sda, the second will be /dev/sdb, and so on, partitions are represented by incremental numbers, /dev/sda1, /dev/sda2, /dev/sdb1, etc... We will ddrescue the whole drive, probably /dev/sda, you can work on parts later...

  3. Now that your computer is booted on Parted Magic it's a good idea to connect your destination media, if it isn't already, and refer to this image for the next few commands:


  4. Open the terminal, run the following command, & use the output to make note of your source and destination drives, you don't want to get these confused:

    lsblk -o name,label,size,fstype,model


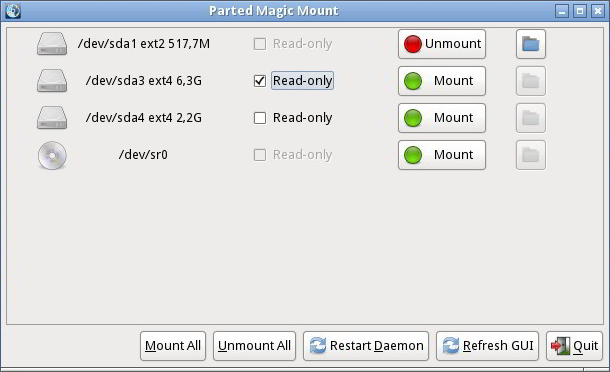
  5. Open the File Manager, mount your destination drive (do not mount your source drive), open it using the folder icon, and browse to where you want to save the recovered drive image:


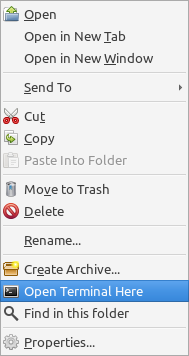
    then right-click and choose "Open Terminal Here":


    a new terminal window should open with your chosen folder as the working directory.

  6. Run the following command using the details noted at step 4, substituting the letter relevant to your source drive (sda, sdb, etc):

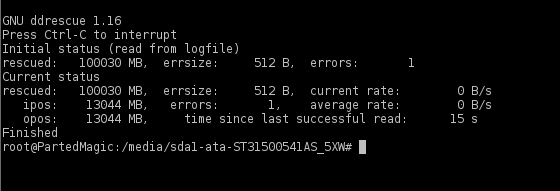
    ddrescue -d -r1 /dev/sda lazarus.img lazarus.logfile

    What it does: ddrescue invokes application; -d uses direct non-cached mode; -r1 specifies 0 retries on fails; /dev/sd* specifies source; name.img is the cloned drive image; name.logfile is the thing you always make with dd/ddrescue - a logfile of WIP notes, allows restart/resume/retry/continue/1up. You need this, you will learn to love it.


    ddrescue will give you progress updates in the terminal and state when it has completed, this may take many hours, so it's best to have a few cold ones waiting, or some comics/books to distract you, whatever blows your hair back, and use UPS if you have it available, also feel free to go ahead & run Audacious & add the following streaming URL for while-you-wait tunes: http://dir.xiph.org/listen/422993/listen.m3u.

  7. When it has completed you can simply press the Up Arrow on your keyboard while your cursor is in the ddrescue terminal window to recall the previous command, then change the number of retries to >1 like 3 for instance:

    ddrescue -d -r3 /dev/sda lazarus.img lazarus.logfile

    Note that the other arguments haven't changed - the same source will be used, the output image & logfile will be updated with any new data recovered from subsequent retries, and any further progress or notes will be added to the logfile.

    Yes, yes it is rather neat.

The point of the 2-step process is to get a base image of the most reliable data first without risking any further collapse of the drive media or file system it contains. ddrescue is designed to dodge about any risky areas using a read-ahead/back "recovery domain" method to avoid failing sectors/blocks. Once reliable data is safely captured ddrescue can then light 'er up and smoke the remainder of the data out of that drive, if anything further can be gotten that is.

Let us know how this goes for you, we can talk about RO mounting, file system checks, & imaging to new media once this much is done.

2 Likes

THANK YOU EVERYONE WHO REPLIED TO THIS AND TRIED TO HELP ME! I honestly really appreciate it :)

I haven't been on Teksyndicate for around 2 days, so I wasn't able to read these amazing ways to recover the data. However, I was able to recover most data, but did it slightly differently during way than recommended, during those 2 days of heartbreak and fear.

(All of whats said below was done within Windows, and the drive that I recovered the data from was a 250GB HDD with all of the partitions and data on it, in RAW format, unaccessible because of corruption/hibernation bullshit)

I first used TestDisk to locate any missing partitions and stuff like that (can't remember exactly), and then I downloaded and installed Recuva and ran the program to do a deep scan of the drive (took around 2 hours). It located basically everything that was in the C partition of the drive, which was amazing. I was able to get back basically all of my data, such as pictures and word documents. It was time consuming, but worked, and I am so happy for it.

Regarding recovering the partition and getting it to work again... Yeah I gave up on that. I spent 3 hours researching and trying to use different programs to rebuilt the MBR, but I failed. I ended up giving up on recovering the partition, and just went straight for the data. I can always reinstall my pirated software again! :D

What i've learned from this is that EVERYONE SHOULD REALLY USE SYSTEM RESTORE BACKUPS, AT LEAST (if on Windows). Seriously. Set up a system restore to a different drive on your PC weekly/server, and then you won't go through nearly as much headache and tears and stress as I did over this past week. If you end up reading this far, please please please, set up a system restore in Windows, JUST IN CASE, so you won't experience something similar to this, or even better, set up something to backup your whole user profile every half an hour, to a seperate drive. Cobian (this is a software) is able to do this, and I used to do it on a Minecraft server I used to host for fun.

That is actually quite fast for data recovery, it is always a slow process when the partition/file allocation table(s) are munted, all data sectors must be scanned and the data type/file chains guessed.

That was very cavalier, you should work on a copy of the backup image of the original drive, never on the original drive lest you lose it all, prefereably not on the only valid image either lest you irreparably damage it and have turn once more to the afflicted drive, see previous statement about losing it all.

Thrilled to hear you got it all back, that's the important thing. For anyone interested in the freeware recovery tool used it was Recuva by Piriform, the crowd that makes CCleaner & Speccy, here's a link: https://www.piriform.com/recuva

1 Like