If you set up Pi-Hole on your network like in the recent video on Level1Tech, then you likely have noticed that the logs show all your DNS queries are coming from the router IP and not from each client. The problem is that home routers typically give out their own IP when clients get set up through DHCP so that the router can cache the results of a DNS lookup. If you are running OEM firmware on your router, it is likely that you cannot change this behavior.
Note: if you are hosting pihole directly under the default network of docker, then you are likely to see a large volume of PTR requests echoing around your network (hundreds a minute in my testing). You can still host pihole under docker and have this work, but use the macvlan driver and assign a static IP when you create the container.
Setting a static IP for your server
TL;DR - assign both a V6 and V4 address
You will need to set a static IPv4 and IPv6 for your server so that you always know where it is on the network. If the machine is already running on the network, then OpenWRT will already know about it making it simple to make a DHCP reservation.
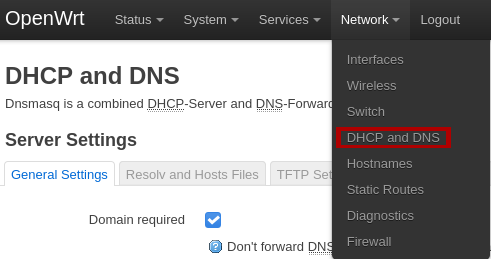
In the web gui Head to Network -> DHCP and DNS -> Static Leases

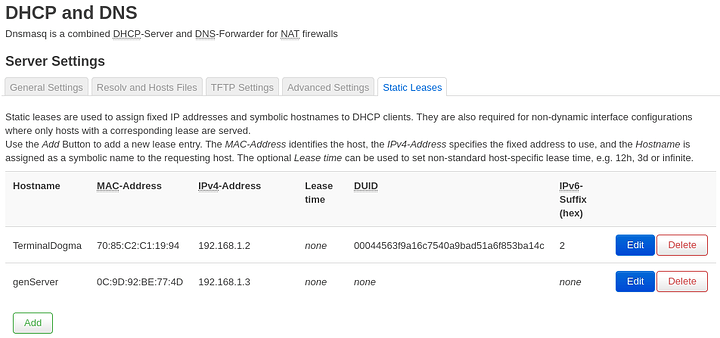
In my setup, I have my DNS service running on “TerminalDogma”. Looking at that line, there are 4 pieces of information used for the reservation - MAC address, IPv4 address, a DUID, and a IPv6 suffix. Lets look at the form to add a reservation and walk through it.
- Hostname - Just choose a name that makes sense. I just copied the hostname that i gave to the server
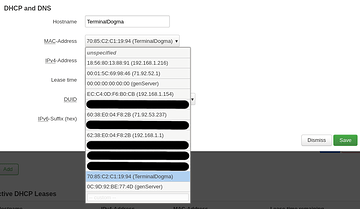
- MAC - when you click on the field, it will have a handy little dropdown (as shown below) where you should be able to just find the right name. If OpenWRT does not know a friendly name, it will give you the ip address at the very least. Note: if you see a MAC with all zeros, just ignore it, that is not the right one
- IPv4 Address - You can set this to nearly anything you want. If you are using the default settings, then your router is probably using 192.168.1.* for the network. Choosing 192.168.1.2 is likely a safe choice. (We are using 2 as the last byte of the address)
- Lease time - leave it alone
- DUID - Once again a dropdown menu. Find your server. If it is not listed here, you should make sure the server is getting a v6 address.
- IPv6 Suffix - for simplicity, set it to the same number that you used for the last byte of you v4 address. (that would be a 2 in my case)
Click Save -> Apply and Save , then reset the connection on the server. We want the server to release with the router to make sure the settings are working. Either unplugging the ethernet cable to the server, pulling power on the router, or finding the reboot button in System -> Reboot will do the trick.
Changing the DNS Server IPs for DHCP
TL;DR - V4 is a custom DHCP option, V6 is in a sub-sub-section
With the IPs assigned to our server, lets now change the IPs given out via DHCP on the LAN.
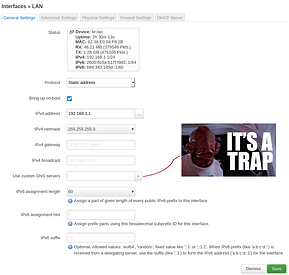
Go to Network -> Interfaces , and then edit the LAN interface.
On first inspection, you might notice the handy fields “Use Custom DNS Servers” but actually this does not do what you want! It doesn’t hurt anything to set it here, but it will not help.
All our work needs to be done in the DHCP Server tab instead. Head there, and then go to the “Advanced Settings” tab. We are going to set our IPv4 address. In the field DHCP-Options, simply type 6,IPv4-Address, but put in whatever address you assigned to your server.

To change the IPv6 address, head one tab over to the aptly named “IPv6 Settings”. Put in the IPv6 Address of your server into the field “Announced DNS servers”.

And with that, we have the settings all done! Hit Save -> Apply and Save , and then reboot the router. (Or disconnect your clients so they release to get the new DNS IPs).
When you check back into the Pi-Hole GUI, you should now see other IPs! (need to log in to the gui for more statistics) Browse on your devices and watch the counters tick upwards.


