Introduction
(i)PXE, this small built-in program. The idea of booting from a network resource, it always fascinated me. For the past few years I’ve been studying it in my free time. Pretty quickly it became clear why it never took off in the consumer space. The personal investment of time and scarcity of instructional material made it very apparent this isn’t something just anyone can get up and running.
With that said. I want to add my two cents by providing as complete of documentation as I can on the working configurations I’ve achieved so that prosumers and home lab enthusiasts might be able to integrate or otherwise take advatage of the feature that’s been staring them in the face for decades.
The utilization of iPXE requires the coordination of several network protocols/features which include but aren’t limited to:
- DHCP
- TFTP
- FTP
- HTTP
- Menu
- iSCSI
- DNS
If you already understand all of these concepts. Great! If not, don’t hesitate to ask for help. ![]()
I’m going to be demonstrating two features of iPXE.
- Installing an OS from Network Media
- Booting an OS from an iSCSI LUN
Both of these features require the pre-configuration of:
- DHCP
- TFTP
- Chainloading iPXE
For most of these demonstrations I’ll be using Ubuntu Server 20.04 but if you know how to make it work on another distro that is entirely at your discretion.
Pre-Configuration
DHCP
There are two packages that can be used in this application. Depending on your network setup they both have pros & cons. If you have a pre-existing network w/ a router DNSMASQ will make for an easy setup. However ISC-DHCP-SERVER is adequate too if you’re willing to make it the DHCP server and just have it point clients to the network’s Default Gateway.
You only need to install one or the other:
apt install dnsmasq
apt install isc-dhcp-server
DNSMASQ
If you opted for DNSMASQ modify the configuration file /etc/dnsmasq.conf. Copy/Paste the following config:
port=0
tftp-root=/pxe-boot
dhcp-no-override
pxe-prompt="PXE booting in", 30
pxe-service=X86PC, "Boot from network", undionly.kpxe
pxe-service=X86-64_EFI, "Boot from network", ipxe.efi
dhcp-range=192.168.0.202,proxy
dhcp-boot=,,192.168.0.202
NOTE: Change the IPs to match the IP assigned to the Server/VM
In this configuration DNSMASQ acts as a ProxyDHCP server. It will service DHCP requests from network clients but it won’t lease IP’s of it’s own. Instead it gets an IP leased from the existing network router and forwards it to the requesting client.
Restart the DNSMASQ service: systemctl restart dnsmasq
ISC-DHCP-SERVER
If you opted for ISC-DHCP-SERVER modify the configuration file /etc/dhcp/dhcpd.conf Copy/Paste the following config:
subnet 192.168.0.0 netmask 255.255.255.0 {
range 192.168.0.2 192.168.0.254;
next-server 192.168.0.202; }

option client-arch code 93 = unsigned integer 16;
  if option client-arch != 00:00 {
     filename "ipxe.efi";
  } else {
     filename "undionly.kpxe";
  }
NOTE: Change the IPs to match the subnet/interface you want to advertise. Next-server is the iP of this Server/VM.
In this configuration ISC-DHCP-SERVER acts as a DHCP server. It will service all DHCP requests from network clients but that will conflict with any router broadcasting it’s own on the same VLAN. To circomvent this disable DHCP on the router and add a option that points clients to the Default Gateway with option routers 192.168.0.1;
Now restart ISC-DHCP-SERVER with service isc-dhcp-server restart
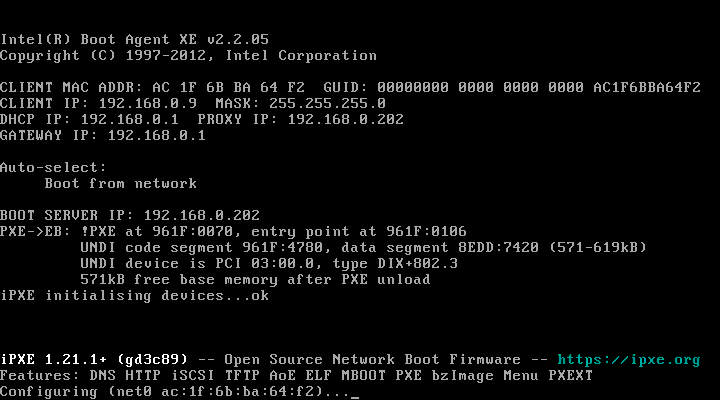
In either setup (DNSMASQ or ISC-DHCP-SERVER) depending on weather the requesting client is using Legacy or UEFI netboot, the corrisponding service will fetch either undionly.kpxe or ipxe.efi from TFTP which we will get to in a little while.
NOTE: If your client is UEFI Netboot capable you have to disable Secure Boot/Pre-enrolled Keys in order to load ipxe.efi. Otherwise the chainload operation will fail.
TFTP
TFTP is the protocol that most (i)PXE clients rely on to perform a chainload operation. Although depending on the existing NIC firmware it may be possible over HTTP.
Start by downloading TFTP apt install tftpd-hpa
Now modify the configuration file /etc/default/tftpd-hpa. Copy/Paste the following config:
TFTP_USERNAME="tftp"
TFTP_DIRECTORY="/pxe-boot"
TFTP_ADDRESS=":69"
TFTP_OPTIONS="--secure"
Note you will likely have to manually create the TFTP_DIRECTORY with: mkdir /pxe-boot
When you’re done restart the service: systemctl restart tftpd-hpa
Chainloading iPXE
In order to use iPXE in either of these particular fasions we’ll want to compile it from source. Before we do though ensure that you have all the necessary packages installed:
apt install make gcc binutils perl mtools mkisofs syslinux liblzma-dev isolinux git
Depending on your distro/existing configuration most/all of these may be accounted for.
Now download the open source iPXE project from git.
git clone https://github.com/ipxe/ipxe.git
And navigate to the folders src directory.
cd ipxe/src
Before compiling, from here you need to embed a script. The script is something iPXE will execute no matter what after it’s chainloaded from TFTP. Start by creating an empty file called embed.ipxe and open it with your preference of editor. What you put in this script is dependent on which function you’re looking for iPXE to serve.
Installing an OS from a Server
If you want to install Operating Systems from a network resource instead of local media create the following script:
#!ipxe

dhcp
chain tftp://${next-server}/main.ipxe
Booting an OS from an iSCSI LUN
If you want to boot a disk-less client from a iSCSI LUN on the network create the following script:
#!ipxe

dhcp
set initiator-iqn iqn.2021-11.ipxe.com:lun1
sanboot iscsi:10.0.0.254::::iqn.2021-11.ipxe.com:lun1
- Make sure to change the Initiator IQN to match your disk.
- Make sure to match the server IP hosting your iSCSI shares.
NOTE: I could not boot iSCSI volumes hosted on Ubuntu Server. I did however find great success with FreeBSD 13, FreeNAS, and I would expect the same can be said for TrueNAS. iSCSI Sanboot on Windows Server or other platforms has not been personally tested.
Once you’re done writing your script(s) how you compile iPXE depends on weather you need to use them on Legacy or UEFI Netboot capable clients.
- If you ONLY need iPXE for Legacy Netboot clients run:
make bin/undionly.kpxe EMBED=embed.ipxe - If you ONLY need iPXE for UEFI Netboot clients run:
make bin-x86_64-efi/ipxe.efi EMBED=embend.ipxe - If you NEED BOTH Legacy & UEFI Netboot make a copy of the ipxe folder and compile both undionly.kpxe & ipxe.efi independently.
- If you need multiple clients to sanboot from different iSCSI LUNs create as many iPXE copies as you require and modify embed.ipxe to point at each different sanboot LUN prior to compiling.
Once compiled take all applicable files and copy them to /pxe-boot.
Installing an OS from Network Media
From here installing an OS from a network resource requires the setup and configuration of two things:
- Apache2 (for HTTP)
- Main.ipxe (feature of iPXE)
Apache2 Installation & Configuration
For this application Apache is very quick and easy to setup.
Install it: apt install apache2
Modify it’s configuration file: /etc/apache2/sites-available/000-default.conf
Copy/Paste:
<VirtualHost *:80>
        ServerAdmin [email protected]
        DocumentRoot /pxe-boot

        ErrorLog ${APACHE_LOG_DIR}/error.log
        CustomLog ${APACHE_LOG_DIR}/access.log combined
</VirtualHost>

<Directory />
        Options +FollowSymLinks +Indexes
        Require all granted
</Directory>
Restart the service: systemctl restart apache2
You should now be able to visit the /pxe-boot directory from the web browser of any PC on the LAN by typing the servers IP in the URL box.
main.ipxe Script Configuration
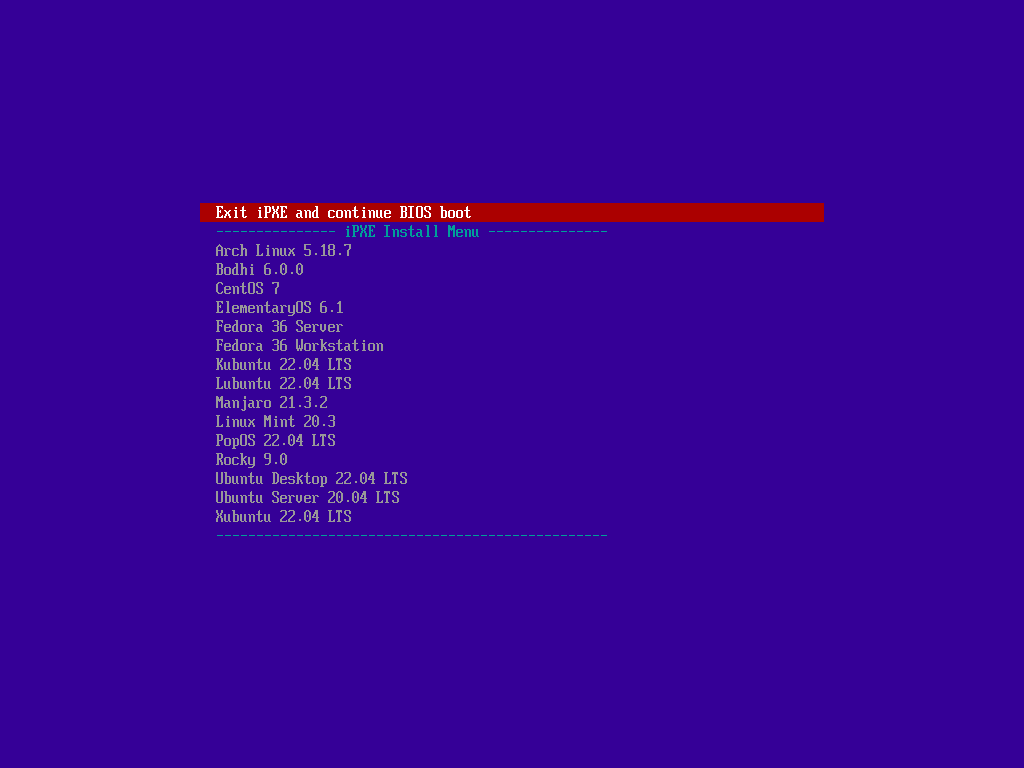
Main.ipxe is the menu that appears with your options after booting from the network. Your NIC → DHCP → TFTPs iPXE → which chainloads main.ipxe (the menu below).
The menu is composed of a script file you will have to write from scratch to suit your needs. This is the file fetched by iPXE after the chainload operation takes place.
main.ipxe has an incredible amount of flexibility for what it is, so much so that I won’t be covering everything you can make it do. But this github post makes for an excellent demonstration of different configuration options.
It’s important that you both name & create the file here: /pxe-boot/main.ipxe. The file path and file name are hard coded into iPXE and cannot be altered without re-compiling iPXE from source again.
Starting with the top half of the script file we have some variables to declare and the menu itself.
#!ipxe

set url    http://${next-server}/
set initrd ${url}initrd/
set iso    ${url}iso/
set kernel ${url}kernel/
set ucode  ${url}ucode/

menu
item exit                 Exit iPXE and continue BIOS boot
item --gap -- --------------- iPXE Install Menu ---------------
item arch                 Arch Linux 5.18.7
item bodhi                Bodhi 6.0.0
item centos               CentOS 7
item elementaryos         ElementaryOS 6.1
item fedora-s             Fedora 36 Server
item fedora-w             Fedora 36 Workstation
item kubuntu              Kubuntu 22.04 LTS
item lubuntu              Lubuntu 22.04 LTS
item manjaro              Manjaro 21.3.2
item mint                 Linux Mint 20.3
item popos                PopOS 22.04 LTS
item rocky                Rocky 9.0
item ubuntu-d             Ubuntu Desktop 22.04 LTS
item ubuntu-s             Ubuntu Server  20.04 LTS
item xubuntu              Xubuntu 22.04 LTS
item --gap -- -------------------------------------------------
choose target && goto ${target}
Now setting variables with values are not explicitly necessary. They just make things less repetitive in the script to follow. How you setup yours is entirely up to you. You have the creative freedom to setup your folder structure in /pxe-boot however you see fit so long as the primary iPXE boot files stay under the root of /pxe-boot.
The menu itself only needs to follow a few basic rules:
- menu at the top
- item + goto identifier + description
- choose + arguments at the bottom
Outside of these rules you can add a timeout clock that picks something automatically after a specified time, you can add alphanumeric shortcut keys 0-9 a-z to make selecting an item faster, you can have sub-menus that the main menu can point to and quite a bit more.
NOTE: In order to boot any OS installer it’s important to understand that this How-To is a continuous work in progress as not every OS accepts the same arguments to launch and learning what they need is difficult due to information scarcity. With that in mind below is the current compatibility list of what I got working for which OS’s. Additionally be careful to note file name/extentions between distros. Not all of them use the same name for the kernel & initrd.
Arch
This method includes Arch 5.18.7 & Manjaro 21.3.2:
:arch
kernel ${kernel}arch/5.18.7/vmlinuz-linux
initrd ${ucode}arch/5.18.7/amd-ucode.img
initrd ${ucode}arch/5.18.7/intel-ucode.img
initrd ${initrd}arch/5.18.7/initramfs-linux.img
imgargs vmlinuz-linux initrd=amd-ucode.img initrd=intel-ucode.img initrd=initramfs-linux.img archiso_http_srv=${iso}archlinux-2022.07.01-x86_64/ ip=dhcp
boot
With both Arch & Manjaro it’s important to extract the entire folder from the .ISO file after downloading before uploading the folder to the server.
If you need help locating the kernel, initrd, and ucode files from the .ISO:
Arch
archlinux-2022.07.01-x86_64.iso/arch/boot/x86_64/vmlinuz-linux
archlinux-2022.07.01-x86_64.iso/arch/boot/amd-ucode.img
archlinux-2022.07.01-x86_64.iso/arch/boot/intel-ucode.img
archlinux-2022.07.01-x86_64.iso/arch/boot/x86_64/initramfs-linux.img
Manjaro
manjaro-kde-21.3.2-220704-linux515.iso/boot/vmlinuz-x86_64
manjaro-kde-21.3.2-220704-linux515.iso/boot/amd_ucode.img
manjaro-kde-21.3.2-220704-linux515.iso/boot/intel_ucode.img
manjaro-kde-21.3.2-220704-linux515.iso/boot/initramfs-x86_64.img
Debian
This method includes Kubuntu 22.04, Lubuntu 22.04, Linux Mint 20.3, Ubuntu Desktop 22.04, Ubuntu Server 20.04.3 & Xubuntu 22.04
:kubuntu
kernel ${kernel}kubuntu/22.04/vmlinuz ip=dhcp url=${iso}kubuntu-22.04-desktop-amd64.iso initrd=initrd
initrd ${initrd}kubuntu/22.04/initrd
boot
If you need help locating the kernel & initrd files from the .ISO:
Kubuntu
kubuntu-22.04-desktop-amd64.iso/casper/vmlinuz
kubuntu-22.04-desktop-amd64.iso/casper/initrd
Lubuntu
lubuntu-22.04-desktop-amd64.iso/casper/vmlinuz
lubuntu-22.04-desktop-amd64.iso/casper/initrd
Linux Mint
linuxmint-20.3-cinnamon-64bit.iso/casper/vmlinuz
linuxmint-20.3-cinnamon-64bit.iso/casper/initrd.lz
Ubuntu Desktop
ubuntu-22.04-desktop-amd64.iso/casper/vmlinuz
ubuntu-22.04-desktop-amd64/casper/initrd
Ubuntu Server
ubuntu-20.04.3-live-server-amd64.iso/casper/vmlinuz
ubuntu-20.04.3-live-server-amd64.iso/casper/initrd
Xubuntu
xubuntu-22.04-desktop-amd64.iso/casper/vmlinuz
xubuntu-22.04-desktop-amd64.iso/casper/initrd
The next method includes Bodhi 6.0.0, ElementaryOS 6.1 & PopOS 22.04
:bodhi
kernel ${kernel}bodhi/6.0.0/vmlinuz boot=casper ip=dhcp url=${iso}bodhi-6.0.0-64.iso initrd=initrd.gz
initrd ${initrd}bodhi/6.0.0/initrd.gz
boot
If you need help locating the kernel & initrd files from the .ISO:
Bodhi
bodhi-6.0.0-64.iso/casper/vmlinuz
bodhi-6.0.0-64.iso/casper/initrd.gz
ElementaryOS
elementaryos-6.1-stable.20211218-rc.iso/casper/vmlinuz
elementaryos-6.1-stable.20211218-rc.iso/casper/initrd.lz
PopOS
pop-os_22.04_amd64_intel_10.iso/casper/vmlinuz.efi
pop-os_22.04_amd64_intel_10.iso/casper/initrd.gz
The next method includes Debian 11.4.0
:debian
kernel ${kernel}debian/11.4.0/vmlinuz initrd=initrd.gz
initrd ${initrd}debian/11.4.0/initrd.gz
boot
This requires a Internet connection and the two needed files can be downloaded here.
vmlinuz & initrd.gz will download the installation files from a Debian mirror. No .ISO required but an Internet Connection will be.
RHEL
This method includes CentOS 7 & Fedora 36 Workstation:
:centos
kernel ${kernel}centos/7/vmlinuz root=live:${iso}CentOS-7-x86_64-Minimal-2009.iso initrd=initrd.img
initrd ${initrd}centos/7/initrd.img
boot
CentOS
CentOS-7-x86_64-Minimal-2009.iso/images/pxeboot/vmlinuz
CentOS-7-x86_64-Minimal-2009.iso/images/pxeboot/initrd.img
Fedora Workstation
Fedora-Workstation-Live-x86_64-36-1.5.iso/images/pxeboot/vmlinuz
Fedora-Workstation-Live-x86_64-36-1.5.iso/images/pxeboot/initrd.img
The next method works for Fedora 36 Server & Rocky 9.0:
:fedora-s
kernel ${kernel}fedora-s/36/vmlinuz inst.repo=${iso}Fedora-Server-dvd-x86_64-36-1.5 initrd=initrd.img
initrd ${initrd}fedora-s/36/initrd.img
boot
With both Fedora Server & Rocky it’s important to extract the entire folder from the .ISO file after downloading before uploading the folder to the server.
If you need help locating the kernel & initrd files from the .ISO:
Fedora Server
Fedora-Server-dvd-x86_64-36-1.5.iso/images/pxeboot/vmlinuz
Fedora-Server-dvd-x86_64-36-1.5.iso/images/pxeboot/initrd.img
Rocky
Rocky-9.0-x86_64-minimal.iso/images/pxeboot/vmlinuz
Rocky-9.0-x86_64-minimal.iso/images/pxeboot/initrd.img
As of this time, for reference, this is my complete main.ipxe file:
#!ipxe

set url    http://${next-server}/
set initrd ${url}initrd/
set iso    ${url}iso/
set kernel ${url}kernel/
set ucode  ${url}ucode/

menu
item exit                 Exit iPXE and continue BIOS boot
item --gap -- --------------- iPXE Install Menu ---------------
item arch                 Arch Linux 5.18.7
item bodhi                Bodhi 6.0.0
item centos               CentOS 7
item debian               Debian 11.4.0 (Requires Internet)
item elementaryos         ElementaryOS 6.1
item fedora-s             Fedora 36 Server
item fedora-w             Fedora 36 Workstation
item kubuntu              Kubuntu 22.04 LTS
item lubuntu              Lubuntu 22.04 LTS
item manjaro              Manjaro 21.3.2
item mint                 Linux Mint 20.3
item peppermintos         PeppermintOS
item popos                PopOS 22.04 LTS
item rocky                Rocky 9.0
item ubuntu-d             Ubuntu Desktop 22.04 LTS
item ubuntu-s             Ubuntu Server  20.04 LTS
item xubuntu              Xubuntu 22.04 LTS
item --gap -- -------------------------------------------------
choose target && goto ${target}

:arch
kernel ${kernel}arch/5.18.7/vmlinuz-linux
initrd ${ucode}arch/5.18.7/amd-ucode.img
initrd ${ucode}arch/5.18.7/intel-ucode.img
initrd ${initrd}arch/5.18.7/initramfs-linux.img
imgargs vmlinuz-linux initrd=amd-ucode.img initrd=intel-ucode.img initrd=initramfs-linux.img archiso_http_srv=${iso}archlinux-2022.07.01-x86_64/ ip=dhcp
boot

:bodhi
kernel ${kernel}bodhi/6.0.0/vmlinuz boot=casper ip=dhcp url=${iso}bodhi-6.0.0-64.iso initrd=initrd.gz
initrd ${initrd}bodhi/6.0.0/initrd.gz
boot

:centos
kernel ${kernel}centos/7/vmlinuz root=live:${iso}CentOS-7-x86_64-Minimal-2009.iso initrd=initrd.img
initrd ${initrd}centos/7/initrd.img
boot

:debian
kernel ${kernel}debian/11.4.0/vmlinuz initrd=initrd.gz
initrd ${initrd}debian/11.4.0/initrd.gz
boot

:elementaryos
kernel ${kernel}elementaryos/6.1/vmlinuz boot=casper ip=dhcp url=${iso}elementaryos-6.1-stable.20211218-rc.iso initrd=initrd.lz
initrd ${initrd}elementaryos/6.1/initrd.lz
boot

:fedora-s
kernel ${kernel}fedora-s/36/vmlinuz inst.repo=${iso}Fedora-Server-dvd-x86_64-36-1.5 initrd=initrd.img
initrd ${initrd}fedora-s/36/initrd.img
boot

:fedora-w
kernel ${kernel}fedora-w/36/vmlinuz root=live:${iso}Fedora-Workstation-Live-x86_64-36.iso initrd=initrd.img
initrd ${initrd}fedora-w/36/initrd.img
boot

:kubuntu
kernel ${kernel}kubuntu/22.04/vmlinuz ip=dhcp url=${iso}kubuntu-22.04-desktop-amd64.iso initrd=initrd
initrd ${initrd}kubuntu/22.04/initrd
boot

:lubuntu
kernel ${kernel}lubuntu/22.04/vmlinuz ip=dhcp url=${iso}lubuntu-22.04-desktop-amd64.iso initrd=initrd
initrd ${initrd}lubuntu/22.04/initrd
boot

:manjaro
kernel ${kernel}manjaro/21.3.2/vmlinuz-x86_64
initrd ${ucode}manjaro/21.3.2/amd_ucode.img
initrd ${ucode}manjaro/21.3.2/intel_ucode.img
initrd ${initrd}manjaro/21.3.2/initramfs-x86_64.img
imgargs vmlinuz-x86_64 initrd=amd_ucode.img initrd=intel_ucode.img initrd=initramfs-x86_64.img miso_http_srv=${iso}manjaro-kde-21.3.2-220704-linux515/ ip=dhcp
boot

:mint
kernel ${kernel}mint/20.3/vmlinuz ip=dhcp url=${iso}linuxmint-20.3-cinnamon-64bit.iso initrd=initrd.lz
initrd ${initrd}mint/20.3/initrd.lz
boot

:peppermintos
kernel ${kernel}peppermintos/vmlinuz
initrd ${initrd}peppermintos/initrd.img
boot

:popos
kernel ${kernel}popos/22.04/vmlinuz.efi boot=casper ip=dhcp url=${iso}pop-os_22.04_amd64_intel_10.iso initrd=initrd.gz
initrd ${initrd}popos/22.04/initrd.gz
boot

:rocky
kernel ${kernel}rocky/9.0/vmlinuz inst.repo=${iso}Rocky-9.0-x86_64-minimal initrd=initrd.img
initrd ${initrd}rocky/9.0/initrd.img
boot

:ubuntu-d
kernel ${kernel}ubuntu-d/22.04/vmlinuz ip=dhcp url=${iso}ubuntu-22.04-desktop-amd64.iso initrd=initrd
initrd ${initrd}ubuntu-d/22.04/initrd
boot

:ubuntu-s
kernel ${kernel}ubuntu-s/20.04.3/vmlinuz ip=dhcp url=${iso}ubuntu-20.04.3-live-server-amd64.iso initrd=initrd
initrd ${initrd}ubuntu-s/20.04.3/initrd
boot

:xubuntu
kernel ${kernel}xubuntu/22.04/vmlinuz ip=dhcp url=${iso}xubuntu-22.04-desktop-amd64.iso initrd=initrd
initrd ${initrd}xubuntu/22.04/initrd
boot

:exit
exit
Booting an OS from an iSCSI LUN
Booting from an iSCSI LUN requires a few operations to take place.
- DHCP needs to be modified.
- The OS needs to be modified.
Modifying DHCP
In a previous step DNSMASQ or ISC-DHCP-SERVER was configured. To make sanboot work some additional values need to be added to their configuration files.
DNSMASQ
NOTE: Currently DNSMASQ can only be used in one of two configurations:
A. For the installation of Operating Systems.
B. For the booting of disk-less clients.
Both may or may not become an option at a later time.
To use DNSMASQ for booting from an iSCSI LUN we need to modify the previously configured /etc/dnsmasq.conf file.
port=0
tftp-root=/pxe-boot
dhcp-no-override
pxe-prompt="PXE booting in", 30
pxe-service=X86PC, "Boot from network", undionly.kpxe
pxe-service=X86-64_EFI, "Boot from network", ipxe.efi
dhcp-range=192.168.0.202,proxy
dhcp-boot=,,192.168.0.202
To follow the following format:
port=0
tftp-root=/pxe-boot
dhcp-no-override
pxe-prompt="PXE booting in", 30
pxe-service=,,
dhcp-range=192.168.0.227,proxy
dhcp-boot=,,192.168.0.227

dhcp-host=set:sanboot,00:02:c9:56:ab:aa
dhcp-boot=tag:sanboot,ipxe.efi1
We remove the iPXE entries for Legacy & UEFI clients replacing it with pxe-service=,, because something still has to tell DNSMASQ that we want iPXE functionality enabled.
After this static entries can be made line by line with
dhcp-host=set:sanboot,00:02:c9:56:ab:aa
dhcp-boot=tag:sanboot,ipxe.efi1
Each of these point to a single NIC MAC and a single iPXE file to chainload. This gives you the ability to assign sanboot disks to clients on a Legacy & UEFI basis.
Additional entries can be made as such:
dhcp-host=set:sanboot2,00:02:c9:56:ab:ab
dhcp-boot=tag:sanboot2,ipxe.efi2

dhcp-host=set:sanboot3,00:02:c9:56:ab:ac
dhcp-boot=tag:sanboot3,ipxe.efi3

dhcp-host=set:sanboot4,00:02:c9:56:ab:ad
dhcp-boot=tag:sanboot4,undionly.kpxe1
ISC-DHCP-SERVER
We need to designate three values:
- A MAC address
- A Static IP
- A filename
As far as ISC-DHCP-SERVER is concerned that is added to the /etc/dhcp/dhcp.conf file in the following format:
host client-name1 {
hardware ethernet 00:02:c9:56:ab:aa;
fixed-address 10.0.0.50;
filename "undionly.kpxe0"; }
This over-rides the default parameters we designated at the top of the file if a NIC with the MAC address 00:02:c9:56:ab:aa requests an IP. You will have to find and note down the MAC for each client you want to sanboot and what file you want to point them to. Multiple of these entries can be made so long as their parameters don’t overlap:
host client-name1 {
hardware ethernet 00:02:c9:56:ab:aa;
fixed-address 10.0.0.50;
filename "undionly.kpxe0"; }

host client-name2 {
hardware ethernet 00:02:c9:56:ab:ab;
fixed-address 10.0.0.51;
filename "ipxe.efi0"; }

host client-name3 {
hardware ethernet 00:02:c9:56:ab:ac;
fixed-address 10.0.0.52;
filename "ipxe.efi1"; }
Modifying the Operating System
Now I have only successfully tested this with Ubuntu Server. It will not work with Ubuntu Desktop since this method requires that the iscsiadm package be pre-installed but this should be possible on other distrobutions of Linux.
Connecting to the iSCSI Disk
From the Ubuntu Server installer once it asks you about configuring the Ubuntu archive mirror DON’T CLICK DONE! Go up to Help → Enter Shell. You’ll have an easier time if you can SSH into the shell for everything you have to enter but it’s up to you.
First run a discovery request to the server hosting the iSCSI targets: iscsiadm -m discovery -t sendtargets -p 10.0.0.254
Then connect to the LUN you want: iscsiadm --mode node --targetname iqn.2021-11.ipxe.com:lun1 --portal 10.0.0.254 --login
From here go back to the Ubuntu archive mirror window and click Done. The iSCSI disk you connected should appear as a disk to install Ubuntu Server on. Go ahead and follow the setup steps as you would normally except when it reaches the end of the installation process DO NOT PRESS REBOOT NOW! Go back into Shell. We have more changes to do.
Once you’re in Shell start by running these commands:
mount --bind /dev /target/dev
mount -t proc proc /target/proc
mount -t sysfs sys /target/sys
chroot /target
hostname -F /etc/hostname
These switch our effective system from the live media over to the iSCSI LUN.
Starting open-iscsi at System Boot
To make sure the open-iscsi driver starts at system boot: echo "iscsi" >> /etc/initramfs-tools/modules
Altering GRUB
Next edit grub: /etc/default/grub
Modify GRUB_CMD_LINUX_DEFAULT to look like this substituting IP’s and iSCSI variables for your own where appropriate: GRUB_CMDLINE_LINUX_DEFAULT="ip=dhcp ISCSI_INITIATOR=iqn.2021-11.ipxe.com:lun1 ISCSI_TARGET_NAME=iqn.2021-11.ipxe.com:lun1 ISCSI_TARGET_IP=10.0.0.254 ISCSI_TARGET_PORT=3260"
When you’re done save the file and update-grub.
Altering Initiator Name
- Overwrite initiatorname.iscsi
- Create iscsi.initramfs
- Update initramfs
echo "InitiatorName=iqn.2021-11.ipxe.com:lun1" > /etc/iscsi/initiatorname.iscsi
touch /etc/iscsi/iscsi.initramfs
update-initramfs -u
At this point in time you can exit shell and reboot the server.
So, order of operations. What should happen now if you have PXE/iPXE set as your primary boot device is:
- PXE/iPXE queries the DHCP service for it’s assigned IP address meanwhile collecting the TFTP IP & Filename to fetch.
- PXE/iPXE queries the TFTP service for the file. Chainloads (downloads) it, and boots it.
- The now updated iPXE image runs the embedded script we wrote and:
- Queries DHCP for it’s assigned IP again.
- Sets the initiator-iqn.
- Makes a sanboot request to the initiator-iqn.
- This starts loading GRUB. GRUB queries the iSCSI service based on how we edited GRUB_CMDLINE_LINUX_DEFAULT.
- As the OS starts to load it starts the iscsi module and queries the iSCSI service based on how we edited /etc/iscsi/initiatorname.iscsi.
- And finally after this process finishes the system wraps up what other data it needs to load into memory from disk. We have a successful SAN booted server!

Compared to everything it took to get here installing a desktop is trivial. My personal long term testing showed this arrangement is very stable/reliable.
Conclusion
These are two fantastic features of iPXE I wish I saw more broadly used in the enthusiast community. Regardless I hope someone finds this information helpful. Installing Operating Systems is going to receive periodic updates from me. Booting over a SAN is more or less complete with the exceptions of using DNSMASQ with multiple iPXE files and finding more distros that can be setup for sanboot. I may invest time to update those.
If people have any thoughts they want to share, questions, or know how to improve the guide I’d love to hear them.