Devember 2022 - Better Windows audio control, MixerFixer [Completed!]

Hi all

Plan is to create a little Windows app that will improve on the default audio mixer control thing that’s been around and has hardly changed since Vista.

I know this is not a new idea and similar apps already exist like Windows Audio Volume Manager or EarTrumpet, but I wanted my own thing. In fact, Windows Audio Volume Manager does pretty much everything I want except it has no dark mode, no microphone control, and I wanted to try something different and use HTML for the UI.

Goals - Primary:

-Easily change Master, Application, or Microphone volume (Mouse click drag slider, scroll wheel)
-Easily toggle Master or Application Mute (Mouse right click)
-Store Master or Application volume in settings file so MixerFixer can restore values (LiteDB)
-Set default Application volume that MixerFixer will use when Applications start up.
-Have MixerFixer reset values to user settings if windows tries to change anything.
-QR Code to easily open with phone… just because.
-Theming

Goals - Secondary:

-Microphone boost
-Store and set display settings

Background

Sound: I’m one of those crazy people who has his master volume set to 100% and then I use the Mixer to set volume levels for individual applications. I’m not even really sure when I started with this setup, but I really like doing it this way… except when Windows decides otherwise and resets everything. I do have a mute key and volume control knob on my keyboard so I can quickly turn things down when windows resets everything.

That said, I’ve never really liked the UI, fine control of the levels has never been great, and everything is gone with a fresh install of Windows or if you plug your USB headset into a new USB port. If you switch devices, like turning on my Bluetooth set, all the levels need to be sit. To some extend, windows will remember the level for each device… until it doesn’t. Oh, and no dark mode!

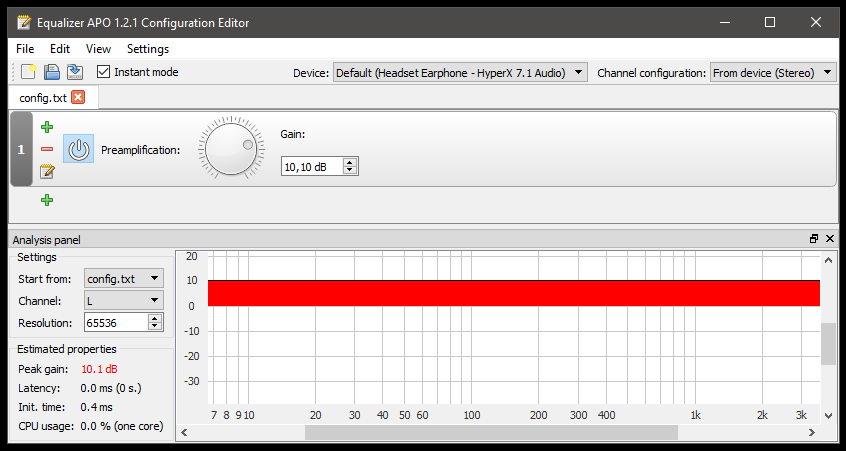
Mic: I’m using my HyperX Cloud II 95% of the time and although I find the mic to be pretty decent, it’s a little on the soft side even at max volume. Many years ago I came across Equalizer APO which you can use to set system wide EQ settings and also boost your microphone. This is one of those set and forget apps and so I’ve continued to use it just for the mic boost, but it is kinda overkill for what I need. I don’t know if I’m going to be able to achieve this kind of boost feature and that’s why it’s a secondary goal and I don’t over promise. I do really want it though.

Display: I have 4 monitors, but only 3 are always in use. The 4th monitor is a 32" I use for watching movies, series, or youtubes and so it’s disabled in Windows almost all the time. I have a shortcut on my desktop that I use to enable or disable this monitor. Now… in Windows 8.1 this worked great as 8.1 would remember the position of the 4th monitor when disabled or enabled. Win10 does not do this and I’m fed up with having to go into the Display Settings to drag the monitor to the correct position every time I enable it. I’ve never tried anything like this and so it’s a secondary goal, but this is another feature I really do want.

HTML?: I could do this with just WPF, but I figured I need to make this harder and use HTML. This will give me a chance to try out WebView2 and SignalR which I’ve never used before. Also, I can then access the mixer controls from anything with a browser like my phone.

Right now… a lot of you are like:
why-pastor

I want to make my own, learn some new stuff and I want to see it exist. I think it will be cool and I rarely do things anymore just because I think it’s cool. I used to things for no other reason than thinking it’s cool when I started playing with computers in the late 90’s, but it’s a rare thing these days with a full time job constantly eating away at my creativity and will to actually do it. Devember is a way to push me to actually do it.

I’ve hosted an HTML page in a WPF app before with MDF Thingy, but that did not use HTML for the UI in WPF it self. The HTML was only for the external devices.

I have actually done some experimentation with this idea and slapped together a quick and dirty prototype and made a short video.

Link back to Recap: Take me to recap!

5 Likes

I actually started the new project yesterday, the 1st, and was waiting for the official announcement, but since I’ve started I figured I should start updating.

GitHub Link: https://github.com/Nicks182/MixerFixerV1

I doubt I will be able to work on this everyday as I do have a full time job and we have constant rolling blackouts.

First update

I’ve created a new project and set most of the ground work in place.

Telling windows what to do:

I’ll be using NAudio along with my own little wrapper class to further simply things. The main classes I’m interested in for now is the MMDevice class and the AudioSession class. My wrapper class will manage either a Device or a Session (application) and has a few functions like:
-Get_PeakVolume (Gets the audio level… used to animate the level bars(UV meters?))
-Get_Mute (return true or false if device or session is mute)
-Get_Volume (Gets the current volume value of device or session)
-Set_Volume (Sets volume value for device or session)

This means I have one object I interact with and this object will internally set or get the correct values based on whether it’s a Device or a Session.

There are also a few events to detect changes like when a new app starts up or is shutdown which I can use to update the UI.

Comms between UI and back end

I’m using Kestrel inside of a WPF app to host the html page and this also allows you to access the page with a browser on the local machine or from over the network. I’m also using SignalR. I’ve never used websockets for anything and it took a little to get it to do what I want. I’m quite sure I’m not using it quite right, but I have a timer class that will push an update to the UI every 30ms so we can see the audio levels bounce up and down on the screen. This is very much not needed and I was worried that performance might be an issue, but it turned out to run really well with about 1-2% CPU usage overall. WebView2 is also performing quite well, but that’s kinda to be expected since it’s based on chromium.

HTML, CSS, & Javascript

I have a wwwroot folder that holds the html page and the bundled css and script file. This whole folder gets embedded into the final exe. I’m using BundlerMinifier.Core to bundle and minify all my script and css file into single files. This means I can have many smaller files that are easier to manage and they all get combined into single files automatically. I’m sure there are probably better ways to do this, but I like this and I’ve used it before.

As for the HTML it self… this is where things get a little… errr… different. I could use something like Handlebars.Net, but I’ve decided that I want to try/experiment with something of my own making. I’ve already done some benchmarks and my method is faster, less ops, but uses more memory which means more GC. So I should be using Handlebars.Net, but with something this small I think it’s fine. I want to actually see it working and then maybe I can come up with a way to improve it. If I can’t, no big deal. Feedback very much welcomed.

I’ve created a class that will generate my HTML for me. This is an idea I’ve had for a while and so it came together pretty quick and it’s actually quite simple. First I have class that is my HTML_Object. This will contain info about what HTML element I want, what attributes it should have, and what child elements it should have. It also contains 2 functions, Add_Attribute and Add_Child.

Add_Attribute will actually first check if the object does not already contain an item with the same name and if it does it will append a space + Value to the existing item. This means you can call Add_Attribute like below and not end up with the same attribute more than once:

HTML_Object.Add_Attribute("class", "input");
HTML_Object.Add_Attribute("class", "shadow");

Actual function:

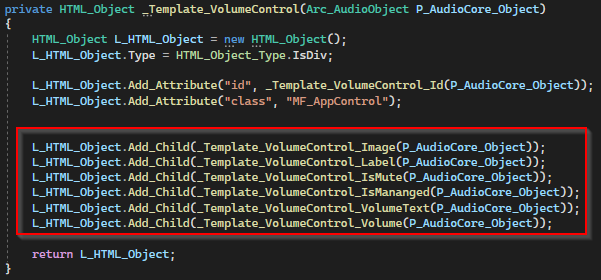
Add_Child simply allows you to easily add a child object. Nothing special here, but it does result in things looking a little nicer. Those functions will return HTML_Objects of their own and may add child object of their own.
image

So you create these functions and they act as your template. It’s also where you do your databinding. This way, the html generator can do a very simple loop from the top most object down to the bottom and just append without having to do any find and replace functions on strings.

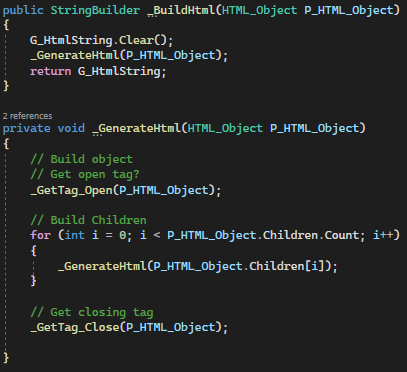
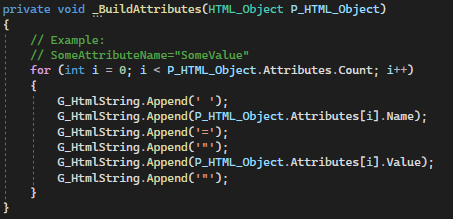
As for the generator it self, It contains a couple of methods that will create the stings for the HTML and appends it to a single StringBuilder instance and then returns that StringBuilder instance. Here I’m using recursion to drill down the objects I’ve created. Every time BuildHtml is called it will clear the StringBuilder and start again. It’s very simple and I’m already seeing parts of the code I should be able simplify, but that’s future me problems.

image

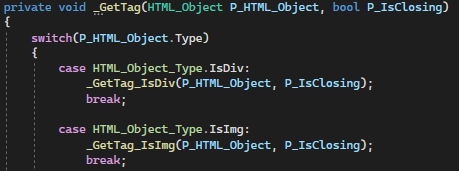
When the generator gets the opening tag, it goes through a switch case to figure out which tag and it will add any attributes at the same time. All happening in the correct order. Snipped of switch case:
image

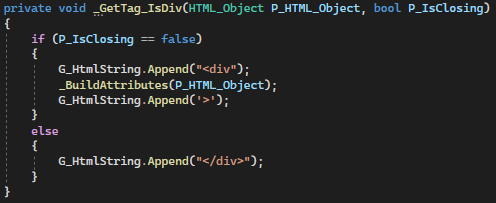
And here you can see all that is needed to build a simple div:
image

image

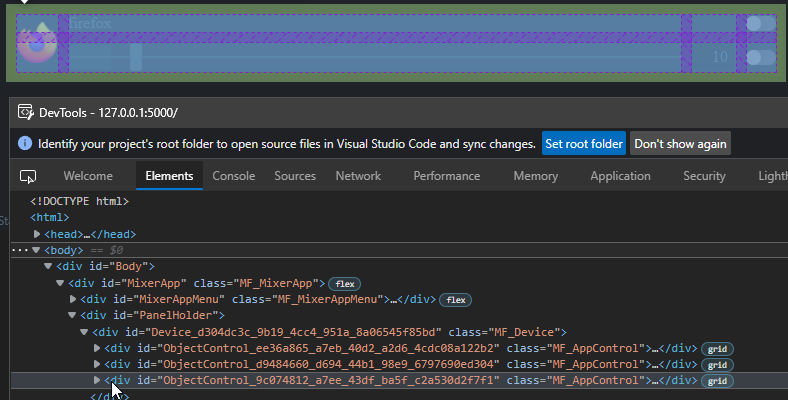
The CSS currently in use is just to get things going. I will be added a way to allow a user to change the colours. This will also need to be added to the WPF app so the title and footer bar matches the HTML part. I’m also heavily relying on CSS for layout. I don’t want to use tables unless it’s really needed. Nothing wrong with tables, but I find they are better suited for large tabular data sets. So things like display flex and display grid comes in very handy here. The volume control uses grid as one example:

I did add the GiHub link at the top and what is there as of the time of posting this is working, but with almost every feature still missing. All you can do is change the volume, see the bars bounce up and down with sound, and you can access it with a browser.

3 Likes

Update 1.1

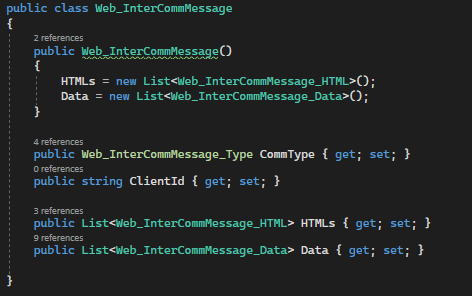
I never talked about how I’m sending data over SignalR. I have a class called ‘Web_InterCommMessage’ and an instance of it is always used to either send info (like user input) from the page to the backend or from the backend to the page.

Below it what the class basically holds:
image

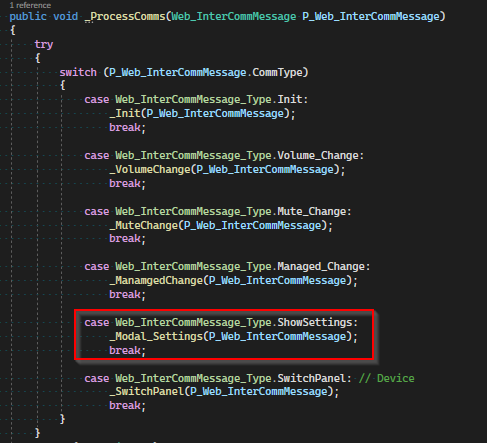
CommType will determine what kind of message it is and on both the page/script and the backend there is a single function that will run a switch case on this CommType and then call the correct function to process the “Message”.

Back end function:
image

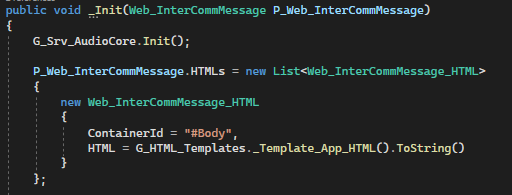
_ProcessComms will run the right function and update/mutate the Message object and then return that same Message Object. In the case of _Init, the Message will be updated with the needed HTML to be placed on the screen. The Init function will also setup the Audio controls in my AudioCore class that does all the talking to Windows:
image

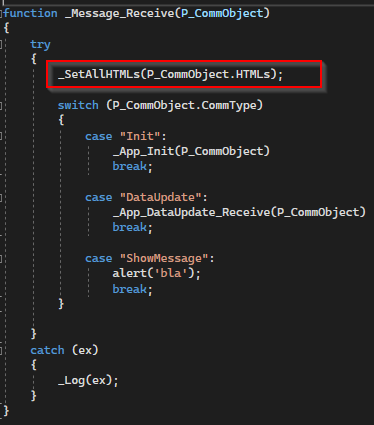
Then on the page side we have the _Message_Receive function that will again use a switch case to determine what the right resulting function is to process the Message object. It will also always try and add any HTML to the page if the Message Object has any HTML in it.
image

image

This is obviously still a work in progress and I will be adding a proper Show Message function which will be used to show errors or warnings. In the _ProcessComms function you can see that I change/mutate the Message Object in the Catch to rather show the error.

As part of the Init process I also start the timer that will constantly push updates to the page. This is how we get to see the bouncing bars/uv meters. It will also update the volume sliders.

The _GetData function will clear all Data items in a Global Message Object, fill it with updated data from my AudioCore object, and then send the Message Object to the page where it will be used to update the UI. Right now this timer runs every 30ms.

With this Message Object I have a standardized way of transferring info between the page and the backend and if something goes wrong I just mutate the Message Object to reflect what might have changed. Everything goes through _ProcessComms on the back end and Message_Receive on the front end.

1 Like

Update 2

Today I had to do some work around the house and I really needed to reinstall Windows on my desktop. I’ve been using my old Samsung 750 Evo I bought back in 2017 as a boot drive, but recently I’ve been getting file system errors. I got new 250Gb Samsung NVME drive as a replacement and now have a nice clean Windows install.

So I tried starting up MixerFixer, but WebView2 would not load. There were no errors, but after some investigation I realized that I did not have the WebView2 runtime installed even though windows is fully up to date. I had a bit of time so I fired up my Dev VM and added a check for the Runtime.

The app will start up, check for the runtime, and show a message with a link to the Microsoft download page for the runtime. I added a timer that will check for the runtime every 1 second and once found it will hide the message and add a WebView2 instance to the screen which in turn will then load the web page. See video below.

I would prefer to not require the runtime to be installed, but making the app truly self contained with WebView2 can make it very large (300Mb) and usually the runtime should be installed anyway. The app worked fine on my brother’s Win8.1 system without needing to manually install the runtime. So I think this is a good backup way to deal with it.

1 Like

Update 3

Was able to squeeze a bit of dev on this in today, but in an hour of posting this I will have another power outage.

I changed the level meter for each audio object (device or app) to show the left and right channels instead of just the master. Some objects won’t have channels like the Mic, but in that case I set the Master value to both the left and right level meters.

Example of getting Left channel level, else return Master.
image

I also made the animation for the volume meters a little smoother by increasing the transition time in CSS to 100ms. The app will still push updated info to the UI every 30ms, but this combo makes it look a lot nicer. If I match the CSS transition with the update, 30ms, then it looks it has a little stutter. Below is a video of what it looks like now.

I’m now also handling some of the events triggered by changes made outside of MixerFixer (Like windows mixer) better and reduced the amount of data being pushed by the background timer every 30ms. Before I sent the current volume level and mute status with this update, but now the update only sends level data and the Volume Change event will push an update to the UI when a change is made outside of MixerFixer to volume or mute.

The app will now also save any changes you make to volume or mute in the DB. If you now turn on IsManaged for a device or app then MixerFixer will override the settings if changes from outside MixerFixer is detected. In the video below you will see that once I turn on IsManaged, MixerFixer will reset the volume to what is stored in the DB and it will also stop the user from changing the volume or setting the mute from outside MixerFixer.

Can now set the Mute by Right Clicking on an object.
Can now change volume with mouse wheel while holding CTRL. (This is so you can still scroll the page up or down without the event being caught by the sliders)

I wanted to spend some time on the UI, but I’m kinda at a loss as to what I can do with it to make it look nicer. Any input or feedback here is welcomed.

So not a huge update, but progress is progress. Github is updated with latest stuff and things.

Update 3.1

Wanted to play a little and access the app from my phone, but it would just time out. Had a quick look at my Startup code and noticed I had a restriction that only allows connections from the local machine the app is running on. Took that out and it works. I think that was something I copied, but doesn’t make any less of an idiot :stuck_out_tongue:

It does work now and it’s a weird feeling to see the app in a browser on your phone react to what is going on in Windows in real time. And then being able to change the volume like this and seeing MixerFIxer, the page in browser on desktop, and Windows Mixer update in real time is just as weird.

It’s weird because I don’t think stuff like this really exist for Windows. I know you get all kinds of web interfaces to control all sorts of stuff for Linux, but here I’m not even using IIS. As long as the WebView2 runtime is installed, all you need to do is double click the exe.

I think it’s pretty neat.

Github updated.

1 Like

Update 4

Another small update, but this coming week I should have more time to work on this and then get to some of the bigger features.

Added default app volume.
-When the app runs for the first time, the default app volume will be set to 10%. This will be something the user can configure.
-This means that MixerFixer will set any application’s volume to a set Default IF that application is NOT marked as Managed.
-If MixerFixer is set to Manage an app, then it will always try and restore the app’s volume based on what is stored in the local DB.

I’ve also done some tweaking to the UI. Still not happy… I think it’s the colors that’s not quite right and I want to flip the toggle switches around so that ON=up. I think it’s kinda better than before… maybe. Once I’m more or less happy I need to go through and set some decent variable names to make it easier to theme.

That said, I am actually already using it on my main desktop. Since I was forced to reinstall windows, thanks to ASUS GPU Tweak garbage, MixerFixer is already useful in setting default volumes when non-managed applications start up and so they don’t blow out my ears :stuck_out_tongue:

Update 5

Worked on the Modal logic today and I started with a JSFiddle to figure out how I wanted it to work. I wanted to add the option to not have a background mask for the Modal which means it’s then more of a popup. In the past I would have either HTML with a background mask and HTML without the mask, or I would have extra logic to show or not show the mask depending on if I’m showing a Modal or a Popup.

I wanted Modal and Popup to be the same thing, same code, but with an option to have a background mask or not. I now have the main Modal div which then contains 2 other divs, the mask and content. If I’m showing a Modal, I make the mask’s width and height equal to that of the whole page. If it’s not a Modal, then I leave it alone. The mask will overflow the main div, but with a z-index of -1 it won’t interfere with the content. With this I can now just interact with one HTML item instead of multiple.

JSFiddle for more detail and working example:

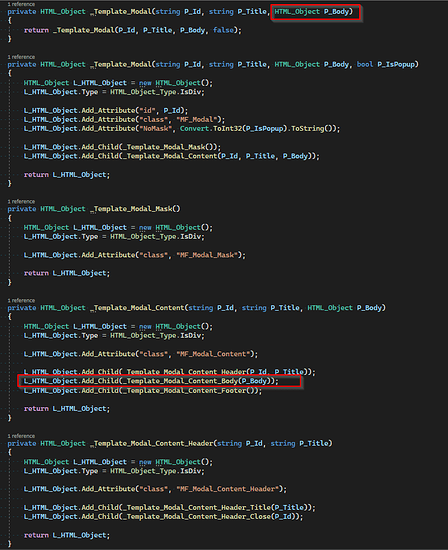
Then it was just a matter of turning it into a template in my HTML generation. So now I can create the Body for the Modal and then pass that to my Modal Template function which will fill in the rest. In this case it’s not quite as flexible as I’d like, but for this project I don’t need it to be. Below is a snippet of the Modal Template which accepts the Body content:

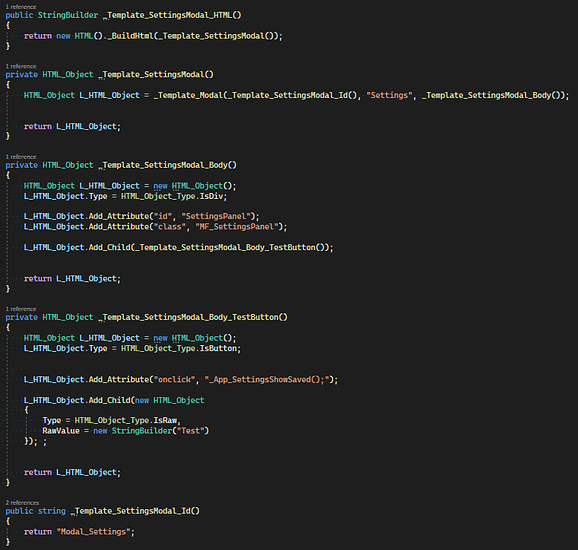
And what the Body template for the settings currently look like… I still need to turn it into something functional.

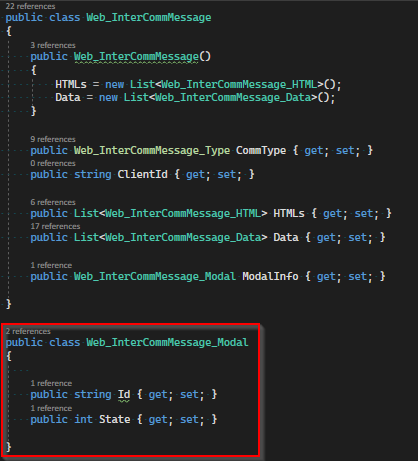
Then as part of my CommMessage object I added another property that will contain Modal Info and will allow the JS to either show or hide/remove a modal. Id is the Modal ID and State is either:
1 = Show
0 = hide/remove
image

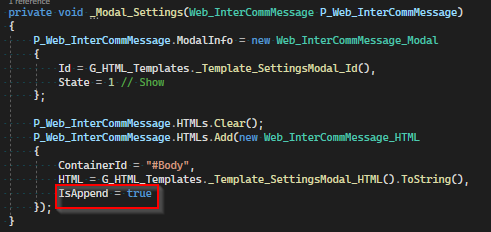
And then this all comes together when ProcessMessage is called, after user clicks settings button, which will then run the correct function to build the HTML and set the Modal Info to show the modal once it’s added to the page.
image

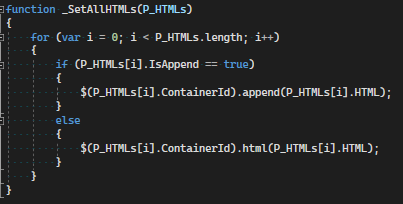
You can see here that I set the HTML to be appended. Default behavior would replace all HTML with new html in the specified container. In this case the container is the main one, Body, but we don’t want to replace everything on the screen with just the Modal. We want to add it and so we specify that it be appended.
image

And here’s the changed JS function that will either append or replace HTML that comes from the backend.
image

Video of Modal in action and you can see it will block out the background.

Obviously I still need to add all the config stuff to the settings modal, but now that the ground work is set that part should be quick-ish. I would have worked on it more, but I’m about to have more 3rd power outage for today :frowning:

Git updated.

Update 6

I have been tinkering with this bit by bit in between family visits ect and was able to tie it all together today. Sort of… I have a bug I’m having issues tracking down.

Summary

-Modal tuning and fixes
-Config settings added and functional.
-Device priority (set Default device)
-Added a bug… as you do…
-Logger for debugging

The Modal

In the previous update I talked about the Modal and how it’s Mask is a div that overflows the main div to create the mask. In that example I was using JS to set the height and width of the mask to that of the window. This came with 2 issues. First, I using JS when I could just be using CSS and the second issue was that the height and width was static and when content was added ,increasing the scroll height, you could scroll the mask and click behind it.

To fix this I changed the height of the mask to 100vh and the width to 100vw in CSS. These are known as ViewPort Units. Read more here:
CSS Viewport Units: A Quick Start

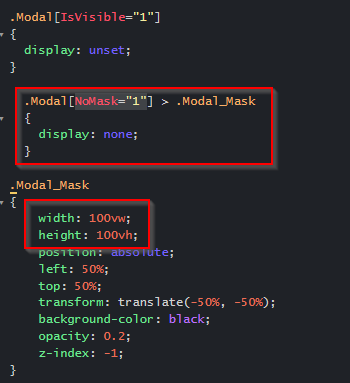
This meant I could do away with the JS that was setting the height and width before and the mask will now always fill the window regardless of scroll height/width changes. If I want to show a popup with no mask I just have to set a attribute on the main modal div, NoMask=“1”, and then CSS will set the mask’s display to none.

Below is a updated fiddle. Points of interests are:
The CSS changes…
image

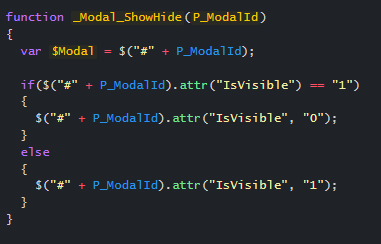
JS changes, now I can just set the attribute to make it visible or not.
image

Settings Modal

All the settings I initially planned to add to the modal are now there and functional.
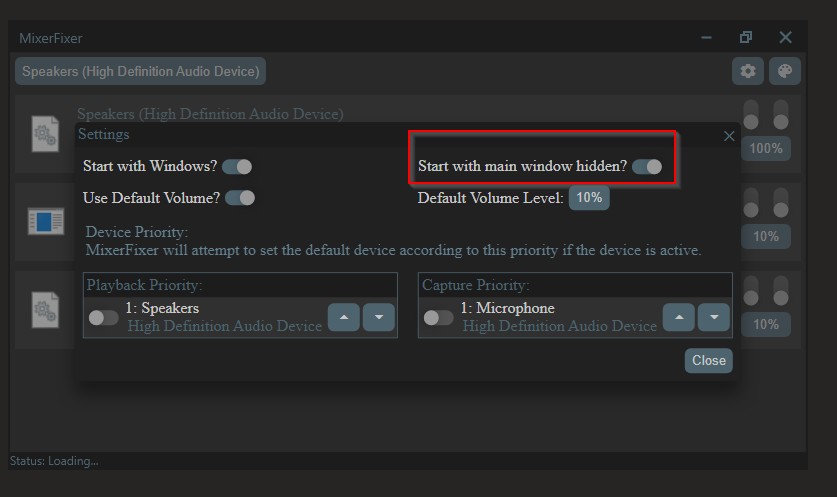
-Can enable whether MixerFixer should enforce a default volume for sessions/applications
-Can set what the default volume should be
-Can set a priority for devices
-Can set whether MixerFixer should enforce device default

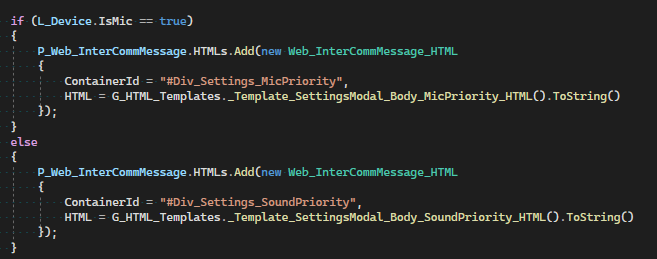
I will still add drag & drop, but for now the up and down buttons is how you change the device priority. When changing the order of a device, it will be updated in the background and the DB entries updated. Then it will re-render the HTML for that part of the page/modal and the page will be updated. Not the whole page, only the part I need updated. This way I don’t need extra JS logic to try and keep the frontend in sync with the backend. Just update the backend and re-render the part that needs updating on the frontend. This is less efficient as it will result in a tiny bit more memory usage, but greatly simplifies the code as I can just reuse the code and logic I already have to generate the HTML. In the below image you can see the if statement I have at the end of my Move function which will generate the new HTML to update either the Sound Priority Div or the Mic Priority Div.
image

Short clip of moving a device and the HTML being updated:

Device priority

This means that MixerFixer will now set a device as the Default depending on it’s priority and if it’s actually active. In the video below I turn on my bluetooth headset which is set to be the first priority. So when MixerFixer detects that the bluetooth set is active it will become the default. When I turn off the bluetooth set, MixerFixer will attempt to make the next active device the default which is my HyperX set.

But why?
This isn’t that big of an issue for me as my devices don’t change often. Windows handles this OK on it’s own if things remain simple. In my case I set my bluetooth set to be the default and then Windows will automatically switch between the bluetooth set or my HyperX set. However, if I plug a new device in Windows will automatically switch to it regardless of what my default is set to be. It assumes the new device is what you want to use, but that might not be the case depending on the device. As an example, my 4th monitor has speakers and is connected using HDMI, but I don’t want to use it’s speakers and instead want to use my bluetooth set. Again though, changing devices is very rare for me, but nice to be able to have the app just manage and set it how I want especially after a fresh windows install.

That said, some of my coworkers will jump around quite a few audio devices. Sometimes they will use the built in audio of the laptop, sometimes a bluetooth set they have at home, sometimes a wired set, and sometimes whatever they can find lying around the office. We mostly work from home and so we often make calls (using stupid teams) to help with support, troubleshooting, and obviously meetings. I will have to see, but maybe MixerFixer can help so that the default device is always properly set whenever they switch devices and we reduce the amount of times people have audio issues when starting a call.

The bug

When changing devices something gets messed up and I can’t change the volume anymore. I think it’s a cleanup issue and when switching devices the volume change event gets fired constantly resulting in the sliders just stuttering back and forth into infinity. I’m using VM to do all my dev work and so debugging it on my main desktop is difficult.

Logger

I added a quick and dirty logger class that gets an instance of my SignalR hub so I can now log stuff to the console in the browser and get a better idea of what is going on and I can use it to push error messages. I don’t know if this will stay… probably will as I’m sure I’ll run into many issues still especially when other people start using it.

Current struggles…

The main struggle points are the events being triggered like when volume is changed or device state changes. In fact, trying to use the DefaultDeviceChanged or DeviceStateChanged events resulted in many issues as these events always ended up being triggered multiple times for some reason even when device priority in MixerFixer was disabled and I was just changing devices in Windows. Most of my day was spent trying to get these events to behave, but I couldn’t get it to work properly. In the end I added another background timer that will check every 500ms if the current default device is the correct device and if not change it. But this has added extra CPU overhead. Not a lot, but too much for my liking. So I kinda need the events to work as I basically just want to check for Default device on startup and/or when Windows wants to automatically mess with it. I don’t think it’s needed that I have a timer constantly checking it, but we’ll see.

Anyway, a video of how things currently work. Again, I turn on my bluetooth set as soon as it’s active MixerFixer will make it the default. If I change the priority so my HyperX is first, MixerFixer will change the default device. If I then disable my HyperX, MixerFixer will set the default to the second device in the list, if it’s active, which now is my bluetooth set.

2 Likes

Update 6.5… kinda…

Spent some time this evening trying to get the events to behave and I got it to work, but the app reacts much slower to the device change. Not great, but I don’t need the timer in the background constantly checking if the current default device is the correct device.

Except, my high CPU usage didn’t go away. Something else was causing it and after some testing I found that if I don’t have any session set to be managed and I restart the app, then I don’t have the high CPU usage.

Turns out that when MixerFixer sets the volume automatically the OnVolumeChange event will also get triggered causing a chain reaction where MixerFixer will set the volume when the event is triggered, but the event gets triggered when I set the volume. So a nice infinite loop… yay.

The obvious fix is to check if the volume does NOT match what is stored in the DB and only then set the volume. Except… I was already doing this, but for testing I removed the check to try and solve the bug mentioned above in update 6 where the volume change event would end up in a infinite loop when changing devices and then trying to change the volume after.

So the fix for the first infinite loop results in a new infinite loop issue.

I actually don’t have any idea on how to fix this. I need the OnVolumeChange event so MixerFixer can stay in sync with Windows, but that event gets triggered every time I change the volume using MixerFixer.

I had another look at the example code from NAudio and everything I’m doing seems fine. The main difference is that when the VolumeChange event is triggered I check if the session is marked as Managed and if so I change the volume back to what is stored in the DB… which causes the event to trigger again.

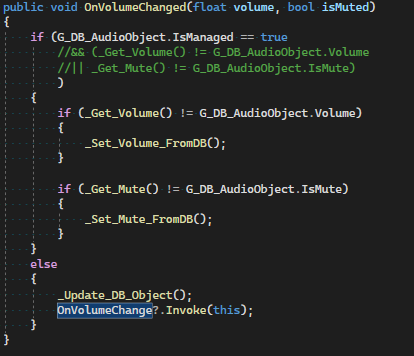
Below is what the event currently looks like. If the object that triggered the event is marked as Managed and the volume or mute does not match what is in the DB, set the volume and/or mute back to what is stored in the DB. Else update the DB with new values and pass the event up to the UI layer.
image

I am thinking about maybe using a single background timer that will check for volume changes and update the gui, or apply volume changes when changed in the gui. This way I then avoid the events completely and with that the infinite loops… maybe. But I’m gonna leave this issue for now and move on. Let the problem simmer in the back of head for bit and change focus.

Think I will do theming next as that’s just a screen where the user can set some colors. Then some polishing and make sure everything else is working.

I still want to try and tackle the mic boost idea, but I don’t think it’s quite possible on app level and I have no idea how to even do this. I need to intercept the Mic input, boost it, and then pass the boosted signal along and it seems I have to do this on a much lower level than ‘crappy little mixer app’ level. I have been trying to do research on this, but so far I’ve not really come across anything.

Tomorrow is a new day.

Update 6.5.1… or something…

I just couldn’t leave the infinite loop issue alone. Between 2-4am we had no power and I was lying in bed listening to all the alarms and dogs while trying to figure out why it looks like it will jump between values. This only happens after switching devices and if I then try and change the volume while it’s set to be managed. It will then just jump between the original value and the new value I set. If the volume was a different value each time the event was triggered then it would make sense that it ends up in a infinite loop of constantly setting the volume which in turn triggers the event.

But why would the value be different? Using break points while running it in the VM I can’t see any differences in the values, but then I can’t reproduce this issue in the VM either.

Then I thought that it’s maybe a instance issue. As part of my Audio Object class, which can be either the device or session(app), I have a instance of the DB entry for this object. This way I can easily update the DB by just referencing this single instance and I don’t need to get an instance each time I need to either check the values in the DB or to update it.

So I thought as a test I will remove this single instance and just get and new instance every time I needed the DB entry… and there my problem goes away…

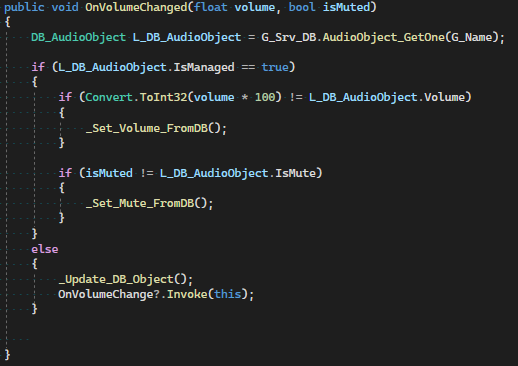
Below is what the event handler now looks like.
image

That said, this event still gets triggered numerous times when I change the volume using the Windows Mixer. This I can check and test using break points with the VM and even after the volume was changed back to X, the event will continue to trigger a couple of times after and I can see that the object’s volume matches what is in the DB.

The VM is where I do dev stuffs.

So let’s say MixerFixer is running and the volume is currently at 10. I then use the mouse wheel to change the volume in the Windows Mixer by one tick which changes the volume to 12. I know it’s 12 because I can check that using a break point in the event handler. So now MixerFixer will check this value, 12, against what is in the DB, 10, and because it does not match MixerFixer will set the volume back to 10.

However, here we see the event getting trigger twice and each time it shows the volume as 12 even though MixerFixer already changed the volume back to 10 the first time. After the first 2 triggers, it will trigger another 4 times with both the volume showing 10 and the DB value being 10 and MixerFixer not doing anything. So it triggers 6 times when it should trigger twice at most.

Somehow the handler seems to be added multiple times, but I’ve checked my code numerous times now and I don’t understand how. If I remove the one place I register the events, then nothing works which should mean that I am not attaching the handler multiple times.

O well, it seems to be behaving now at least and although the event is triggered 6 times in total it won’t actually do anything 6 times as it will only actually do something if the volume does not match the value in the DB.

My code is a bit of mess now as things didn’t quite turn out as I initially planned. It’s not horrible, I think, but can be a lot better if I redid a lot of it. This tends to happen when you are learning new stuff and experimenting and not knowing where everything might lead to. For now I’m going to focus on getting it as complete as I can and then I might redo some stuff with all the hindsight.

Git updated.

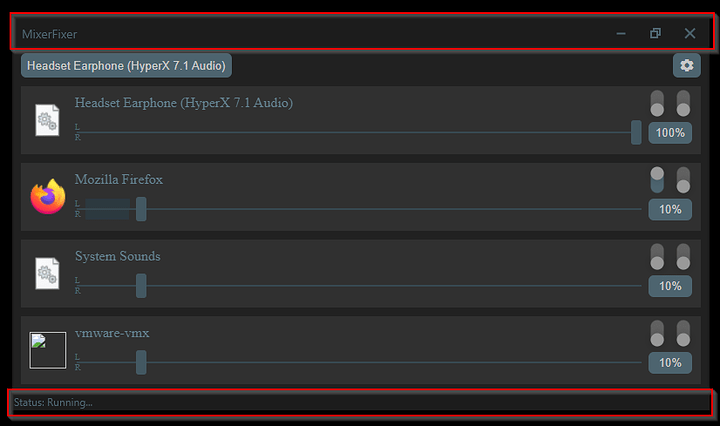
Next step, theming. This shouldn’t be that hard. Going to store some color values in the DB which then just gets turned into some CSS variables that will override the default variables. I also need to read some of these color values from the DB so I can make the WPF part of the window match the rest of the theme. See highlighted areas below.

Will go into more detail with the theming once I’ve done it.

1 Like

Almost update 7…

A little teaser, have to wait until tomorrow for full update…

EDIT: Just noticed I forgot to disable Dark Reader in Chrome so the colors are a little off there…

1 Like

Update 7… actual…

-More modal tweaks…
-Saving and loading of colors to DB added
-Modal to edit colors added
-Live Update of colors as user changes them
-WPF reading and applying color values from DB added
-Smooth scrolling…?

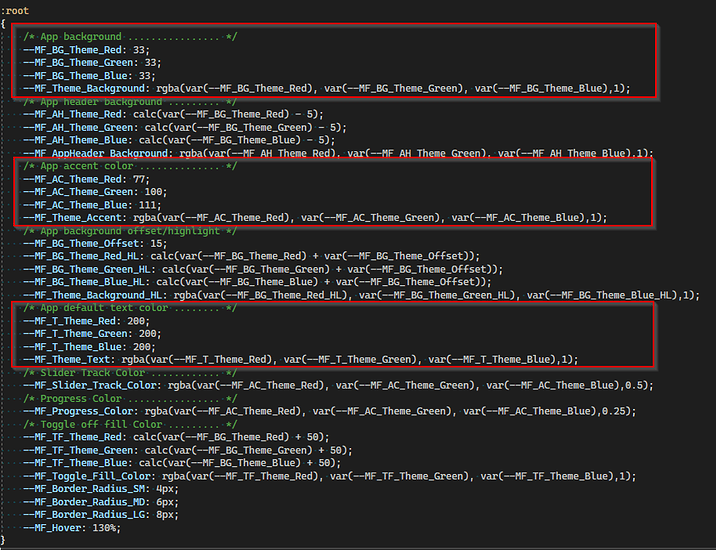
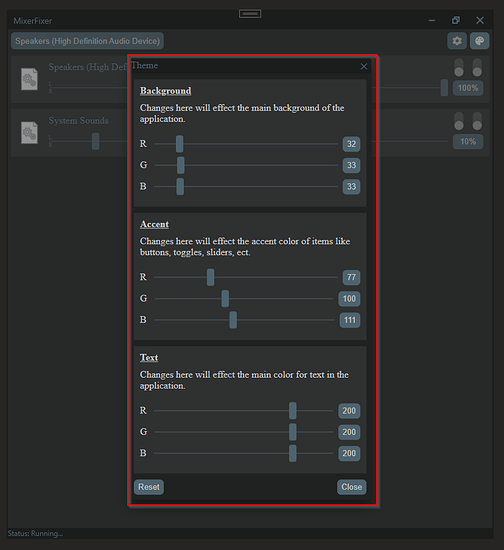
After some tweaking and tuning I ended up with only 3 colors that needs to be editable. I could do more and give slightly more control, but I can also add more if need be later.

The 3 colors are:
-Main background
-Accent
-Text

I have quite bit of CSS variables and some of the colors are derived from the main 3. Yes, adding or removing values from the RGB variables can result in numbers bigger than 255 or smaller than 0, but CSS handles this fine on it’s own and I don’t require extra logic. Even so, this is probably a terrible way to do things… but it works and seems to work well in that it’s not a performance issue…

At the start of the project I planned on having a color picker and storing the color as a hex value. This is fairly standard and I’ve seen this approach a lot, but I never really liked it. From an end user perspective I never really liked opening a screen, choosing some colors, and then only seeing the effect/result once I save my changes. Some apps require a restart before seeing the new colors.

So I decided that I would update the whole app live as you change colors. Then I decided to just have some RGB sliders for each of the main colors you can edit. I think the effect came out kinda cool.

Modal tweaks

Although the modal was working, it wasn’t working quite the way I wanted. I wanted the modal to be only as big as it needed to be for it’s content, but then also not be any bigger than the available windows size. This meant that if the content is too big that the modal should automatically enable scrollbars. This wasn’t working as it should as I was using height:100% so the div knew when to enable scrollbars, but this means that the modal would be the full height of the app even if the content was tiny. After some trial and error I figured out that I need to make my main Modal Div also display:flex and remove height:100% and then things started working. A little bit of tuning later and I now have a modal that will size to it contents or enable scrollbars if content is to big using nothing but CSS. The only JS here is to either show or hide it. The best way to see how it works is with the updated fiddle:

Saving colors in DB

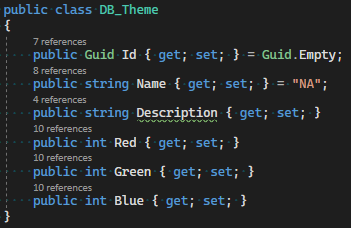
Nothing special here. Just 1 record for each of the 3 main colors storing the R, G, and B values. I should probably have called something other than ‘Theme’, but it will do.
image

Color editor modal

I did think to just add the RGB sliders for each of the colors to the settings modal, but decided a separate modal was better. Again, nothing really special here. I did add a reset button at the bottom though so it’s easy to reset things back to defaults.

Live color updates

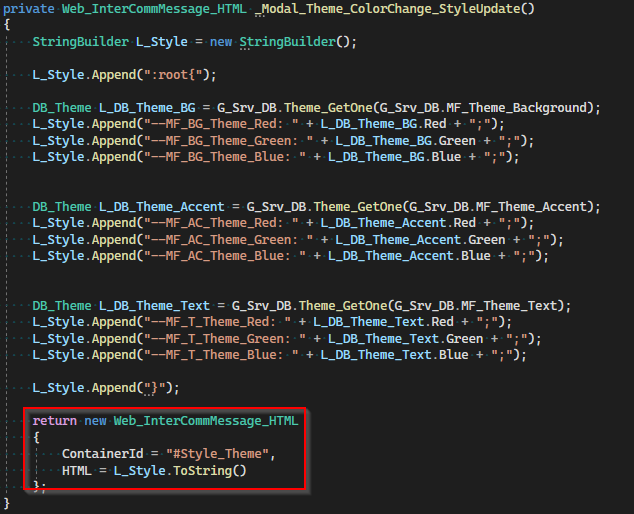
Because I’m using some CSS variables, all I have to do is create some overrides and place it on the page. This isn’t exactly an elegant or even efficient way to do it, but it was easy as I could once again just reuse a lot the mechanics I already built.

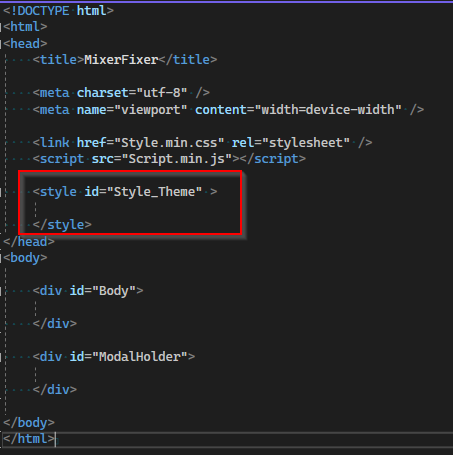
On the page I have a Style tag with a Id and when the user moves a slider it will instantly send the new value to the backend, update the DB, and then return some generated overrides for the required CSS variables which is placed in the Style tag. This uses the same mechanic used for added/replacing server side generated HTML to the page.

Style tag… and this is the whole index page BTW… everything you see the app do is generated on the fly.
image

Once the new int value has been saved to the DB I have to add the CSS variable overrides and also update the label that shows the current int value to the right of the slider being changed.
NOTE: The second line is to trigger WPF to load the new values. More about this in WPF section below.

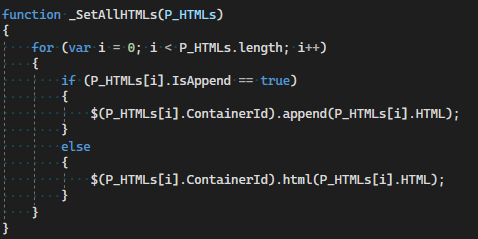
And here’s the overrides being build along with the container ID of where it should be added on the page. A piece of javascript will always try and add/replace what is on the page with what is in the message if the message has anything.
image

And just for completeness, the JS function handling any HTML strings coming from the server side/backend.
image

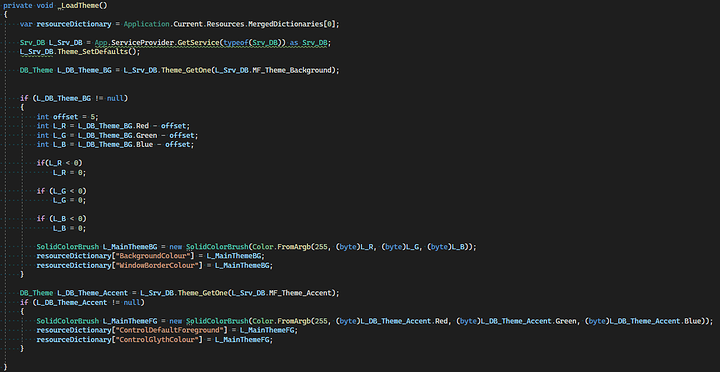
WPF update colors.

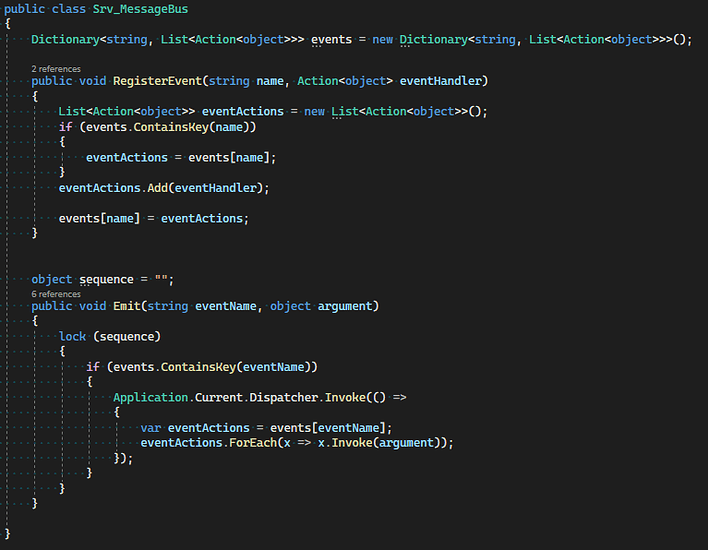
All of this is hosted inside of a WPF window and so I need to update the title and footer bar to match the colors. I added a simple message bus class at the beginning of the project for the purpose of easily pushing/triggering events in the WPF side of things and here is the first time I’m actually using it.

The messagebus class…

As part of my App class I add some singletons so I can use them anywhere in the app.
image

Then as part of my startup I register the ‘themechanged’ event and also manually call the _LoadTheme function to set the colors on app load.

And here we see _LoadTheme just get the colors from the DB, add a small offset as the window header and border is slightly darker than the main background, and also ensure we don’t have values less than 0 as C# doesn’t handle that quite as nicely as CSS as will default to 255 when going into a negative.

Smooth scrolling

Those of us who use FireFox might not even realize that smooth scrolling of HTML content is not a thing on Chrome or most chrome based browsers. This includes WebView2 which is based on the Chrome engine. I didn’t really notice until I was testing and making sure it all rendered properly in FireFox.

To get smooth scrolling in chrome… you need to enable it…

It took me a while to figure out how to enable this flag in WebView2, but by combining info about different issues people were having trying to enable other flags, I was able to figure out the correct string and now MixerFixer will have smooth scrolling for the HTML.
image

Below is a vid showing everything I talked about in this update, BUT… I’ve looked through my previous posts and I feel I can do better at explaining some of mechanics in MixerFixer and so I will start work on some better posts and visual aids. Not sure when I’ll post those, but for now I’ll just keep working on the app so that it’s at least done before the end of the month.

Git update + new build/zip:

1 Like

Update 8

Back at work this week, but I did make some progress.

Summary:
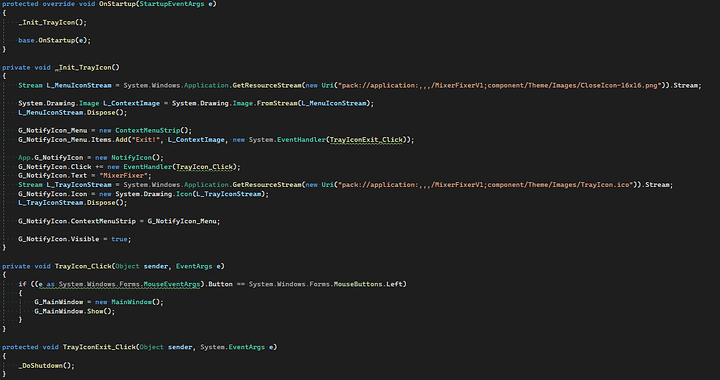
-Tray Icon
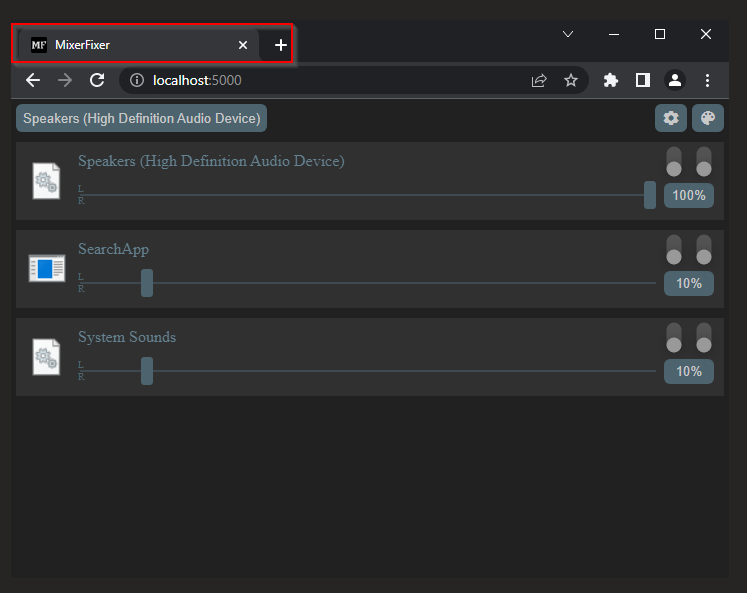
-Icon for when loaded in browser.
-Start with windows
-Start without main window

TrayIcon

Nothing that special here. During app startup I create a tray icon and a context menu with one item, Exit. If you left click the Tray Icon it will show the Main Window.

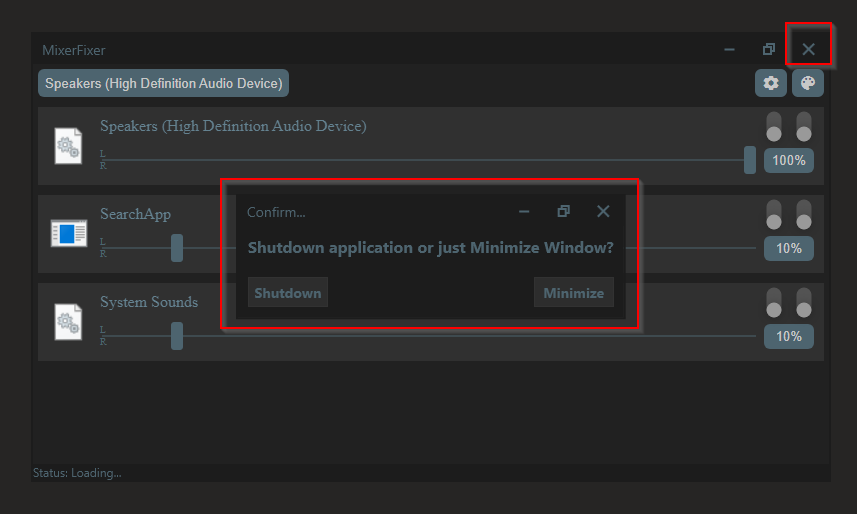
When closing the main Window, the user can either shutdown the whole app or just the Main Window. Although it says minimize, in reality the main window is killed off so it doesn’t eat up resources in the background for no reason.

Browser icon

Standard stuff, just the favicon for when loaded in a browser.

Start with Windows

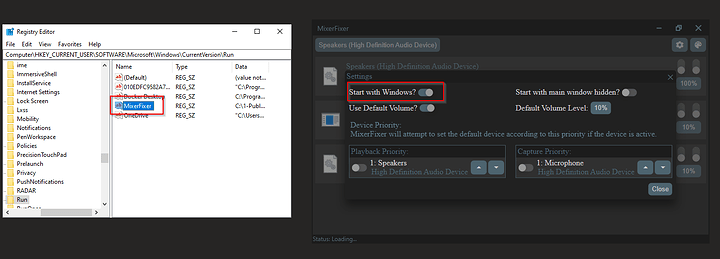
Under the settings the user can now enable ‘Start with Windows’ which will add it to the startup items in the registry. This is also pretty standard behavior and was fairly easy to add after a quick Google search.

One thong to note here is when apps are started like this, their working directory is System32. This meant I had to get the file path of the exe at startup so I can ensure the Settings DB is created inside the app’s folder and not System32.

I did have a small problem with getting the startup location of the app though. Below are some methods to do so and they all work fine when running the app in debug using visual studio, but as soon as I publish it as a single exe then these don’t work. After messing with this for a while I believe it’s because these methods rely on the ‘MixerFixerV1.dll’ to be a thing, but since it’s a single exe there is no dll.

In the end this method worked which would return the full path and file name of the exe. So I just needed to remove the name of the exe. Not exactly eloquent, but it works.

Start without Main Window

By default the Main Window will show when you start up MixerFixer. In the settings screen the user can now have MixerFixer startup without showing the main window. This combined with starting with Windows allows MixerFixer to just do it’s thing quietly in the background while still being accessible via the browser.

I’m now running the app permanently on my main system for about a day and so far it seems to be behaving. It’s not been a full day’s worth of running the app due to pretty bad rolling blackout we are having again. Today we have 3 power outages planned of which 1 session is 2 hours with no power and the other 2 sessions are 4 hours with no power :frowning:

Will have to see how things go during the week and I’m going to ask a friend at work to give it a try.

Github updated.

4 Likes

very thorough and detailed! bit above my understanding limit but i know enough to know how much work you’ve put into creating this

:star: :cookie:

4 Likes

Small check in…

I’m working on adding the ability to store and restore Display Settings. This means MixerFixer will be able to enable/disable, set resolution, and set position of a monitor based on data stored in the DB.

Unfortunately this has proven harder than I thought. I am using WindowsDisplayAPI and I’ve actually had a bit of a hard time figuring out how it works and using it. I’ve figured out most of what I need, but I’ve ran into an issue when enabling or disable a monitor.

A name in the Device class is changing when the monitor goes from Enabled to Disabled which means that you can’t enable the monitor again. I have an idea for a workaround where I store the required names myself and then add my own override method in the WindowsDisplayAPI project which will then allow me to specify the correct name manually, but I’ve reported the issue and made a demo project to show the issue.

It’s obviously VERY possible that I’m doing something wrong, but will wait to hear from the dev of the project.

Video of issue using WPF demo project below. You will see that the ‘ScreenName’ property changes from Display2 to Display1 after it’s been disabled. No idea why though. I’ve checked an all other data points to the correct display I’m trying to Enable, but the ‘ScreenName’ property seems wrong for whatever reason.

Again though, I might just be doing it wrong…

1 Like

Almost Update 9…

FINALLY figured out how to use the WindowsDisplayAPI. First with a WPF test app and once I was happy with the basics I started moving it over to MixerFixer.

Below is a sneak peak. Don’t pay to much attention to the UI and text of the new modal as most of it will almost certainly change.

I’m working on making Update 9 the last update regarding the app it self. After that I want to post some recap posts about how all of this is working.

Update 9 Actual

Summary:

-Custom port
-Microphone volume
-QRCode
-Store and set Display settings
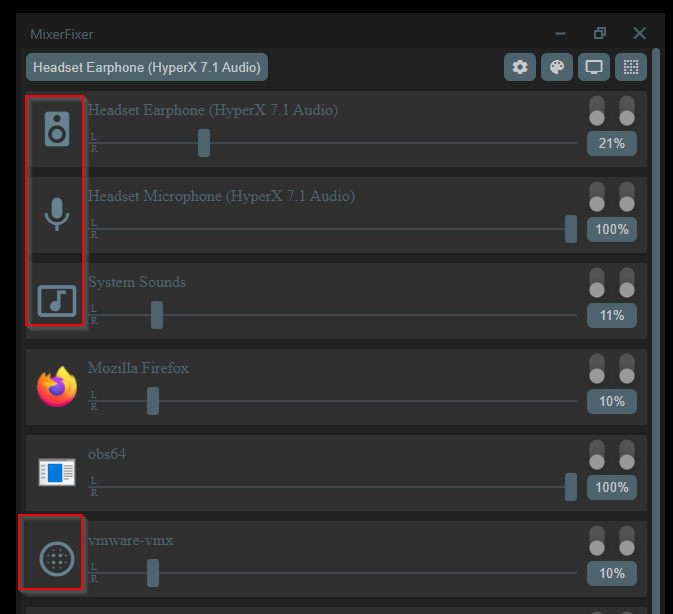
-Added icon for Speakers, Microphone, System Sounds, and if a app return the DLL icon
-Bad news, no Mic boost :frowning:

Custom port

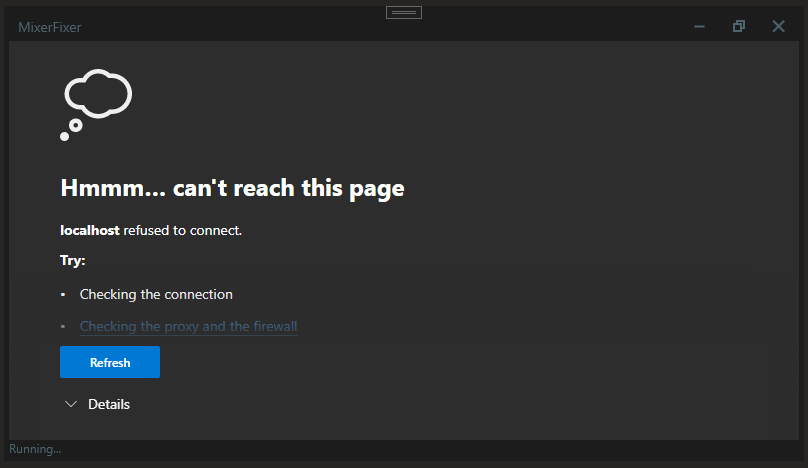
My friend tried the app on his work laptop and the port conflicted with a test site he had running so I decided to change the default port to 5555 and allow the use to set a custom port. Didn’t have any good ideas on how so I settled on creating a txt file called port and typing the number in the file.
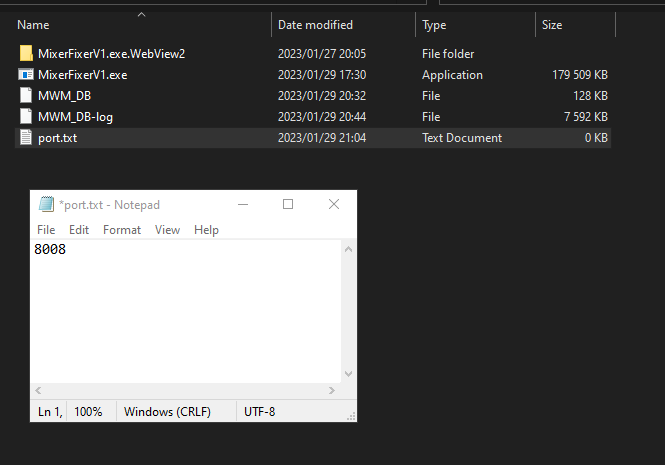
image

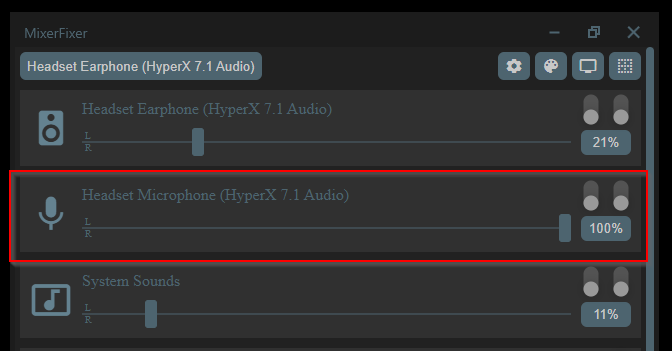
Microphone volume

I actually forgot about this. Only when I reviewed my original goals did I remember that I said I would allow changing of microphone volume. So I added that and it seems to work fine in my VM. I did forget that my HyperX cloud 2 does not allow you to change the microphone volume in Windows. I have to use the little wirid remote/DAC. For me this isn’t really an issue as I have the volume at 100% all the time anyway and the main issue I have is the fact that even at 100% volume the mic is too soft. O well… the volume slider is there and I’m sure it will be handy when I eventually switch microphones.
image

QRCode

For this I’m using a library I’ve used before, QRCoder. To show it I just added another modal. While the HTML for the modal is being generated, I get the local IP address, pass that to QRCoder which results in a Bitmap. I then convert that Bitmap to base64 and embed it in the HTML as the source for the HTML image control.

Below screenshot shows the HTML object being made for the modal. These objects then goes to the HTML generator to be turned into actual HTML.

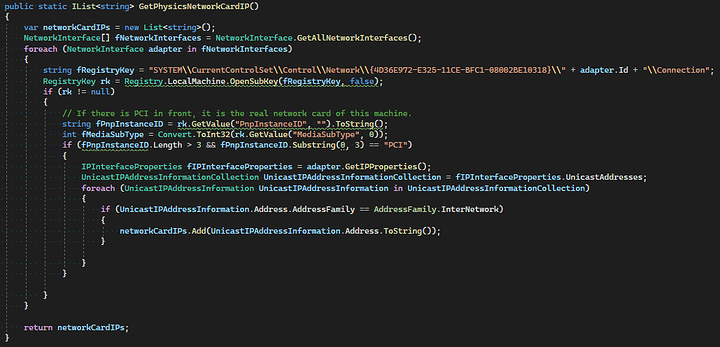
And below is the function that gets the IP address. My friend found that my old way of getting the IP address resulted in a IP address for a VPN instead of his physical device’s IP. This was due to things like FirstOrDefault() on the array of IPs. A quick google search let me to this function and it seems to be doing what we want and getting the IP of only physical adapters. It check the registry to make sure it’s a PCI device. This might not be 100% fool proof either, but until I can think of a better idea it will have to do.

Store and set Display settings

Finally, the big one. First, just a quick recap as to why. I used Windows 8.1 until late 2021 on my old AMD FX8320. I also used, and still do, an app called ‘MultiMonitorTool’. Win8.1 had zero issues with me using this tool to quickly disable or enabling a monitor with a shortcut on the desktop and it would always place the Display back in it’s position where I placed it. This is not the case in Win10. Every time I disable my 4th monitor, Win10 would reset it’s position and I then have to go into Display Settings and manually drag it back to the position I want. Well… no more!

This turned out to be much harder than I thought it would be… well… sort of. I found a library called DisplaySettings. It can store and set things like position and resolution. Exactly what I wanted… but… I wanted to be able to turn a display on or off using MixerFixer and this library can’t do that. After a day of trying to find a way to do it and not finding anything that actually works… I should have given up… should have.

I then proceeded to spend another 4 days trying to make this work. 2 of those 4 days was spent trying to figure out a different library I found, WindowsDisplayAPI. I was easily able to find the Display I wanted and then disable it, but I couldn’t Enable the Display. Eventually talked with the dev and it turns out that I was using legacy code and that I should be using a different class in the same library. He then also explained which classes I should use to do what I want and that it’s not a 100% as the data stored by Windows will be different after a reinstall or graphics card change. The only 100% reliable way of identifying a monitor would be the serial… if all monitors had it and you could read it from it’s properties.

Anyway, we have 3 classes that we want to be using. PathDisplaySource, PathInfo, and PathDisplayTarget.
In short:

  • PathDisplaySource is the source of what you want to display. This could be your main/only desktop, or your second/extended desktop.
  • PathDisplayTarget is what the source should be displayed on. Basically, which monitor you want your source to be on.
  • PathInfo connects your source and target(s). Each Path can only have 1 source, but could have multiple targets. In the case of a desktop clone, you have one source but 2 or more targets for example. In the case of an extended desktop, you’ll have 2 sources, 2 paths, and at least 2 targets.

The PathInfo object will contain a property for the Source and an array of targets. So for the most part you only really need to work with the PathInfo object.

The dev also pointed me at another project of his, HeliosDisplayManagement, which uses his WindowsDisplayAPI library that I can use as an example and with all that I was able to make my idea a reality.

In the end, I get all the Active Paths, I then serialize the ones I want as JSON and store it in the DB. This is exactly how it’s done in HeliosDisplayManagement. I can then at a later stage pull this json and de-serialize it back into a PathInfo object which allows me to restore a display to a previous state.

To tell Windows which displays should be on (along with positions, resolution, frequency, ect) you have to pass in all the PathInfos for each display.
Let’s say I have 3 Displays and I want to turn 1 off.
I get all the Active PathInfos which will result in an array with 3 objects.
I then remove the object of the display I want off and then I’m left with 2 in the array.
I then pass only those 2 to Windows and the 3rd display will be off.

Below is an example of turning a Display on.
I first get all the current Active displays which in my case will be 2.
I then add my PathInfo object which was stored as JSON in the DB, and so now I’m passing 3 objects which results in all 3 Displays/Monitors being on.

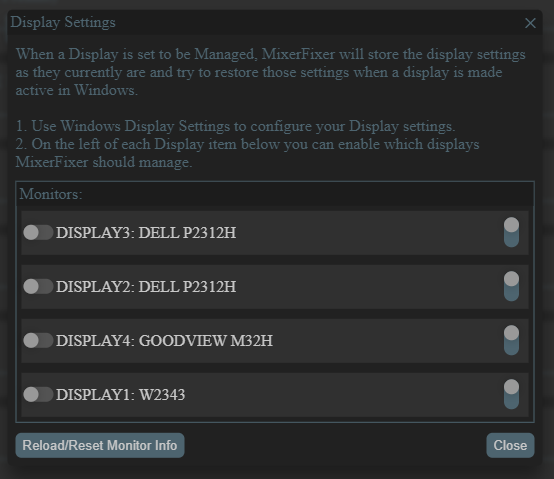
In the background I have a timer running which will check if any monitors are turned on and then check if that monitor is marked as ‘Is Managed’ in MixerFixer. It will then restore that Display/Monitor’s position, resolution, frequency, ect as it was stored when marked as ‘Is Managed’.

You have to use the Windows Display Settings to set things up the way you want and then mark which displays you want MixerFixer to manage for you. After that you can disable or enable monitors and MixerFixer will restore them to their previous state if marked as ‘Is Managed’
image

Also, the toggle on the right will turn a display on or off. :slight_smile:

How well is this working?? For me it seems to work fine. It’s rare that other people might want this and so I don’t really have tests done on other machines. If bugs are found I will try and fix it though.

Below is a new video showing it working :slight_smile:

Added icon for Speakers, Microphone, System Sounds, and if a app return the dll icon.

Decided to add some basic icons for the Speakers, Microphone, System Sounds, and apps without an icon. When trying to get icons for these you end up with the generic icon for a dll file. I don’t know how to get the icons that Windows uses and I don’t want to risk falling down a new rabbit hole so close to the end. These will do just fine :slight_smile:

Bad news, no Mic boost :frowning:

Unfortunately this will have to be a fail. I knew it probably would not be possible on app level to boost the incoming signal for the mic before it goes off to… err… what ever app might be using it. From what I’ve seen online it seems I will have to do something much lower down instead of in a crappy little app. I’ve used EqualizerAPO to boost the mic volume for a good few years now and it’s one of those set and for get types of apps which are generally the best kind. It looks like it’s doing stuff on driver level… maybe… I don’t really know, but if you’re looking to adjust anything audio related system wide then you should check this app out as it can do a whole lot more than what I’m using it for.

Although I consider the app it self now complete, I did say in a previous post that I was going to try and improve on how I’ve explained how this app works. It won’t be crazy details, but I think some visual aids are in order. I also consider this thread as part of the project as a whole and so I’m not done.

Today I was on the roof almost all day installing new wiring and I got some bad sun burn, but I will try and get these Recap Posts done before end of the month.

For today’s video, I decided that something local is in order.

1 Like

The Recap Part 1

The why:

I actually explained quite well why I wanted to build what I built in the original post and so I don’t want to just copy paste everything here. Link to original post which has a link back to this point:
To 1st post

But, here’s a quick summary anyway.
-Windows Mixer hasn’t really changed since Vista.
-No way to specify default volume level for applications when they start up.
-Will reset audio levels when you plug your USB headset into a new USB port… or because reasons…
-Will change default output or capture device when plugging in or enabling. In my case it will sometimes switch my audio to my 4th monitor which is connected using HDMI and has its own sound, but I don’t want it to.
-No way to store and restore audio levels when doing a reinstall.
-No dark mode…. The white glare burns us!

-Building it in HTML because extra challenge and I prefer making UIs using HTML and CSS.
-Chance to use SignalR (Web sockets) and WebView2 (browser control) which I’ve never used before.
-Because I think it’s cool and Linux has had apps with HTML frontends you can access over the network using a browser since forever. Windows historically not so much and I think it’s neat even though I know it’s extra work that’s not needed for this use case.
The Recap Part 2

App overview:

We use a WPF windows desktop app to contain everything we’re going to be doing. It will host our web server in which 99% of functionality will exist. Below image is a very simple overview of what is in this app.

WPF App:
The WPF app has 2 windows. A main window and a small window that will ask if the user wants to shutdown or minimise the app when clicking the close button. It also has a TrayIcon so MF can run quietly in the background without a GUI open.

Confirmation window:

The main window holds the WebView2 control which is just a browser control. It’s based on Chromium and so works basically the same and supports everything chromium does. This control will host 99% of our UI which is done using HTML and CSS.

Main window with WebView2 control with no HTML content:

The WPF app is also responsible for starting the Kestrel web server. The web server will in turn initialise the AudioCore and DisplaySettings classes.
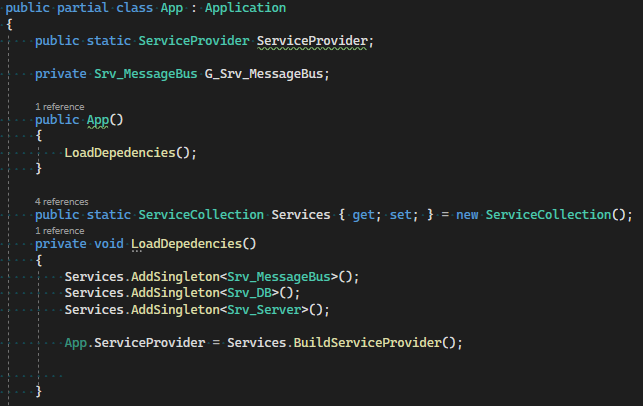
During startup we also init the Tray Icon, load theme info so the the WPF part matches the HTML part, and we register our events with our MessageBus class so we can easily talk between WPF and web server when things happen. For example, the message bus is used to update the colours of the WPF part on the fly as we change it in the HTML part.

The change event to update WPF to match HTML colours:

The WPF part is basically just our host… a container for our web site in a way. It has almost no UI or functionality tied to what we actually want to do. All the main functionality lives inside our website part.

1 Like