This makes things a lot easier when trying to deal with Windows Audio. The library can do a lot, but I’m only really interested in the MMDevice and AudioSessionControl classes.
MMDevice represents the device you want to interact with. This can be your onboard sound or USB headset. MMDevice can be sound output, like speakers, or input like a Microphone.
AudioSessionControl represents an application you may have running that is producing sound. This can be your browser playing a youtube video, a game, or something like discord.
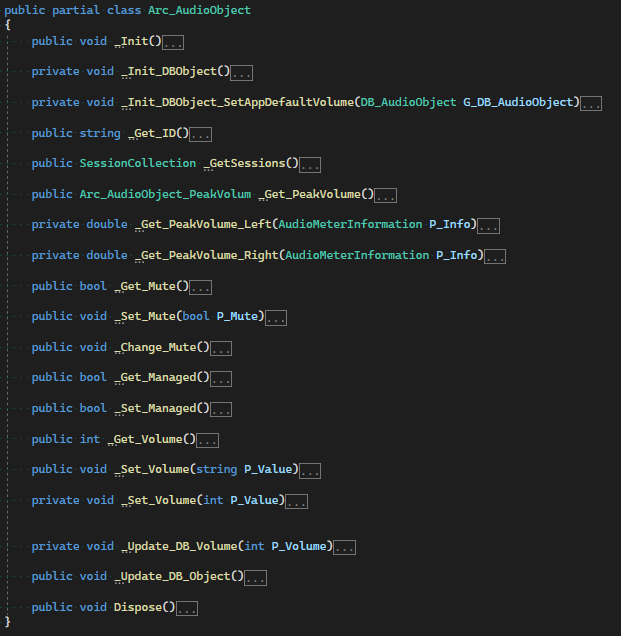
I created a wrapper class called ‘AudioObject’ that can hold either a MMDevice or an AudioSession. This wrapper class contains some functions like:
-ChangeVolume
-ChangeMute
-ChangeIsManaged
-GetMute
-GetVolume
When one of these functions are called, let’s say ChangeVolume, it will internally figure out if it needs to change the volume of a device or audio session and then I don’t have to worry about it. Below is an overview of the functions of this class. It also handles events (not show here) like when the volume changes in Windows so we can react to it.
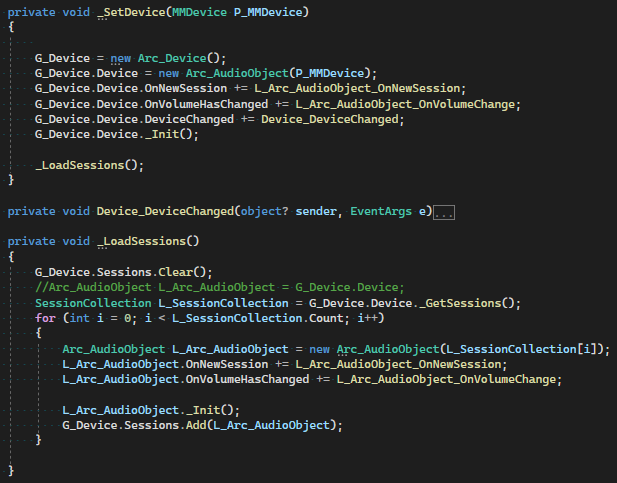
I then created a class called AudioCore and this class will load your current default device along with any apps you may have running using the AudioObject class to store and keep track of everything. It will also keep track of apps starting up or shutting down and when an App starts up it will set the app to a default volume which is configurable in MF. An Update event will also be triggered so the UI will know to update as well.
Here we set our device, load all our audio sessions, and assign our event handlers:
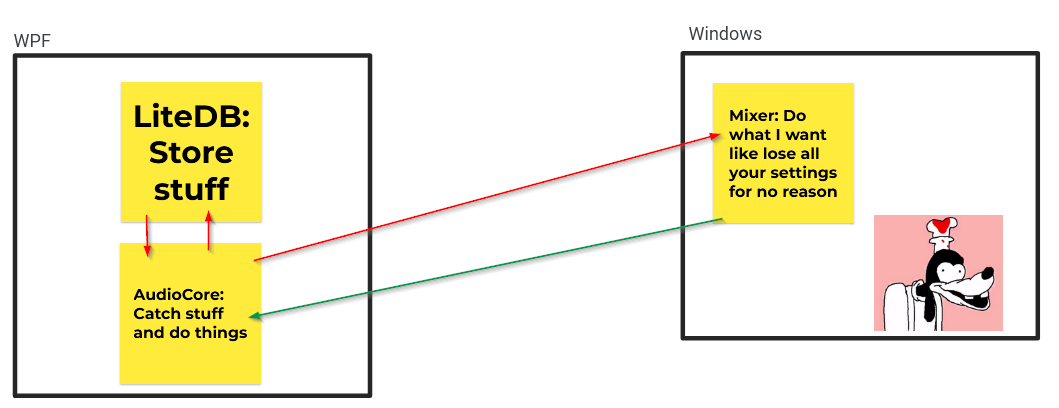
AudioCore and the AudioObject will also update the DB with any changes made making sure it stays in sync with what is going on. If the volume of an App is changed, it gets updated in the DB right away. If an App is marked to be Managed by MixerFixer, then MF will try and push the volume levels stored in the DB to Windows effectively disabling changing of volume level in Windows.
In short we can catch when things change in Windows and we can also push changes to Windows. We can then also do things like detect when Windows changes something and then override it and put things back as they are stored in the DB if configured to do so.
This allows us to have volume levels persist across device changes or even system changes.
Recap for my recap:
I’ve been using an app called ‘MultiMonitorTool’ with a shortcut on the desktop to quickly turn on or off my 4th monitor. In windows 8 this worked great as Win8 would remember the position of the 4th monitor no matter how many times I enabled or disabled it meaning it would always end up back where I initially placed it in Windows Display Settings.
Windows 10 does not and I have to manually place it back in the correct position every time I enable the display again. I just wanted a simple way to store a monitor’s current settings like position and then have it automatically restored whenever I enable the monitor. Having this be part of an Audio Control app is a little odd, I know, but I wanted everything in one place.
The over complicated and probably not needed solution:
I set out first using a different library, DisplaySettings. It supported reading and restoring things like the position and resolution which is really all I wanted, but it does not support turning a monitor on or off. This functionality wasn’t really needed, but something in me just had to have it. I tried a lot of methods I found online, but none actually worked. So after 2 days I gave up and I should have left it there…
Enter a different library… WindowsDisplayAPI. This supports everything I wanted, but I had a real hard time figuring out how to use it. After 2 more days and chatting to the dev I finally had some idea of what I needed to do.
The WindowsDisplayAPI contains some legacy code which doesn’t really work which is what I was stuck on for 2 days. What we are interested in are the following 3 classes: PathDisplaySource, PathInfo, and PathDisplayTarget
-PathDisplaySource is the source of what you want to display. This could be your main/only desktop, or your second/extended desktop.
-PathDisplayTarget is what the source should be displayed on. Basically, which monitor you want your source to be on.
-PathInfo connects your source and target(s). Each Path can only have 1 source, but could have multiple targets. In the case of a desktop clone, you have one source but 2 or more targets for example. In the case of an extended desktop, you’ll have 2 sources, 2 paths, and at least 2 targets.
The PathInfo object will contain a property for the Source and an array of targets. So for the most part you only really need to work with the PathInfo object.
The dev of the project also pointed me at another project of his that uses his WindowsDisplayAPI that I could use as an example of how to do what I want to do: HeliosDisplayManagement
In the end, I get all the Active Paths, I then serialize the ones I want as JSON and store it in the DB. Serializing the object as JSON is exactly how it’s done in HeliosDisplayManagement. I can then at a later stage pull this json and de-serialize it back into a PathInfo object which allows me to restore a display to a previous state.
Below is how you get all Active Paths. I placed it in a function so I can reuse it.
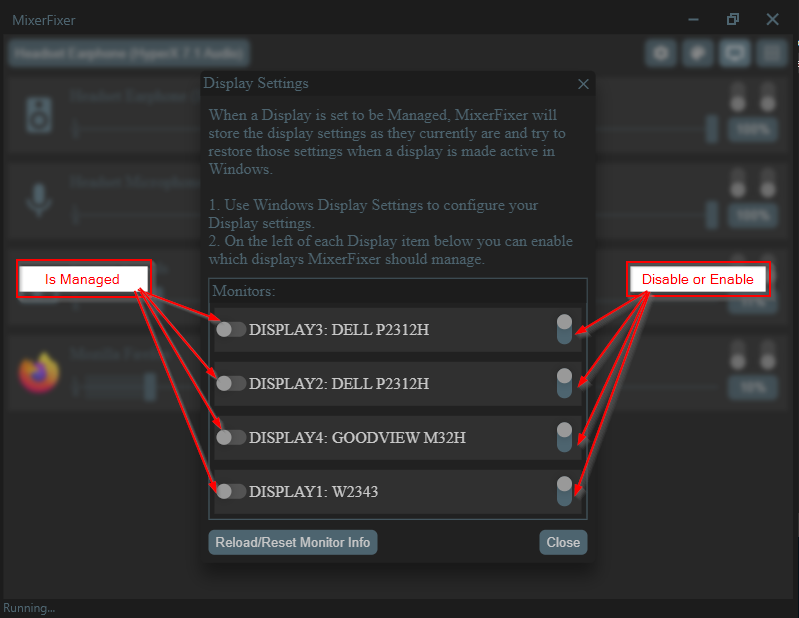
In MixerFixer I update and store Display info every time the user marks a display to be managed or when the user turns a display off using MF so that MF knows how to restore the display if the user then turns the display back on using the Display Settings Modal in MF.
In the background a timer will check for any Display Info in the DB that is marked as Is Managed and if it detects that a Display was enabled it will try to restore that Display to a previous state automatically.
Below is what the Display Settings Modal looks like and the 2 options to mark a Display as managed or to turn it on or off.
To inform Windows which displays should be on (along with positions, resolution, frequency, ect) you have to pass in all the PathInfos for each display using the ‘ApplyPathInfos’ function in the library.
Let’s say I have 3 Displays and I want to turn 1 off.
-I get all the Active PathInfos which will result in an array with 3 objects.
-I then remove the object of the display I want off and then I’m left with 2 in the array.
-I then pass only those 2 objects/PathInfos to Windows and the 3rd display will be off.
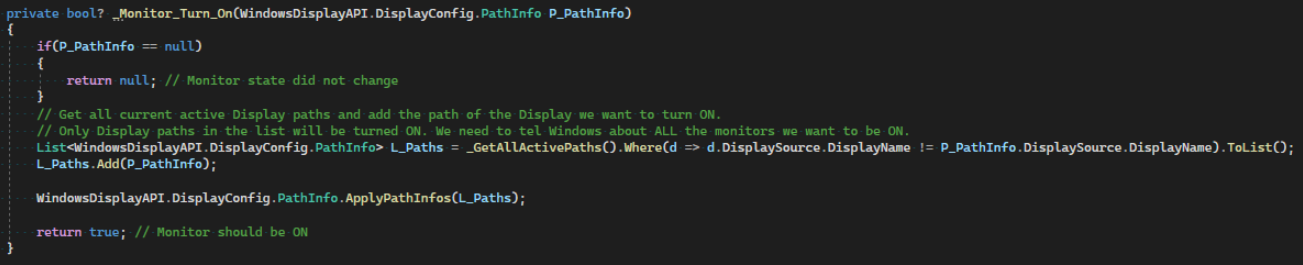
Below I get all Active Paths except the one I want off:
Below is an example of turning a Display on.
-I first get all the current Active displays which in my case will be 2.
-I then add my PathInfo object which was stored as JSON in the DB, and so now I’m passing 3 objects which results in all 3 Displays/Monitors being on.
The basics here consist of Kestrel, SignalR, and our webpage/HTML. When it comes to Kestrel and SignalR it will be better to read the official documentation rather than me trying to explain it all here. I’m far from an expert and will probably just get a lot wrong anyway.
Kestrel:
In short, Kestrel is our web server which will start our SignalR hub and host our web page. It allows us to connect to our webpage over the local network using a browser. This is not needed though. The WebView2 control supports comms between the page and the C# backend, but I wanted the page accessible over the network and for that we need a web server.
To enable kestrel in our WPF app, we have to edit our project file to include support for it. We also need to include any folders or files we want to embed in our web app so it all ends up as part of the final exe. These can be JS libraries, images, css files, ect.
Best would be to look at work done by someone far more qualified than I. Below link goes to a blog post that goes through step by step on how to host a HTML page inside of a WPF app:
SignalR:
I wanted to use websockets for this project and SignalR was an obvious choice here. It’s been around for some time now and it’s constantly updated. It will also automatically fall back to long polling if websockets is not supported on a given environment.
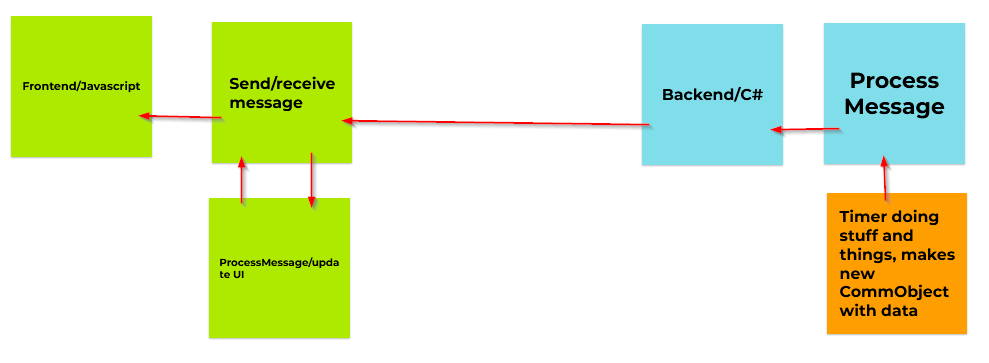
Websockets allows us to have full 2 way communication between our web page and the C# backend. It means we can push data to the page live at any time from the C# backend as things happen while the user might be interacting with the GUI at the same time. We don’t have to wait for user requests and this, along with a timer in the backend, is how I’m able to constantly push audio levels to the front end so you can see audio level changes live.
So with hosting and comms figured out, we need to look at our actual UI and how we are going to build it. I could easily just have stayed with WPF, but I really prefer doing UI things with HTML and CSS. So to make things harder that’s what I wanted to use.
Normally you will write some HTML and some CSS classes to create the UI you want, but we need something more dynamic than that. Something where we can create templates and have our HTML be generated as and when we need it.
There exist many ways to do this already and in C# there is a library for this exact use case: Handlebars.Net
However, I don’t like the idea of having to write HTML by hand… even as templates. I wanted to see if I can come up with a way of generating HTML without needing to manually write any HTML by hand.
I came up with the idea of breaking it into 2 parts, the objects that represent my HTML elements and the Generator.
NOTE: This is by no means some kind of industry ready thing I’ve come up with. It was an idea I’ve had for a while and this was a good excuse to try it.
HTML Objects:
We define what we want using a C# class. This will be our ‘HTML object’. Inside of it will be what type of object it should be like Div or Img, what attributes it should have like id or class along with the value of that attribute, what children it should have, and what data it should have. In the case of a Label, we need to add what text it will be showing. So this is also where we do our data binding. This means our generator does not have to do any kind of find and replace work to bind our data to our HTML. Our generator can have a clean straight loop through our objects and generate our HTML in one simple swing.
Below you can see what this HTML object looks like. The Children property is just a list of HTML objects again and so you nest objects just like you would HTML elements when writing html by hand. It also has a function to add attributes which will also check if an attribute already exists in the list. If it does, it will just append the data to the existing attribute item so we don’t have to worry about accidentally creating multiple attribute items with the same name. The AddChild function is just to help make the code a little neater when using this object.
The Generator:
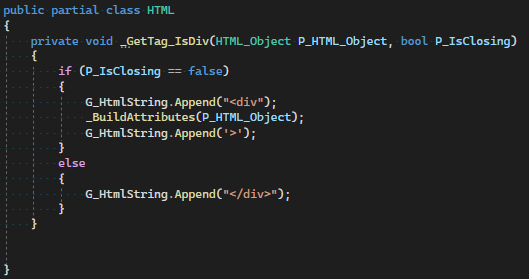
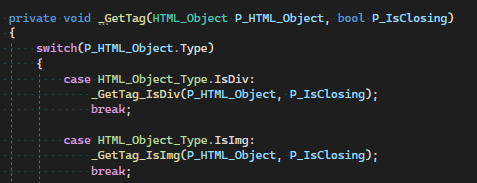
For the generator I had to write some HTML so it knows what and how to generate my HTML when I pass my ‘HTML object’ to it. This was quite simple as HTML elements are actually very simple. To generate an element I need to create the open and closing tags along with any attributes like id or class. Below is a piece of the generator that generates a Div.
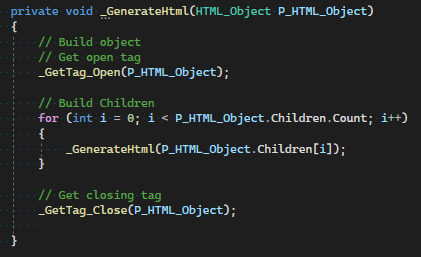
The generator class has a single StringBuilder instance and as the generator loops through all the objects (using recursion) it will append the HTML string to this StringBuilder instance in the correct order. Meaning, open tag first, then attributes, then any child objects/elements, then closing tag.
And here’s a snippet of GetTag:
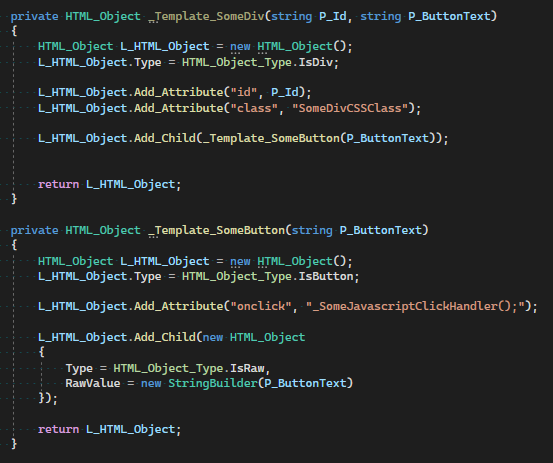
The way I use this is by creating some functions that will return my HTML objects. These functions act as my templates. Let’s say I want a Div with a Button inside it. I will then have a function that builds my Div Object and another function that builds my Button object. These functions will have some parameters so I can pass data to them like what Text I might want inside my button. In the case of MixerFixer, I can pass the whole AudioObject class so I can build the volume control along with the slider, text, toggle switches, and icon for the Speakers or application and bind any data I need as part of my HTML at the same time.
The Div function will call the Button function and add the Button object as a child of the Div. In the case of the button text, we add a child HTML object of Type ‘Raw’ to the button object with the text we want in our button. Raw means to take the data and add it to our HTML as plain text. A good example of where to use this would be a Label, but here I’m using it for my button. Naturally, the raw text you might want to add can be huge, but that’s up to you.
As for styling with CSS… that’s still done the good old fashion way… by hand. You can however specify the CSS class as an attribute when building the HTML object.
I then send my Div object to the generator and I get the HTML for a Button inside of a Div back as HTML string. Here’s our example in code.
And the resulting HTML string:
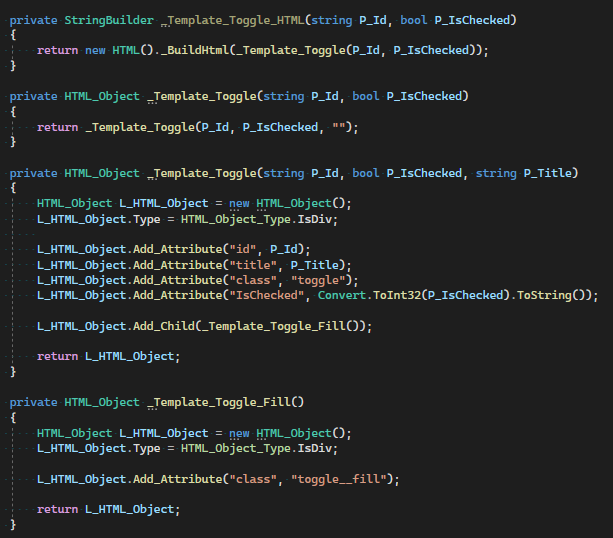
You can create template functions that are reusable. I for example created a function that will generate my toggle switches and I can now reuse this function over and over. I can also have my template just straight up return the HTML I want by building my template and then sending it straight to the generator to be turned into HTML. See example:
These templates can be as big and as complex as you want, but they are all built using the same basic ‘HTML object’ class just stacked as high as you want. It’s like having a piece of lego… you stack the same piece of lego as much as you want and can potentially build something quite large…
… James May’s lego house…
Once I created my HTML objects and then turned them into HTML string using the generator, I need to send my new HTML to the screen which we’ll look at in the next part as that is part of the comms between the front end and back end.
Comms between frontend and backend…. The next part:
We need to be able to take user input on the frontend, send it to the backend to be processed, and then send updates back to the frontend.
To transport our data we are using SignalR/Websockets covered earlier, but the data we send can potentially be in all sorts of formats. I wanted to try and have a kind of ‘standardised’ way of passing data between the frontend and backend.
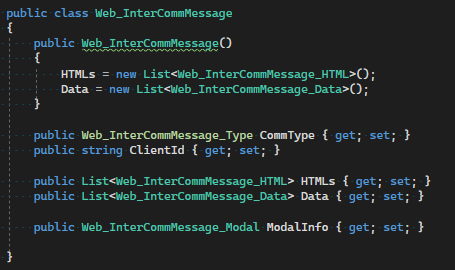
To do this I first created my CommObject, a C# class. This object contains things like what type of message it is, what data we might be passing, and then also things like our generated HTML and the state of any Modals we might have (show or hide).
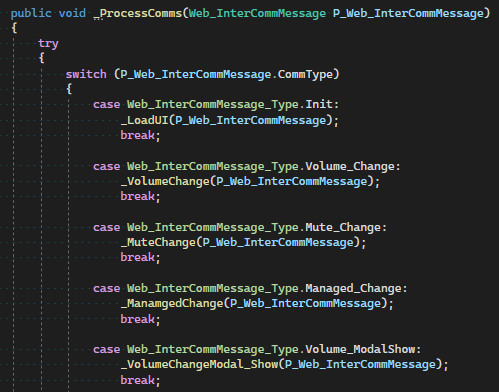
Then on the backend we have a single function that will process all incoming messages. This might be text the user entered or a button click. This function will take the CommObject and essentially mutate it by potentially changing its CommType, adding Data, or even adding new HTML to it and then sending this mutated message back to the frontend.
Snippet of Backend ProcessMessage:
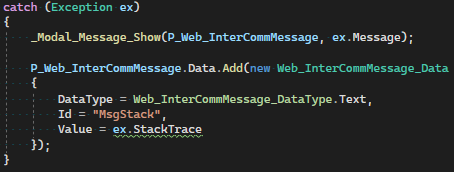
In the case of an exception, the CommObject will be mutated into a ShowMessage object along with the error message which will then be shown on the screen. Below I’m also adding the stack trace of the exception which will be logged to the console for debugging. Normally you won’t and should not send the stack trace to the frontend, but it’s a good example of how the CommObject can be mutated
The ‘_Modal_Message_Show’ function is mutating the CommObject to have info about the state of the Modal, generating the HTML for the modal, and also changing the CommType so the javascript side knows how to deal with this CommObject.
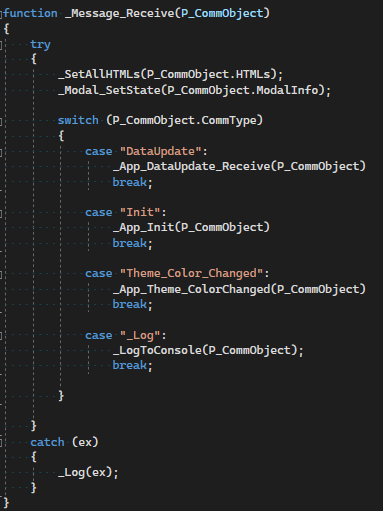
On the frontend, javascript side, we again have a single function that will deal with any incoming CommObjects. It will always check for HTML and then add that HTML to the page. It will also check for any Modal info and then either show or hide a modal depending on the state of the model in the CommObject.
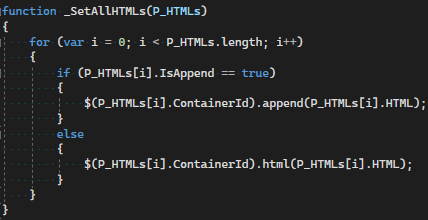
The ‘_SetAllHTMLs’ function is below and all we’re really doing is placing the HTML string inside of the specified container. This can be a div, button, or even style tags.
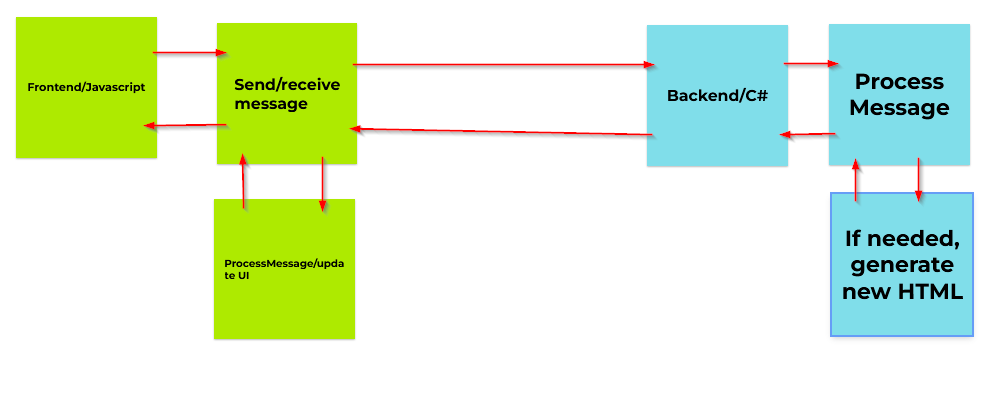
Below is how data/CommObjects move around. All user interactions ( frontend in green) follow this pattern. User does a thing, CommObject goes to backend for processing, mutated ComObject is sent back, JS handles the result/updates UI.
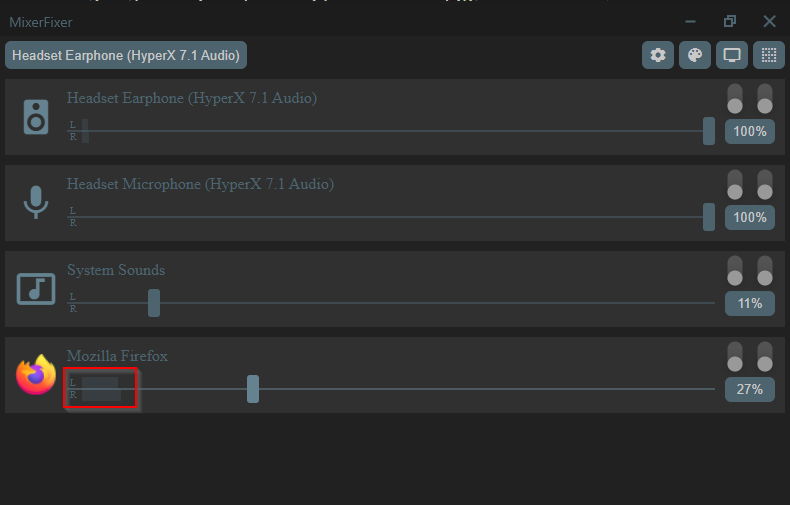
The Data in the CommObject can be things like the Volume Level the slider should be at, the text of a label or input, or the current level of the audio that might be playing which in this case is just 2 divs working like a progress bar we constantly update. This gives us the bouncing bars as Audio is playing.
You need to include the id of the element you want to update, what type of element it is, and obviously the data you wish to update it with. Let’s say we want to change the text on a Label… the data needs to contain that’s it’s for a label with the id and the text we want to place inside the label.
The reason we need to know what type of element it is comes down to the fact that you access certain aspects of an element differently depending on the type of element it is. In the case of my Toggle switches, I need to access the ‘IsChecked’ attribute of the div that makes up the switch. For a text input I need to access the value property.
I’m sure there are many ways to improve and even simplify this and I do actually have some ideas, but for this project I didn’t want to dive down that rabbit hole just yet.
As part of our webpage/frontend, we obviously have CSS. Using CSS variables we can easily define our colours to be used and then if we want to have customizable theming all we have to do is override some of these CSS variables to change the colours.
Below are the variables for MixerFixer. Some of them are derived from the 3 base colours. I’m using an offset to lighten or darken some of the colours and that is how we get things like our ‘app header background’ and ‘background highlight’. This offset method is terrible and I won’t recommend it as it has limits. Fortunately, css handles those limits gracefully and for what I’m doing this will do. I’ve not done theming quite like this before and so will need to do more research on how I can achieve something similar without using an offset like this.
In the case of MixerFixer, we end up with 3 main colours we can override to change the whole look of the app.
MF_Theme_Background
MF_Theme_Accent
MF_Theme_Text
In reality though, we’ll be overriding the RGB variables for these 3 main colours.
Originally my idea was to have a colour picker, but that’s how most apps do it. Since I needed to override the RGB values I decided to use sliders instead. So for each of the 3 main colours, we have 3 sliders for red, green and blue with a range of 0-255.
Then it’s a fairly simple case of creating the variable with the same name for each of the RGB values and placing it on the page to override the defaults. And since we’re using websockets we can do this live.
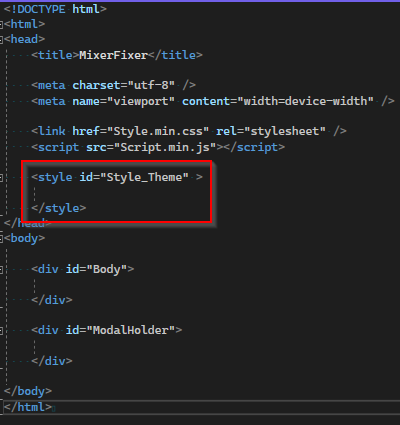
Earlier I said that we can place our HTML string inside basically anything with an Id. This is how we override our CSS variables. On the page we have a Style tag with an Id. When we change any of the RGB values we generate new variables in C# as a string and add it as “HTML” to our CommObject and our _SetAllHTMLs JS function will take care of the rest.
Yes, we can do this just in JS and pass only the value to be stored in the DB to the backend. But although it’s not optimal, it does reduce the complexity and amount of JS I have.
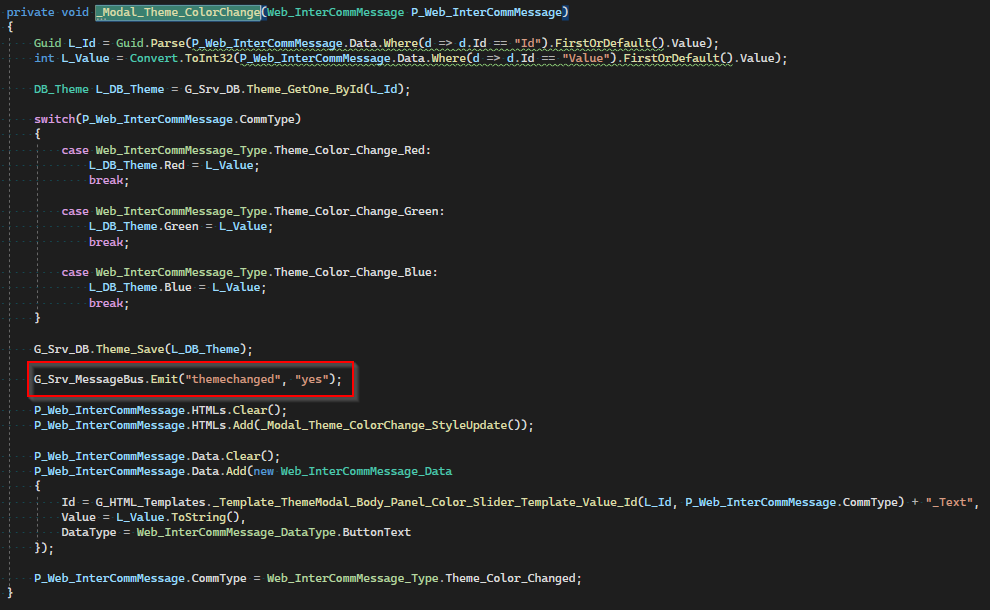
Below is the C# function that will handle the change event when dragging one of the RGB sliders. It will update the DB with the new custom value, add a new HTML string (which is just our CSS overrides), some data to update the text on the screen, and send the CommObject back. Then our JS function will dump our “HTML” into our style tag and CSS takes it from there.
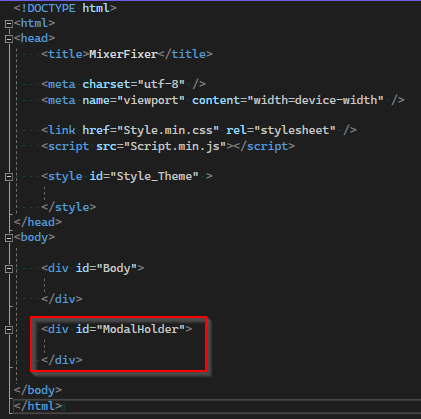
And here’s our HTML page with the Style tag where our CSS overrides end up…
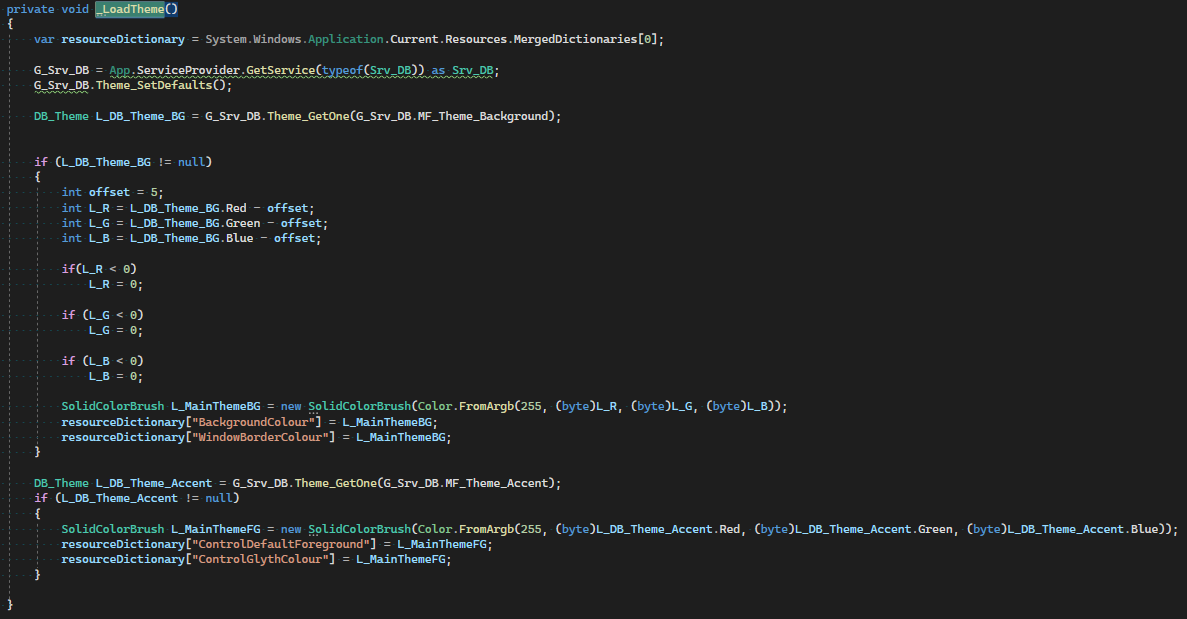
We also need to inform the WPF part that the colours have changed. So we trigger the ThemChanged event we registered during startup and then WPF will read the new colour values from the DB and apply them to it’s own theme.
And then the LoadTheme function in WPF. C# does not handle colour values lower than 0 gracefully so we have to check it when applying our offsets. WPF only cares about the Background colour and Accent colour.
As already stated, things can be done very differently here and certainly a lot better. For what I’m doing I think it’s fine and I know there is a lot of room for improvement.
I’ve used and made many HTML modals over the years, but they all had similar limitations. I would often need 2 sets of code that’s basically the same apart from one set that does not have the mask to make it a popup instead of a modal. Often the modals I used in the past would have a separate div as the background mask and JS would be needed to show both the mask and the content. Sure, normally, you didn’t really need to worry about this little detail as the library would take care of it for you and you just need to call a Show or Hide function. Still, I felt it could be better and it’s something we can really use at work.
I wanted to make a modal that could do both Modal with a mask and a popup with no mask with just a small property change. I also wanted to make the Modal quite simple to use and have it automatically restrict its max height and width depending on the amount of space available. Normally I would do this using JS, but things have moved on and I wanted to try and do as much as possible using just CSS.
Turns out, I could do basically everything with just CSS. Below is a link to a JSFiddle showing it in action:
I have my main Modal div which has width: 90vw; and height: 90vh;. This is what automatically gives us our maximum height and width for our modal. You can also use calc in CSS to fine tune what the max height and width should be.
-The main div then contains my background mask Div and my Content Div.
-The main div is set to have overflow: visible; This is so we can have the mask be visible when we make our main Div visible.
-The mask is position: absolute; along with a z-index: -1; The -1 is important to make sure the Mask does not interfere with the content.
-The mask also has width: 100vw; and height: 100vh; So now the mask will always be the full size of the viewport. More on viewport units here: CSS Viewport Units: A Quick Start — SitePoint
-The content has display:flex; This is important if we want it to automatically add vertical or horizontal scroll bars if the content is too big for the available space.
-The content body then has overflow: auto; which will give our scrollbars if the content is bigger than available space.
-If we want to show a popup with no background mask, we have to set a attribute on the main div like this: NoMask=“1”. In the css the mask will then be set to display:none; and with that we have a Modal and a Popup in one.
-The only JS needed is to set another attribute on the main div to either show or hide the modal, IsVisible=“1”
Using JQuery it looks like this: $("#MyModalId").attr("IsVisible", "1");
One thing you’ll notice is that the HTML for all the Modals in MF is being generated and added to the page on the fly. For this we have a ModalHolder div on the page where we APPEND our Modal HTML.
When we close the modal we actually remove the html for that particular modal instead of just making it not visible. So every time you open a modal, a CommObject is sent to the backend, the backend builds our modal and sends it back, and finally our JS will add the HTML to the ModalHolder and ensure it’s visible.
I’m trying to remember all the important bits here, but I think I have it all covered. In hindsight I should have done more documentation on this as I was working on it. The fiddle is a working example and should be easy to copy if anyone is interested.
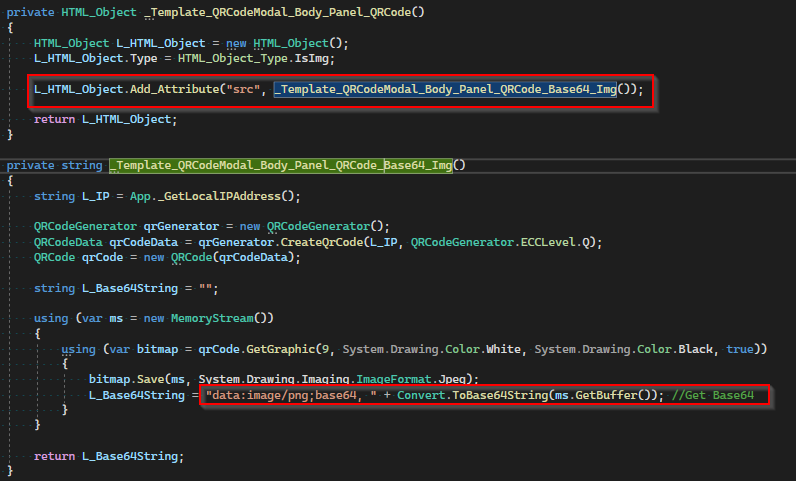
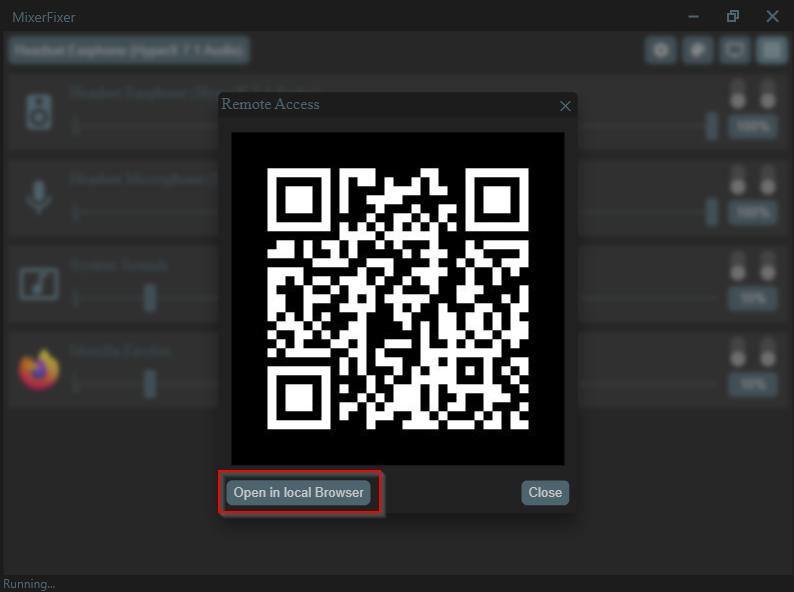
To make it easier to use something like your phone to open MF in the browser, I’ve added a HTML modal that will show a QRCode with the web address to MF. QRCodes have been around for a while and so I don’t think too much needs to be said here.
You pass a string to the library and it creates a QRCode Bitmap with it. Then it’s up to you what you want to do with that Bitmap. In my case I wanted it shown in a Modal in my HTML page. So I convert the bitmap to a base64 string and add it as the value for my ‘src’ attribute in my HTML object. Once the generator runs through my HTML object it will embed that base64 string in the ‘src’ property of the html image element.
I’m mostly happy with the outcome… mostly because it’s working… at least for me. I am very well aware that a lot of what I’ve done can be improved or done a lot better if I were to do it again.
In terms of the code and project structure I think it’s maybe a 5 out of 10. Not horrible, but not decent either. This usually happens though when you do a lot of stuff for the first time and you don’t know how things will turn out when you start. This can make it hard to plan properly ahead. More experience will also help a lot with planning in general even when working on new things.
In terms of functionality it’s going to have to be an 8 out 10. This is down to the fact that I could not do the Microphone boost like I wanted and nothing is perfect.
In terms of performance I would give it a 8 out of 10. Start up is a little slow, but performance seems pretty good while it’s running as it’s not using a lot of system resources. Resource usage goes up when you have the UI open, but that’s to be expected. Even with the UI open I think performance is quite acceptable.
Or I am completely out with my scoring and Ryan will tear me a new one… have at it
I think I’ve covered everything that needs it. I obviously didn’t go into too much detail as I mostly wanted to bring across how things work rather than what each line of code does. Even so I probably included more code than what was needed.
And I’m sure there will be more bugs to fix
GitHub is up to date and I also updated the ReadMe file there to include a video and some basic info on what it is, what it can do, and how to use it.
Found some bugs while using the app… shocking, I know
Stupid infinite loops…
Had another case of an infinite loop when changing the volume of an app while it’s marked as Is Managed. Honestly, I’m not 100% how to deal with this properly and I think I need to change quite a bit to try and handle the volume change events triggered by Windows in a better way.
When I change the volume using MF, Windows will trigger a volume change event and then on rare occasions the DB somehow gets out of sync and then MF and Windows jumps between 2 volume levels forever until I kill MF.
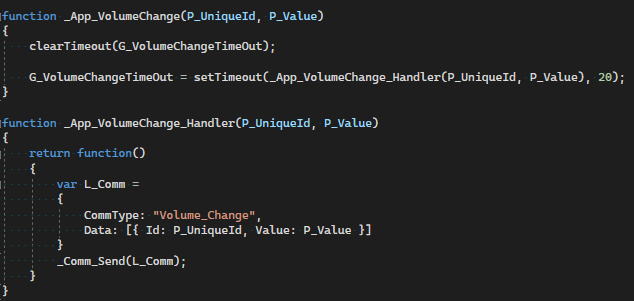
To try and prevent this until I can come up with something better, I added a timeout to the OnChange event of the HTML slider control. Now the change will only be committed to the backend after a 15ms delay. If another change happens within that 15ms delay, it gets reset for another 15ms. This won’t solve the problem, but I hoping that it will result in the issue being even more rare. I’ve spammed click and dragged and scrolled the slider as much as I can and I can not reproduce the issue.
Change to JS code handling the Slider change event. First we clear the timeout, then we set the timeout. If the function is called before the 15ms passed, it will be cleared and then set again. Yes, a bit of a hack, but I need to rethink this and the events.
Device Priority issue
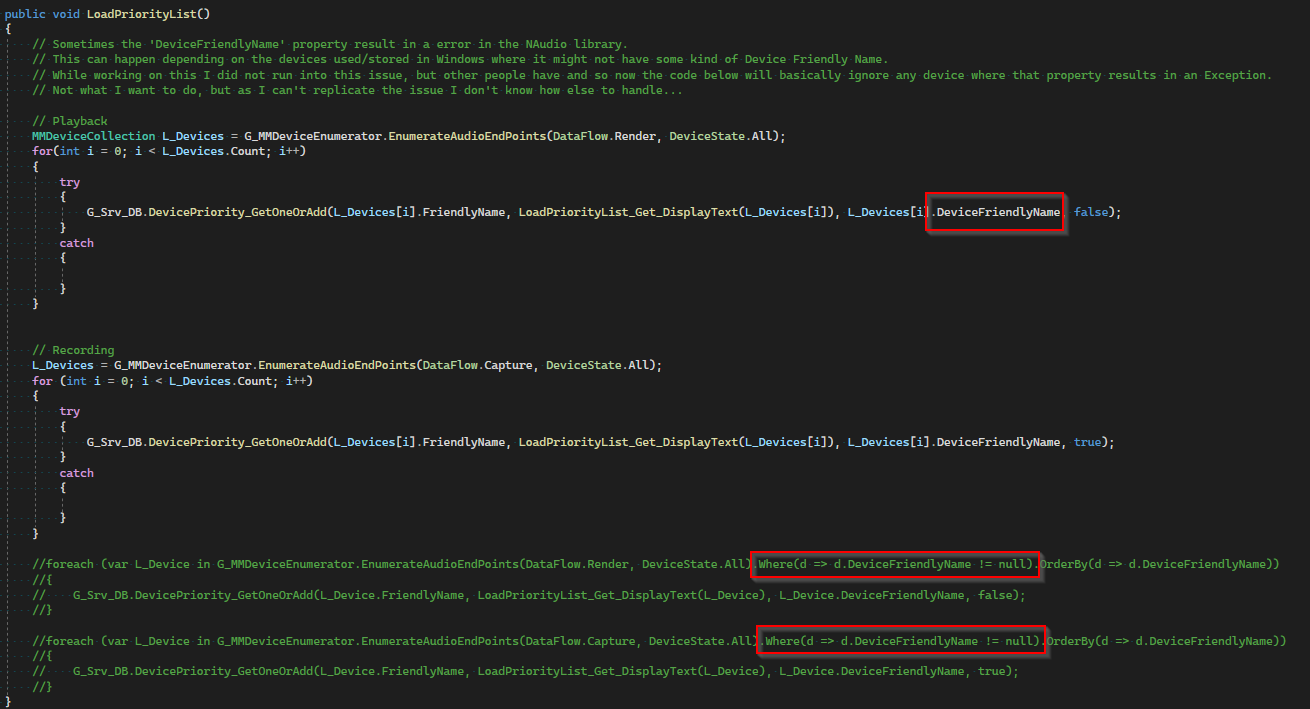
On my friend’s work laptop MF would just throw and error every time he tried to run it. Wasn’t really able to figure out why, but it seemed that a device on his system did not have the DeviceFriendlyName property in it’s property list. So when I tried to access it using the NAudio library it will result in an exception. To get around it I changed the function to loop through all devices and then skip a device if an exception is generated while trying to access the DeviceFriendlyName property. This solved the issue on the laptop and my friend was able to run MF just fine after that.
Weirdly, we see the same devices in MF vs what we see in Windows. I don’t know what MF is finding, but it seems even Windows is like…
Code change below. You can see at the bottom I tried to ignore all devices where the property is NULL, but it will still generate an exception.
MF can enforce which device should be the current default depending on which devices are Active. If a device becomes active, MF will make it the default IF the user has set it up in MF and then update the UI.
But let’s say no devices are set in MF to be managed and your default device changes in Windows. Although I did have the DeviceChanged event it didn’t seem to do what I thought it would and the UI did not end up being updated. The device would change, but MF would continue to show the UI for the previous device.
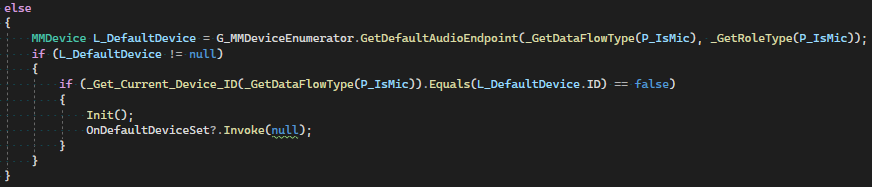
To fix this I added a ELSE to the timer used to enforce the default device. If no devices are set to be Managed by MF, then it will check if the current device in MF matches the current default device in Windows. If it does not match, it will reload the AudioCore class and trigger an update for the UI.
So even though I have zero devices set as Is Managed in MF, the UI will update when I turn on my bluetooth headphones as Windows will make that the Default on it’s own.
Git readme fixes…
When I did the read me file on git, I was in quite a rush and missed some issues. It’s also fixed now.
That’s it for now.
I have the app running all the time and starting up with Windows. Apart from the 1 time infinite loop, it actually seems quite stable and doing what I wanted… at least on my machine
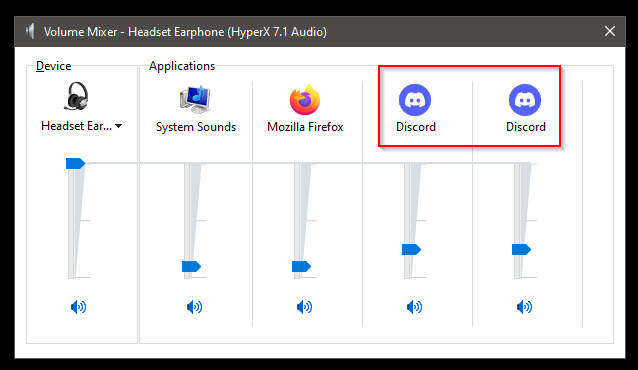
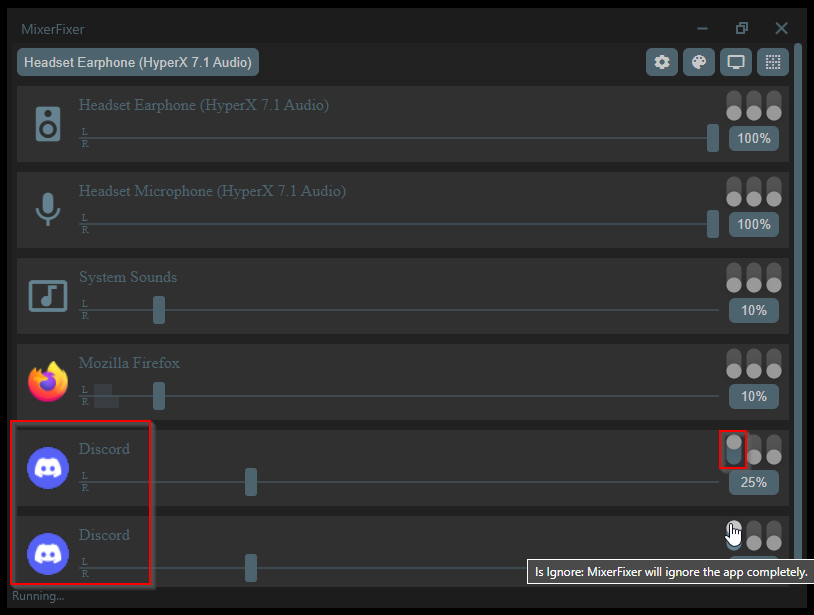
Some apps will show up twice with the same name like Discord. Looks like one instance is the sound of Discord app it self while the other is the audio of whatever channel you may be connected to.
I believe this is what actually caused the infinite loop mentioned in the post above. I did try and see if there is another way to Uniquely identify these instances, but Process ID is all that seems to be unique which I can’t use as it changes each time you start up an application.
I did have the idea of marking certain applications to be ignored by MixerFixer and decided to add that feature as a way for me to get around the duplicate name issue for now.
I have MF setup to default the volume of any application that starts up to 10%, but in the case of Discord I don’t want that. Problem is that I have 2 instances with the same name which is what I think caused my infinite loop issue. I still need to find a good couple of hours to try and reproduce this issue as right now I’ve not been able to.
For now I have MF set to ignore Discord so it won’t mess with the volume in any way regardless of what I set it to.
very very awesome, i’ve read it all and truth be told most of it is way over my head but bits like the above one make perfect sense. if you already wrote bout this i’m sorry but have you thought about an overamplification option? like for some things (lookin’ at u plex ) which need a bump in amplification for source material that has a way low output?
i love the little switch toggle thingies, they’re great!
Thanks. Unfortunately boosting system audio at app level doesn’t seem like the way to go. I wanted to boost microphone input, but from what I can see online this is something you need to do on a lower level in the OS.
You can boost audio on app level if that app is producing the audio, like VLC for example, but if you want to boost system wide or boost app from outside the app (Like boost VLC with another app), you need to intercept the audio, boost it, and then send it along to it’s destination like your headphones. There’s probably some hacky way to do it, but I’ve not found it.
It sounds like you need to boost certain source files and not everything? That will need to be done either on the fly by plex or the media player that you use. VLC can go up to 200% and Media Player classic has a boost option in the settings somewhere.
In your case, finding a way for your media player to boost on the fly will probably be the easiest as some plugin might already exist… although I’m assuming you’ve already looked.
You could also look into using something that can open your source material and boost the volume in the files directly, but that will require you to go and manually do it or write an app that can do it for you. It looks like FFmpeg can do just that. It can also detect the current volume level in a file which can be useful to then boost it by the correct amount to get it inline with other content.
I use FFmpeg to merge the audio and video files I get from the youtubes by passing arguments to the FFmpeg exe from an app I wrote I think in 2014. FFmpeg can be super useful… worth a look for anyone playing around with video and audio.
However, if by chance you are watching plex on a specific machine (and it’s windows), then you can boost and/or change all kinds of audio stuff using:
I use it to boost my microphone, but it can do all sorts of cool and interesting stuff to your audio. When you run it for the first time, it will ask which audio devices you want to be affected and it will require a restart.
Unfortunately it does not look like you can make changes to audio for a specific app. However, if you are watching plex through a specific audio device then this might still be useful as you can boost that audio device. Everything that uses that audio device will be affected, but I bring this up in the small chance that only plex might be affected when boosting your audio device.
Not sure how helpful any of this is, but feel free to ask if you think I can help
yeah its a lovely feature & my distro does overamplification though you’re absolutely spot on, system wide would have to be handled at a lower level.
yup and my roomie who runs our plex server also has as well but its likely such a common problem that someone, somewhere has a fix…just needle + haystack kinda dealio!
very, and its appreciated thank you. I’m not saying we’re lazy & don’t want to ffmpeg (or handbrake increase levels) every single file) was just hoping there was an OTF method is all
This background timer seemed to work fine and it resulted in the app responding to device changes faster. However, I got a app crash one evening when I turned my Bluetooth headphone off. I started up the app and then turned on my bluetooth set and then off again with no issues. It was late so I left it at that.
As time went on I got this crash every now and then when I turn the bluetooth set off and eventually I figured out that if I use the bluetooth set for like 2 hours I would then get this crash consistently.
In short, the timer was trying to access device info and set the device default while windows was still switching things around on it’s own.
The fix
In previous posts I talked about how there is a way to catch the event when device state changes and that I can use that to enforce my device default. Only problem is that this state change event fires like 6 times…
Regardless, I disabled the timer and turned back on the event and so far I have not had any crashes. It’s not pretty, but it seems to be doing what it should be doing and not crashing.
I’m leaving it as is for now and if it remains reliable I will spend some more time to see if I can clean it up a bit.