What commands are you running?
Im not sure I follow what you are explaining yet.
What commands are you running?
Im not sure I follow what you are explaining yet.
No commands, at least not that I can see. I’m sure something is happening but I’m not aware of how to find out.
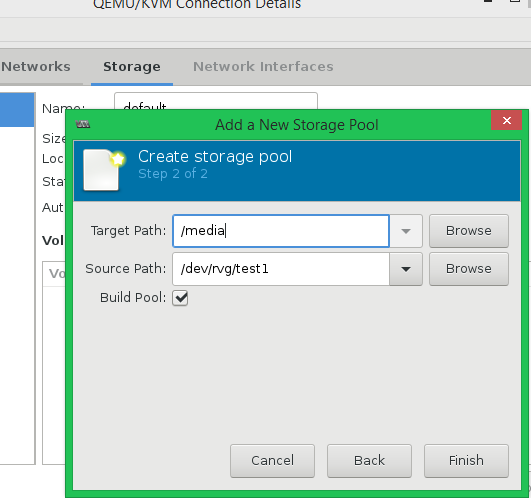
I’m using the virt-manager (Virtual Machine Manager) GUI in Ubuntu to try to set up a VM. Part of that process is choosing the storage location/image.
Instead of setting up a raw image on a mounted partition in the host OS, I’d like to just set up the Storage Pool for the VM as a Disk that’s passed directly to the VM. As in /dev/sda in this case.
I’ll update the OP with some pictures.
Are you doing something like this?

To pass through actual disks I had to use virsh edit VM_NAME
Under Devices the drives passed through need to lokk like below with the correct /dev/XXX . Example below.
 <devices>
     <emulator>/usr/bin/qemu-kvm</emulator>
     <disk type='block' device='disk'>
       <driver name='qemu' type='raw' cache='unsafe'/>
       <source dev='/dev/sdf'/>
       <target dev='vdb' bus='virtio'/>
       <boot order='2'/>
       <address type='pci' domain='0x0000' bus='0x00' slot='0x06' function='0x0'/>
</disk>Is there no way to get it to work using the GUI?
Not for disks with Virt-manager. BUT Im a newbie as well. I googled the shit out of it but.
Updated OP with pictures but yes.
How would I do it without having a VM already created? Do I have to create a dummy image just because and then remove it after?
Is there a bug for this or any hope of it getting fixed soon?
Create a dummy VM yes with a image on the DRIVE you want to passthrough. Don’t have to install it. Just format it and make a qcow on the target drive.
If you want multiply drives make qcow images on each and add them as well.
When your done edit with virsh edit VM_XXX
The key change should be apparent from what I listed above. IE
Thats from memory not expertness…just read the original and compare to my example.
Key is format and add a qcow image on each drive to be passed through. With Virt-manager. The edits are much easier then.
And add an ISO as DVD to install the new VM when ready.
If you already have something on the raw device… sda… then I believe that is what is causing it to fail.
I just created a pool using a logical volume worked.
Deleted the pool then tried to reuse the same logical volume… got the error
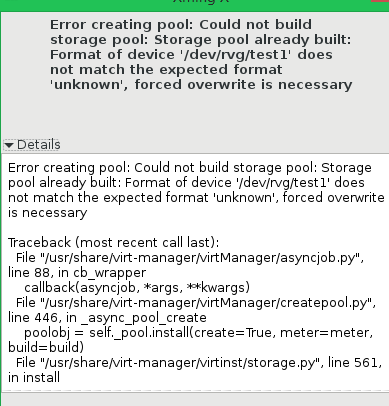
edit:
after dd with zeros over the first 1GB of the logical volume… the same pool creation completes without error.
If you do the work in virt-manager and make a qcow file system on each physical drive to be passed through and post the
virsh edit VM_XXX
I can help with what needs to be edited. it loads in vim so its the usual INS key and ESC and :q or :wq to exit etc
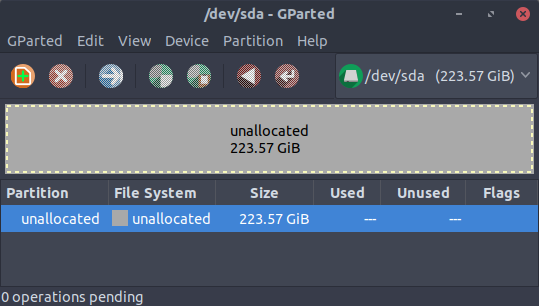
It should be completely wiped with no partitions. (done via GParted):
I don’t really follow what you did to make it work but it sounds like that’s what I need to do.
overwrite a gig or so of the beginning of the device (sda).
ensure that folder under /media that you wanted to use is already created.
Try it again.
Can you provide an example command?
Tried sudo dd if=/dev/zero of=/dev/sda bs=1GB and it looks like it worked but took longer than expected.
I can create a Volume now with virt-manager but I don’t know what I should fill in. I just want it to use 100% of the drive:
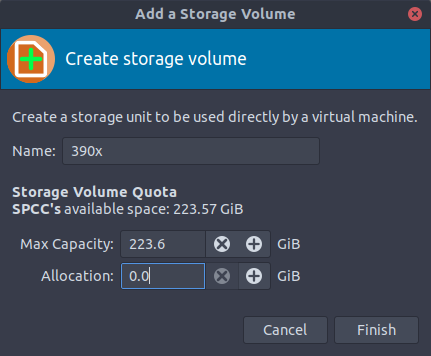
At least from here, it looks like those ought to maybe be set to the same thing? Super ambiguous what each represents… (I went ahead and just maxed them both out)
<volume>
  <name>myfile</name>
  <key>gluster://localhost/volname/myfile</key>
  <source>
  </source>
  <capacity unit='bytes'>53687091200</capacity>
  <allocation unit='bytes'>53687091200</allocation>
</volume>
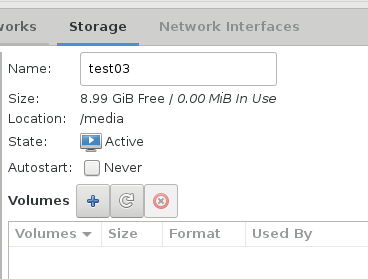
virt-manager Can’t seem to mount the created volume:
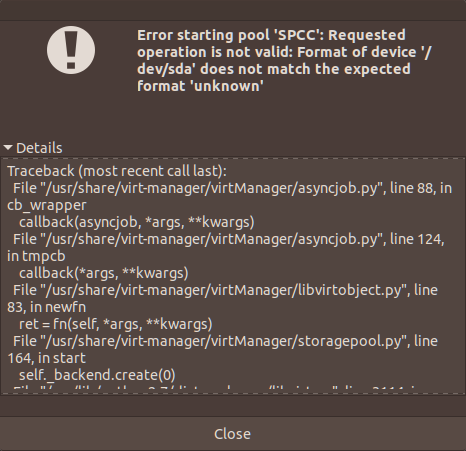
At this moment, the drive is mounted via virt-manager and fully functional but I’m pretty sure if I reboot, it will fail to re-mount (it has once already anyway).
If possible, I’d like to verify that it will in fact be re-mounting automatically at startup before rebooting the host as I don’t want to have to format the drive and start over.
Disk /dev/sda: 223.6 GiB, 240057409536 bytes, 468862128 sectors
Units: sectors of 1 * 512 = 512 bytes
Sector size (logical/physical): 512 bytes / 512 bytes
I/O size (minimum/optimal): 512 bytes / 512 bytes
Disklabel type: dos
Disk identifier: 0x2fb0da7b

Device     Boot Start       End   Sectors  Size Id Type
/dev/sda1          63 467668214 467668152  223G 83 Linux
As for the virt-manager config stuff, this is the only info I’ve been able to gather on my own (practically zero experience with command line kvm/qemu stuff):
<!--
WARNING: THIS IS AN AUTO-GENERATED FILE. CHANGES TO IT ARE LIKELY TO BE
OVERWRITTEN AND LOST. Changes to this xml configuration should be made using:
  virsh pool-edit SPCC
or other application using the libvirt API.
-->

<pool type='disk'>
  <name>SPCC</name>
  <uuid>4b793b32-8e87-44d3-bb33-c5a5ba1bf0b6</uuid>
  <capacity unit='bytes'>0</capacity>
  <allocation unit='bytes'>0</allocation>
  <available unit='bytes'>0</available>
  <source>
    <device path='/dev/sda'/>
    <format type='unknown'/>
  </source>
  <target>
    <path>/media/SPCC</path>
  </target>
</pool>
Which doesn’t seem to totally line up with the virsh pool-edit SPCC contents:
<pool type='disk'>
  <name>SPCC</name>
  <uuid>4b793b32-8e87-44d3-bb33-c5a5ba1bf0b6</uuid>
  <capacity unit='bytes'>240054796800</capacity>
  <allocation unit='bytes'>239446093824</allocation>
  <available unit='bytes'>608670720</available>
  <source>
    <device path='/dev/sda'>
      <freeExtent start='239446126080' end='240054796800'/>
    </device>
    <format type='dos'/>
  </source>
  <target>
    <path>/media/SPCC</path>
  </target>
</pool>
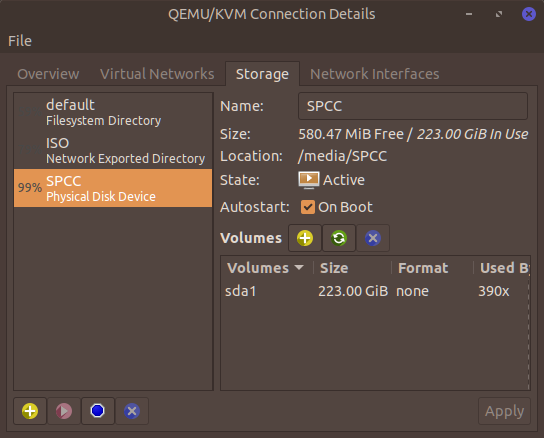
It kinda almost seems like it was a fluke and it’s not really configured correctly maybe?
If you want to pass through a raw disk device, you don’t create a storage pool. Storage pools store images.
In the storage selection step, select “Select or create custom storage”, then type /dev/sda in the entry field. Click Forward.
Actually, it’s better if you don’t use the /dev/sd* entries for this, use the link to the device in the /dev/disk/by-id directory. This way, if the name of the device changes (because you plugged in a usb drive or whatever), it’ll still work.
It is peculiar you say that given that there is a "Physical Disk Device" option:
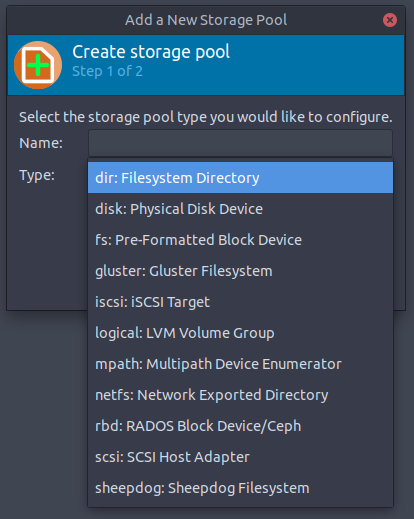
But since it doesn’t seem fully functional I’m happy to oblige. I did locate the full by-id path: /dev/disk/by-id/ata-SPCC_Solid_State_Disk_0043000140 which I tried adding as described but failed to boot.
Just to test locally I removed the existing vdisk and tried adding it as recommended. I turned off and removed the old storage pool as seen by virt-manager.
:~$ ls -l /dev/disk/by-id/
total 0
lrwxrwxrwx 1 root root  9 Jan 31 13:48 ata-Kingston_SHPM2280P2_240G_50026B727200513E -> ../../sdb
lrwxrwxrwx 1 root root 10 Jan 31 13:48 ata-Kingston_SHPM2280P2_240G_50026B727200513E-part1 -> ../../sdb1
lrwxrwxrwx 1 root root 10 Jan 31 13:48 ata-Kingston_SHPM2280P2_240G_50026B727200513E-part2 -> ../../sdb2
lrwxrwxrwx 1 root root 10 Jan 31 13:48 ata-Kingston_SHPM2280P2_240G_50026B727200513E-part3 -> ../../sdb3
lrwxrwxrwx 1 root root  9 Jan 31 13:48 ata-SPCC_Solid_State_Disk_0043000140 -> ../../sda
lrwxrwxrwx 1 root root 10 Feb  2 23:50 ata-SPCC_Solid_State_Disk_0043000140-part1 -> ../../sda1
This one appears to work as described /dev/disk/by-id/ata-SPCC_Solid_State_Disk_0043000140-part1 would be the alternative.
Works locally, going to test rebooting with auto-start of the VM. Works perfectly. Thanks a bunch!
I’m noticing less than bare metal for sure however. Entirely separate issue but on bare metal, the 390x could handle tomb raider maxed out no problem. Can’t quite get there with PCI pass-through.
This solution works!
However trying to install win10.iso -> raw disk will not yield great results… testing now. will update when i install windows to that harddrive on host machine vs VM and see if its a better process
You can try passing through a HDD of the Win10 bare metal install instead. I have a R9 390 passed through with almost bare metal performance. Only when I did my setup like this, did I have close to bare metal performance.
To pass through the HDD using virt manager, just go about creating a VM like normal, creating a qcow2 image to get you through the VM creation process. Once you are able to edit the VM afterwards, delete the qcow2 image then head to add hardware to pass through your HDD, which should work without requiring you to create a storage pool.
*I suggest you install your windows to bare metal while having you other OS drives disconnected do that it doesn’t mess with the boot-loader.
for my situation whenever i created the m.2 && ssd win10 instanced when windows created the partitions i had to target both part2 of the by-id*… mother f*