Edit Update: Check the post beneath for further testing with an L2ARC instead. Spoilers: L2ARC far better.
Introduction
So I was reading around the VFIO reddit scene I came across the following thread from last year: https://www.reddit.com/r/VFIO/comments/eryb71/best_storage_for_vfiokvmqemu_experiment_results/
Basically the TL;DR is that this guy “etherael” (henceforth nicknamed /r/vfio guy) used a bcached striped ZFS setup using a 512GB NVMe instead of L2ARC/ZIL/SLOG as the cache, two regular 2TB HDDs and got some blazing fast speeds and high cache ratios. So I decided to copy his setup on my workstation as a weekend project to learn a little more about bcache and ZFS in general.
The goal here was RAIDZ with bcache in writeback and ZFS with the following setup:
-
48GB of RAM
-
3x 4TB HDDs (Two 5400rpm Toshiba P300s and a 7200rpm WD Black 4TB)
-
1x 1TB WD Black SN750 NVMe
-
Arch with ZoL
Unlike the /r/vfio guy I decided to opt out of TrueCrypt/VeraCrypt and go with ZFS’ native encryption instead. Plus RAIDZ1 instead of RAID1 which is a large departure in terms of performance.
Disclaimer:
Before anyone goes screaming about RADIZ1 being crap, it’s a waste of space and resources, that you might as well have no redundancy at all, it’s dumb, it’s bad, you should have bought an extra HDD and gone with RADIZ2, it’s not supported by DELL anymore…
I know.
This is not a NAS. Important data is not staying on the disks otherwise I’d mirror it. So I know exactly the risks and downsides I’m taking by doing this. If one disk dies and I need to resilver, the chances of it annihilating another drive, especially of this size, is immense and that is fine.
With that out of the way
Steps:
This isn’t exactly meant as a complete guide, I’m skipping the general ZFS stuff after creating a dataset. Most of this is just from reading instructions on the Arch wiki and bcache’s manpages.
Started off by wiping the disks in gparted first to only have unallocated space.
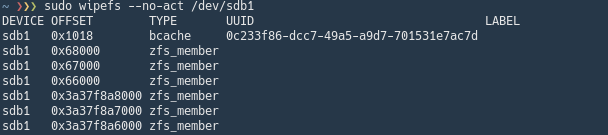
Wipefs was needed to wipe the disks clean of any superblocks from previous filesystems, otherwise bcache will complain.
# Wipe all the drives completely clean.
wipefs -a /dev/sdb
wipefs -a /dev/sdf
wipefs -a /dev/sdg
wipefs -a /dev/nvme0n1
Next up was creating the underlying bcache layer.
make-bcache -B /dev/sdb     # "Wyld"   - HDD Backing device
make-bcache -B /dev/sdf     # "Weaver" - HDD Backing device
make-bcache -B /dev/sdg     # "Wyrm"   - HDD Backing device
make-bcache -C /dev/nvme0n1 # "Umbra"  - NVMe Cache
Afterwards I needed the cset.uuid of the caching device to attach it to the backing devices:
bcache-super-show /dev/nvme0n1 | grep cset
# a6641b9e-2238-3119-c779-32aab53621b8
Now with the uuid in hand I attached it to each backing device.
echo a6641b9e-2238-3119-c779-32aab53621b8 > /sys/block/bcache0/bcache/attach
echo a6641b9e-2238-3119-c779-32aab53621b8 > /sys/block/bcache1/bcache/attach
echo a6641b9e-2238-3119-c779-32aab53621b8 > /sys/block/bcache2/bcache/attach
Then I enabled writeback mode (read and write cache) for these devices.
I don’t really care if I lose dirty data if the NVMe dies, as I do have a backup setup of important data and have mostly non-critical data on these drives anyway. So I’m sticking with a single drive instead of the recommended “one cache per backing device”.
echo writeback > /sys/block/bcache0/bcache/cache_mode
echo writeback > /sys/block/bcache1/bcache/cache_mode
echo writeback > /sys/block/bcache2/bcache/cache_mode
At this point we’re ready for ZFS. I created a RAIDZ zpool on the /dev/bcacheX devices
zpool create -f -o ashift=12 -O mountpoint=none Triat raidz /dev/bcache0 /dev/bcache1 /dev/bcache2
The rest is just usual setup of datasets on the ZFS drives.
As an example I did exactly like the /r/vfio guy and created a dataset to hold my VM stuff this way and added encryption plus zstd compression to it instead of lz4:
zfs create -o sync=disabled -o xattr=sa -o atime=off -o relatime=off -o recordsize=64k -o encryption=on -o keyformat=passphrase -o compression=zstd -o mountpoint=/run/media/mechanical/Dreaming Triat/Dreaming
Works like a charm! Next up was setting up ZFS import cache and everything which I won’t go into detail how to here, read the ZFS manpages or wikis instead.
However I noticed an issue. After rebooting the bcache drives were not detected anymore and the pool could not be imported. How come?
The long standing ZFS uberblock bug:
After a lot of research into why the bcache udev rule couldn’t find the bcache drives anymore I found a persistent bug in ZFS On Linux.
It has been reported multiple times before, but is yet to be fixed.
From what I could gather ZFS adds some uberblocks at the end of the disk/partition which makes blkid think the whole disk is a zfs-member type. This means that the usual TYPE=“bcache” that appears in blkid is gone on everything except the cache device which doesn’t have ZFS installed on it. This confuses the bcache udev rules since it cannot find any backing drives with the bcache type.
The required bcache uberblock is not removed mind you. It’s still there, so it can be registered manually just fine. However due to the ZFS blocks at the end of the disk screwing with the signatures, blkid will not report directly that the disks are in fact bcache devices.
I tried one of the fixes which was creating a zpool on a partition, shrinking the partition by 10MB, adding a small extra partition at the end and wiping the extra partition’s uberblocks to clear them and make ZFS not create new blocks at the end in fdisk. Unfortunately that didn’t work and ZFS recreated the end-blocks after a reboot.
So what I decided to do is change how the udev rule attaches the bcache devices, as registering the bcache devices works fine.
Here’s a replacement 69-bcache.rules (put it in /etc/udev/rules.d/)
# register bcache devices as they come up
# man 7 udev for syntax
SUBSYSTEM!="block", GOTO="bcache_end"
ACTION=="remove", GOTO="bcache_end"
ENV{DM_UDEV_DISABLE_OTHER_RULES_FLAG}=="1", GOTO="bcache_end"
KERNEL=="fd*|sr*", GOTO="bcache_end"

# blkid was run by the standard udev rules
# It recognised bcache (util-linux 2.24+)
ENV{ID_FS_AMBIVALENT}=="other:bcache*", GOTO="bcache_backing_found"
# It recognised something else; bail
ENV{ID_FS_TYPE}=="?*", GOTO="bcache_backing_end"

# Backing devices: scan, symlink, register
IMPORT{program}="probe-bcache -o udev $tempnode"
ENV{ID_FS_AMBIVALENT}=="other:bcache*", GOTO="bcache_backing_end"
ENV{ID_FS_UUID_ENC}=="?*", SYMLINK+="disk/by-uuid/$env{ID_FS_UUID_ENC}"

LABEL="bcache_backing_found"
RUN{builtin}+="kmod load bcache"
RUN+="/usr/lib/udev/bcache-register $tempnode"
LABEL="bcache_backing_end"

# Cached devices: symlink
DRIVER=="bcache", ENV{CACHED_UUID}=="?*", \
SYMLINK+="bcache/by-uuid/$env{CACHED_UUID}"
DRIVER=="bcache", ENV{CACHED_LABEL}=="?*", \
SYMLINK+="bcache/by-label/$env{CACHED_LABEL}"
LABEL="bcache_end"
The big difference here is this part:
ENV{ID_FS_AMBIVALENT}=="other:bcache*"
blkid does report the ID_FS_AMBIVALENT signature which says it is bcache and zfs_member. So with this it can tell that it is a bcache device and still attach it as usual.
Now how the hell /r/vfio guy did this, I have no idea. Maybe he used an older version of ZoL without this bug? ZoL didn’t have persistent L2ARC at the time of writing, so I bet he was using an older version of ZFS on Linux.
Benches:
You’re probably interested in the benches, right? How is this thing actually performing? I’m no Wendell so I don’t exactly have much benchmarking experience, but I did the same benchmarks the /r/vfio guy did. I can probably run some more if needed.
I don’t have any comparisons with an L2ARC setup, so I can’t vouch that it performs better than L2ARC or anything like that. The reason the /r/vfio guy used bcache is due to L2ARC’s lack of persistency which it now has today unlike back then and low hit rate. So using bcache might have been dumb for all I know.
The I/O scheduler used was mq-deadline.
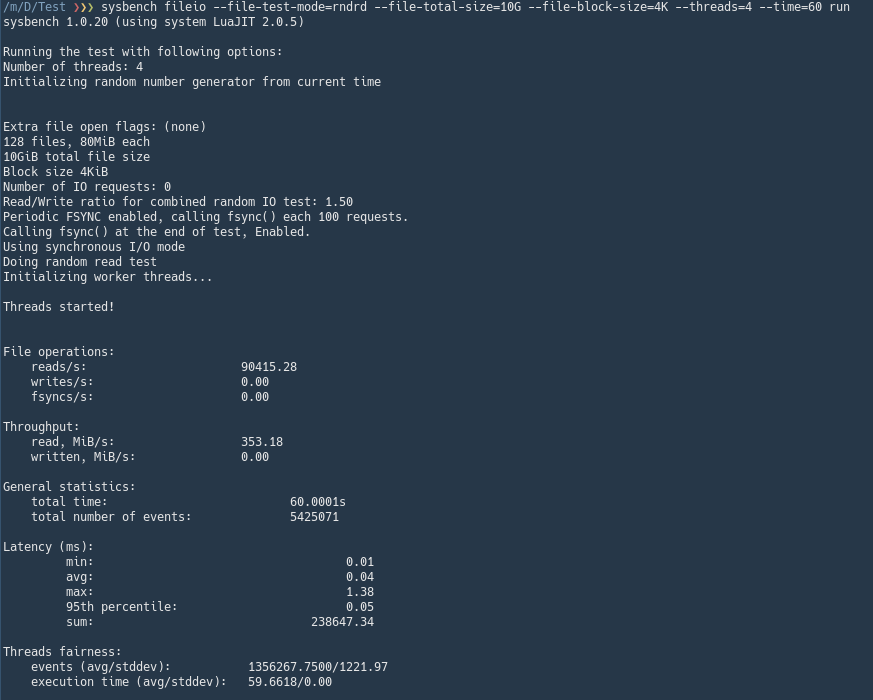
Bare metal disk performance:
These are done straight on the filesystem, no VM.
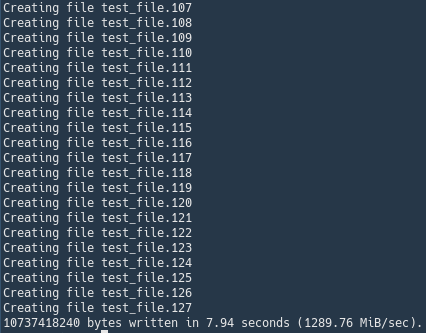
sysbench fileio --file-total-size=10G prepare
sysbench fileio --file-test-mode=rndrd --file-total-size=10G --file-block-size=4K --threads=4 --time=60 run
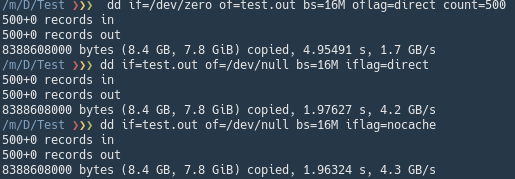
dd tests:
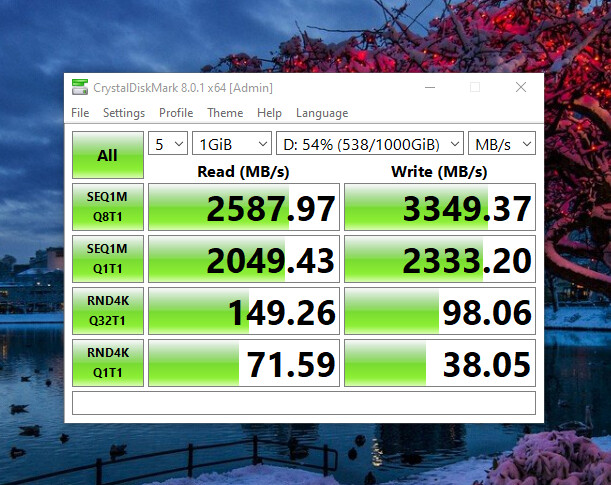
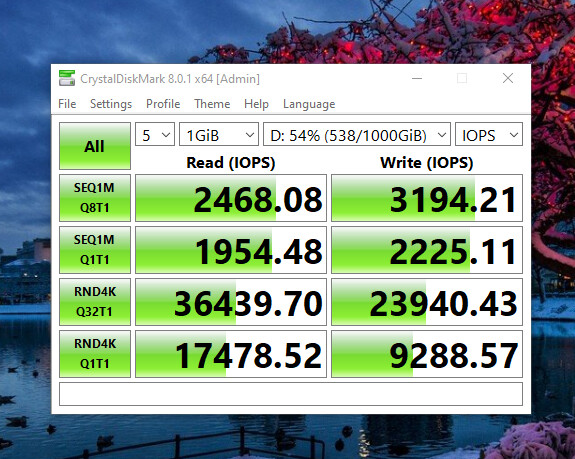
Windows 10 VM’s CrystalMark performance:
This is my gaming VM with the 180GB raw image with Windows on and a 1TB raw image in a dataset with the options mentioned last in the Steps section.
I’m using Virtio SCSI for this one. io=threads and cache=none
MB/s:
IOPS:
Cache stats after a relatively heavy day
Most of this was already cached. Playing a few hours WoW TBC Classic, a few hours Fallout 3 and some Adobe Premiere editing.

Normally the hit ratio is around 90 unless something new is being installed.
Conclusion
Very fun project to do and I’ve learned a lot. Plus the results are actually quite promising.
Almost everything I use regularly is cached in the NVMe which means a ridiculously high 90ish hit ratio on the cache.
My Windows VM and the stuff I commonly use in the separate 1TB data image is almost always cached. It does not cache the entire image, just the data it needs. The write speeds are also excellent since the NVMe is getting written to first and then it writes the HDDs afterwards. Though loading a game that is not in the cache is of course like running it from an HDD temporarily until things get cached, the next time it’s booted it’s fast as all hell.
I regret not testing L2ARC to get some data to compare and check whether bcache is a good alternative or if the “new” persistent L2ARC is the better alternative. /r/vfio guy was not impressed by the L2ARC and you can read his reasoning in the reddit post. Might need to do another weekend project at some time and check L2ARC out just to give it a spin.
Other than that this is more or less exactly what I wanted from the setup.
Would I recommend this for any critical data? Probably not. If so I’d have RAIDZ2 or mirror and a NVMe/SSD cache per backing device and even then this is kinda experimental.
Thanks a lot to the /r/vfio guy etherael for even coming up with and testing this mad scientist project in the first place. I just stole what I saw.
Feel free to speak up if this is incredibly stupid, dumb, useless and wasteful. Hopefully this helped or was informative to some people anyway.