I should really try 4600 again with his settings on 2000fclk instead of 2033 to see if that’s what was causing TM5 to fail.
Are you passing testmem5 now at 4600 and his settings?
I should really try 4600 again with his settings on 2000fclk instead of 2033 to see if that’s what was causing TM5 to fail.
Are you passing testmem5 now at 4600 and his settings?
Yep, TM5 passes for me at 4600 and the updated sub-timings (even at 2033 FCLK), but throughout this thread I’ve had a more stable system then others (e.g. I can boot at 5200).
Would 4X48GB work on the 7950X?
Probably yes, but at best at the same speeds as 4x32. Can‘t be sure though as there is no expo profile and no QVL (at least for my motherboard). But those don‘t exist for 4 ranks per channel any way.
I‘m a bit disappointed at the rated speeds at 2x48. I would have liked a kit at 6000.
New bios available for my motherboard
So far I would not recommend others to update. Old memory settings are not stable on bios 922 for me
And trying to rollback to 0805 has now left me getting 3 beeps and i cant get to bios even with 1 dimm. Damn
The whole “128GB max” is mainly because that’s what is tested on existing modules by the manufacturers.
Non-binary memory modules were announced some time ago and I’m happy to see them hit the retail market now. 48GB modules will be available in march and I expect other brands to follow this year.
Benefit is that they are using just higher capacity dies instead of adding new technologies, so 24GB modules should perform as 16GB modules do now, same with 48GB and 32GB capacities. 2x Single rank 24GB DIMM is a big deal as it was the staple setup for max performance. This should now be achievable with 48GB total which is great.
4x48GB? Will work, but don’t expect anything other than today’s 4x32GB performance/compatibility. If any, expect those new non-binary modules to have teething issues until some BIOS updates and time will solve this.
Oof I hope you’re able to recover it.
I moved back down to 2x32GB at DDR5-6000 a while ago since I am able to manage with 64GB.
I updated to 0922 on the ASUS ProArt X670E-CREATOR WIFI on Friday, it took multiple reboots and >5 minutes to do the update (far longer than I’m used to, I’m glad I let it sit and work itself out).
After the update I was able to restore my saved BIOS settings with all the same memory timings applicable to 2x32GB DDR5-6000 without issue. I have not tested 4x32GB on the BIOS yet but it’s not a good sign if yours isn’t working with even one stick ![]()
It took me several tries but I’m now back on 0805 with 1 stick. By several I mean I continually attempted to reflash for about an hour and eventually it just worked thankfully
Oof, on my board (also proart x670) everything’s fine on 0922, but I have only 2x16GB…
yep 3 beeps is a memory fail.
empty the board of everything bar the cpu…
pull the battery.
connect the psu and turn its power on to put residual current into the motherboard.
turn off the psu and quickly short the +/- battery terminals. for 2-5 seconds.
replace the battery.
plug everything in (use 2 sticks of ram in the correct slots)
once done power on and you should be able to get into bios.
do you have a dual bios on that board.
if you do, plug all your ram in and power on. (the point here is for the bios to detect bad ram timings)
wait till you hear the beeps and then leave it…
if your lucky the pc will reset itself after about 30-60 seconds, and load in the second bios.
after which you should be able to boot.
good luck.
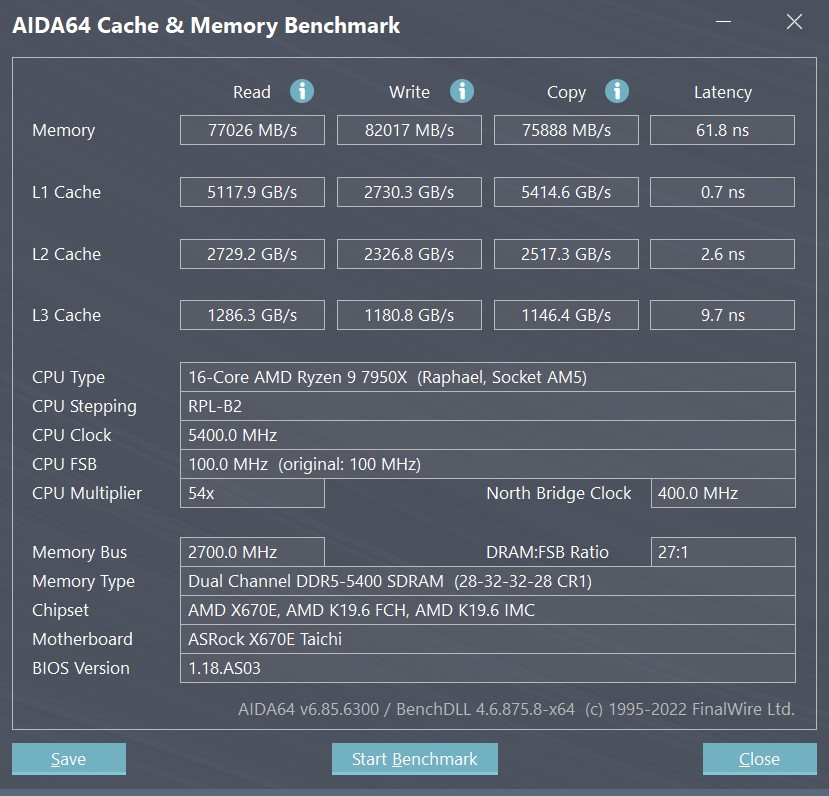
I’ve managed to achieve stable 128G four DIMM DDR5 performance at 5400MHz. I believe bus termination setting tweaks are part of my success.
More information is available in a overclockers com forum thread titled “Four DDR5 DIMM stable settings and performance results (not questions)”.
Incredible results. I hope others are able to come even close to matching your settings. If I can ask for some hand holding, when you say your bus termination settings, could you help me with how I would match those settings? I haven’t touched anything outside of my voltages and timings.
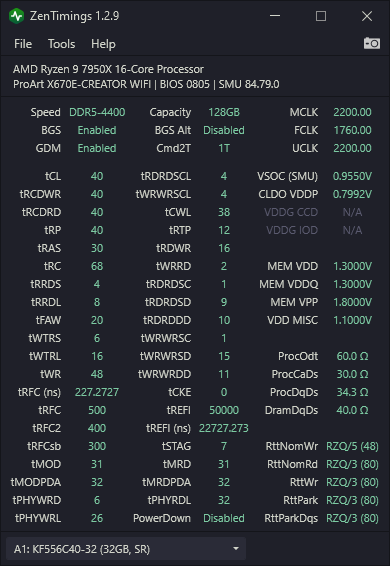
If I look side by side we have a lot of differences, I’ll need a solid bump in voltages all around and I won’t be attempting to exactly match your superior ram but I’ll try get as close as I can
my zentimings output
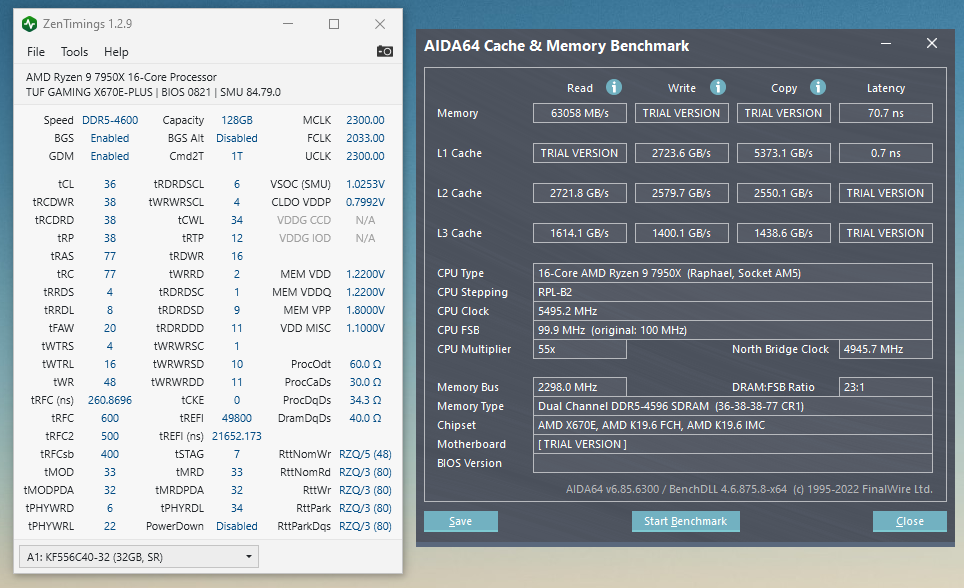
my poor aida results but I have good day to day performance (but I won’t say no to trying to get close to your 70GB/s compared to my 59GB/s)

Oooof, incredible results for sure, but GÖTTERDÄMMERUNG that latency hurts… Going from regular 7,5-15 ns latency to 5x-10x that, really hurts. If you need throughput over latency though that is awesome.
Thank you all for your invaluable work pushing these RAM sticks and showing what sacrifices you need to make to get better throughput!
[Edit] Nevermind, I read that chart wrong, seems like regular 40 CAS latency. Still, thank you! :)[/edit]
Well, you can run 4x32 GB but probably not with full performance of the DIMMs’ rated speed.
For example I have a ASUS x570 ProCreator MB. I’m using 4x32 GB DIMMs. Though if I try to use XMP profile, it causes problems. Not at first maybe but waking from sleep or during a game it may crash. You wouldn’t want that. I leave it on “Auto” to keep the PC healthy.
BTW, Auto uses 1.2V, while XMP profile uses 1.35V and this causes heating. That may be the cause of the crashes.
I don’t understand how can you work on such potentially unstable systems. Aren’t you afraid of corrupted results (if you don’t use it for gaming) or, for example, losing data in filesystem due to corrupted cache?
I don’t think anyone here is daily driving an unstable computer. I only change settings at the weekend
WARNING:
Only try using my exact settings if you have VERY similar hardware.
Suggestions:
My PC ran Aida64 overnight with CPU, cache, and system memory stability tests enabled. I ran Aida64 all day with only system memory stability test enabled. I ran slightly slower settings for one month. Those settings are shown in the first post of the overclockers forum thread mentioned above.
If you feel you must, only experiment with lowering voltages (e.g. curve optimizer) after you’re 100% positive you have a 100% stable system.
Does anyone have an idea why Micron DDR5 32 GB ECC UDIMMs have vanished from the market in Europe?
I know Micron is hurting due to low memory/flash storage prices but not selling any product sounds a bit odd.
MICRON MTC20C2085S1EC48BA1R? I tried ordering those back in October 2022 in North America. Even here, it was perpetually back-ordered (multiple vendors) and the dates kept slipping. I gave up and got the Kingston KSM48E40BD8KM-32HM instead.
I’ve stopped by this thread every so often, as I made a very similar build around the same time you posted originally @frzn.
I was frustrated by the long retraining times on the early BIOS, and decided I’d wait a while before retrying.
Months passed and i even fell into the same trap, and nightmare recovery, you had with the recent BIOS update.
After restoring, decided to start afresh - tweaking gradually - and logging changes as I went.
I saw on another forum someone used Aida memstresstest, which I found to be very much faster at finding faults and sped up the testing exponentially.
I expanded tests to TM5 anta777, memtest86 etc if the Aida MemStresser reached 15mins.
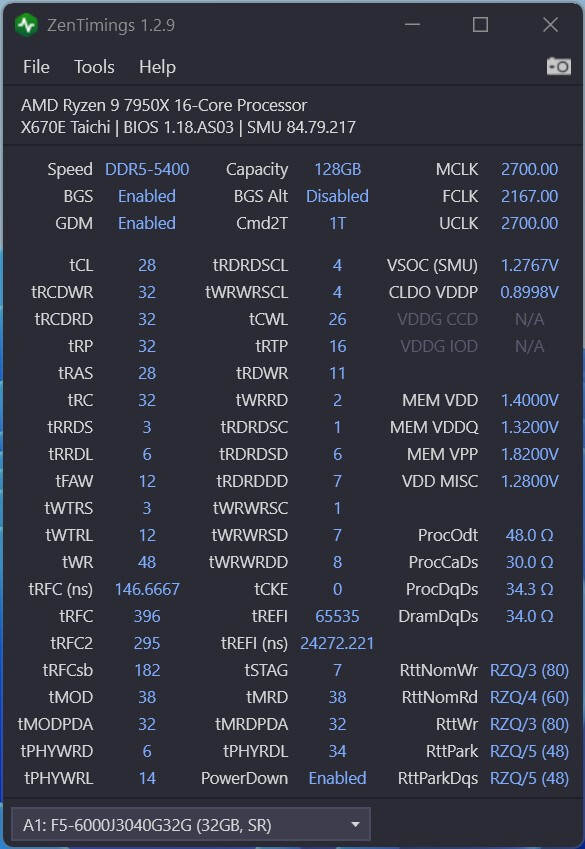
With that said, I managed to finally get stable 4600 with tighter timings (with the same memory kits), so I feel confident you should be able to recreate results.
Other notable settings:
After all the tests, looking over the data it may be lower 1.22v on sticks is possible with the CO -15.
Very similar settings to BZ secondary timings, with a couple of minor tweaks.
One thing may be crucial to achieving stability is the VSOC.
In BZ vid he sets to 1.25, but I believe due to running in 4 slots makes the voltage extra sensitive.
One takeaway from this, was when bumping up the ram voltages incrementally, 50mA too little/too much on the VSOC leads to wild results, even before the OS.
By setting the FCLK manually, and VSOC on Auto, the voltage auto step-up applied from the FCLK going from 2000 > 2033 may be what helped with the stability overall.
I think with the extra lanes, the voltage needs to be dialed in exactly, and the auto VSOC finds the Goldilocks spot - more efficiently than is possible with 50mA tweaks.
Interested for @Qiasfah to test this theory also, as the last screenshot is achieving similar but with 1.4v applied.
As you’re also a linux user @frzn , so I’ll add I also ran successful tests with stressapptest.
I haven’t yet completed a full stress including the GPU. Not sure how yours sits in your case - but the intake on my FE being directly under RAM - looks like it could lead to air being siphoned away from there if GPU is really heating up.
Something i think I’ll have to consider for when running the next set of tests, as I’m convinced 4800 is within reach at similar voltages.